Showing posts with label front hall closet. Show all posts

1.14.2014

Operation {Re}Organization: What's Working and What's Not


If you've been following the blog for awhile, you may remember that last year, one of my major goals was to get a few "problem" areas in our apartment organized. I took on a new area of the house almost monthly, and the hard work really paid off! As I've been thinking about new ways to get organized this year (isn't just about everyone thinking about that right now? ha!), and what I want to work on, I've also been reflecting a bit about what I did last year that worked, and what might need some tweaking.

Before we get going, I want to say one thing: once a space is organized, that doesn't necessarily mean it's done forever and that the system will always work perfectly. For example, perhaps you purged and organized your pantry. You put a system in place, gave everything a home, gave yourself a big pat on the back for a job well done, and then came to realize a short while later that, oh shoot, this isn't working. You know what? That's ok. Seriously ok. I consider myself to be a pretty organized person, and my systems fail too. I still have clutter, even when I spent what feels like a year going through most every space in our apartment.

But guess what, my friends, all that work is not, I repeat, IS NOT worthless. Organization is a continual process. It takes time and effort, and I hope that some of my projects have inspired/will inspire you to get (back) on that organization horse. Writing these words is going to help keep me accountable as well. I've got some project ideas up my sleeve, but before I start again, let's take a look back at three of last year's major problem areas that I detailed in this post...

Problem area #1: Front Hall Closet


Overall Grade: A-

This closet has come a long way, baby! It serves all of it's (many) purposes well, including storing coats, athletic gear, tools, paint, utility-related items, wrapping paper, vacuum and dog supplies. It pretty much looks just like this photo does now after living with it for nearly eight months.

My only complaint is that the wrapping paper can be a little tricky to get to with all the coats in place. Thankfully, I don't have to get it out very often, but when I do, it's a little annoying to shove the coats to the side and pull a roll down.

To read more about this space, take a look at the inspiration, the before, and the after.

---------


Overall Grade: C-

Alas, the "pantry" area (we have a small cabinet in the kitchen and one small piece of free-standing furniture we use as pantry storage) has really gone downhill. It's not a total fail, but not everything fits anymore, and the use of space doesn't totally make sense anymore in the kitchen cabinet area. I think I'm going to clean out and start over there. I'm brainstorming some alternatives, so I'll let you know what I come up with soon.

On the bright side, the storage system in the free-standing piece of furniture has worked really well. It holds all the extra/overstocked and baking-related items still looks very much like this photo below:


To read more about the pantry organization, check out these posts: before (and a little progress)after, and DIY pantry labels

---------

Problem area #3: Bathroom
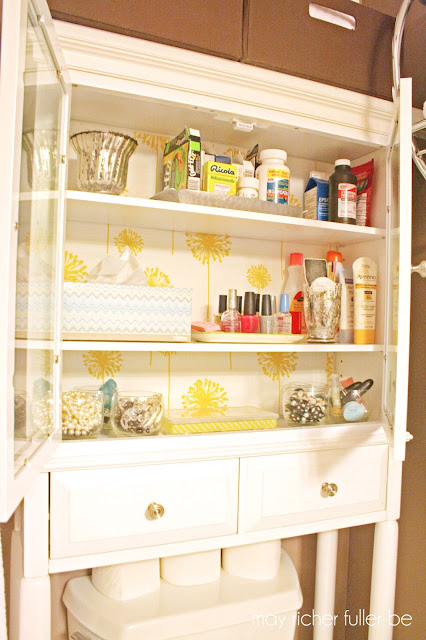

Overall Grade: B+

The bathroom is certainly a success story. I'm proud to say that the over-the-toilet storage has worked really well as it looks above, and that I've only made a few very minor changes since tackling that project back in March. 

The place that could use a little bit of work is the storage under the sink. It's nothing major, but I think it's time to clean out the clear storage bins and baskets, take inventory, and figure out what we need to stock up on. I hate it when we suddenly run out of shampoo or some other item, and I have to buy it full price! I'd much rather shop the sales, use coupons, and store the items in the bins for later, but in order to fully utilize that kind of system, I need to know what I have! Plans are in the works to make that a reality...

To read more about the bathroom organization project, check out these posts: introduction, before, and after.


So that's where I am today on some of the major organizing projects from the past year. I need a little kick in the pants to get going, so I figured sharing a little bit on the current state of these projects would help! A little bit at a time...

What are you hoping to organize this year? Any help or tips I can give to kickstart the process?

Pin It!

6.03.2013

May Project Round-Up


I feel like I say this every month, but man, May flew by in a flash. Welcome, June! I'm excited summer is here - are you?

Before May is a distant memory, let's take a few minutes to look back at the projects I posted about on the ole blog this past month, starting with this fun way to display printed Instagrams using pants hangers. (I print my Instagrams to Walgreen's One Hour Photo using an app called Printicular. It's so easy and inexpensive.)


My favorite project of the month (and the most popular one with y'all as well) was the wood shim pendant light. Though it ended up being a little more challenging than I anticipated, I love how it came together in the end, and seeing it hanging over our dining room table really makes me happy. If you missed any of the posts about it, you can catch up here: one, two, three.


I revamped the every-other-Friday Creative Bits Series a bit, and shared a really pretty office space and a beautiful living room this month. This has been a fun way to connect with other bloggers, so if you have a space you think has a few Creative Bits of its own, send a photo of it my way and I might use it in a future post!


Operation {Re}Organization continued this month. This time I tamed the chaos of the front hall closet in a series of three posts (inspiration, before/strategy and after). What was a disaster area is now sooo much more functional and even has secret storage for sporting equipment. Did any of y'all tackle an organizational project this month?


And of course you can't have "function" without "fun" (bad pun, sorry), so I added these blue watercolor-y/painterly labels to make sure things are easy to find and are returned to their proper homes. There's a link to download a free set of blank labels too if you need some!


I also took on a new cleaning plan in Operation {Re}Organization this month. The first week has gone pretty well so far. Since I technically implemented this plan last Tuesday, I technically have one more day to do my last weekly task...clean the bathroom...ugh. At least once it's done I'll have the satisfaction of checking that box once I'm done though - thanks to my handy list here :).


Are you a Kate Spade fan? If so, you'll want to check out the Kate Spade Style Soiree hosted by Jenna and others last month. I joined their party and created a Kate Spade-inspired gold zig zag pitcher. Who doesn't need a little gold in their lives?


To celebrate my mom this month on Mother's Day, I took some photos with my brother, Instagrammed them, and created a photo strip style card for her. It was a fun project for me, and she loved it! Win win.


Another one of my favorite projects this month was this DIY iPhone speaker made out of...a toilet paper roll. Talk about doing a project "on the cheap" :). I use it all the time!


Last but not least, I shared a recipe for banana avocado bread. Head on over to the post to see why I used avocados, of all things, in this delicious quick bread.


That about wraps it up for May! Thanks, as always, for reading. I'm so grateful to each of you for stopping by my little corner of the blogging world.

And thanks to these wonderful blogs for featuring my posts this month:


Come on back tomorrow for a fun project I did over the weekend. Want to know what it is? Go back to this post from last week for a hint!

Pin It!

5.23.2013

Blue Watercolor Labels {Free Printable}


For the final post in (what's turned into) the Front Hall Closet Mini-Series, (See: Inspiration, Before, After) I want to talk labels. Picture me with a big smile on my face right now because this is one of my favorite topics. I LOVE labeling things - but what I think I love most is actually designing labels. 

For the ones in my front hall closet, I took inspiration from a trend I've seen popping up a lot lately - watercolors. I've really been drawn to abstract and modern watercolor paintings, fabric, and DIY projects, so I figured why not take that idea and run with it for these labels? I love how they turned out. You can see them pretty well in this shot of our closet:


I designed them in Illustrator, printed them on regular ole white printer paper, cut 'em out, and laminated them using my favorite technique using clear packing tape. In my humble opinion, every project needs a little "pretty" and these labels are the pretty part of this one. 

If you're in need of some pretty labels in your life, you're in luck because I'm offering these guys as a free printable! These blank versions of the ones I made are formatted for an 8.5x11 sheet of paper, so all you have to do is download and print on your home printer. Print as many copies as you'd like. If you want to laminate them using the packing tape method, they're made to perfectly fit the height of the tape (with a small border around the edge).

To download them, click here. The link will take you to a high-resolution PDF that you can download and print.

Enjoy!


Pin It!

5.22.2013

Operation {Re}Organization: Front Hall Closet {After}


It's time to reveal the "after" of the front hall closet today! If you read yesterday's post, you saw a little teaser, but you get the whole thing today! I'm excited about checking this trouble spot off the Operation {Re}Organization list. Let's get to it, shall we?

Just to remind you, here's what it looked like before I got my hands on it last weekend:


And after!


I've got lots of details to share, organizational tips, and a couple of creative solutions anyone could use, so let's get started!

First off, an observation. Yes, it looks very full. I realize that. But, the reason for that is mostly the bulky winter coats. They just take up a LOT of space and make the closet look crowded. When you look closely though, everything has a home and is very accessible. If you read my long list of items to store in this closet yesterday, you'll having a home is quite an accomplishment!

Next, let's go to my favorite creative organizing solutions for two items that can be a pain to store: large sports equipment and wrapping paper. If you move those bulky coats, you'll see I utilized some space at the very back of the closet to store these items:


For the sports equipment, I put up a tension rod (you can barely see the end of it on the right side of the photo) and hung some old shower curtain hooks I had on it. This provided a way to hang the equipment up so that it took up as little space as possible and wasn't a bulky mess on the floor. The combination of shower curtain hooks and a tension rod was a perfect, non-permanent solution for organizing this stuff (great for renters like me!). Oh, and P.S. bike helmets hang here too, but aren't in this photo.

For the wrapping paper, the tension rod/shower curtain hook combo came in handy again. I basically made a little storage area for it that I can easily access (there's that phrase again!) when I need to wrap a gift. I tied two pieces of wide, grosgrain ribbon to the existing clothing rod, and tied the other ends to the shower curtain hooks. I placed the hooks on the tension rod in the back, which created a support for the wrapping paper rolls to sit on. Pretty nifty right?

Now to the top of the closet:


I already had these ELFA wire baskets from the Container Store, but they were storing various other things around the house. Since three of them fit perfectly on the closet shelf, they got repurposed for spices, paper products and small sporting goods. Each one is labeled so we can easily find what we need without having to take them down to look at the contents.

The right side of the closet is the most difficult area to access, and needed some sort of shelving to make it functional. I've had this wire shelving unit since college, and it fits perfectly in this space.


It's sitting on top of the bulky toaster oven that we aren't currently using, but want to keep for the future. Placing the shelving unit on top of the toaster oven box made it the perfect height (the bottom shelf wasn't very accessible or useful when it was sitting directly on the ground). Gotta work with what you've got :).

That big green bag above the wire shelving is a cooler. I used another tension rod and shower curtain hook to hang it up there.

Let's take a look at what I decided to store on the wire shelving...


The top shelf has a bunch of miscellaneous home maintenance items like light bulbs, and that little set of clear plastic drawers full of small items like screws and paint brushes. The next shelf down has all of my paint on the right side and games on the left (they're in that white box). The bottom shelf has a clear plastic tub on it with all of Jackson's (the dog) stuff. The little metal bucket has his treats. An umbrella hangs in front of the shelving unit on (yet another) shower curtain hook.

And lastly, let's take a look at the floor space!


The vacuum lives on the left side. It's now fully accessible whenever I need to pull it out - maybe I'll use it more often now?! My grocery cart (yes, city living necessitates having a cart to put your groceries in when you're walking to and from the grocery store) sits on top of the plastic drawers and tucks in behind the coats. The two clear plastic drawers on the right hold gift bags and tools. I use that tool drawer on an almost daily basis, so it's really nice to have right there. It used to be on the floor in our bedroom closet, and I always had to move stuff out of the way to be able to fully pull out the drawer. This is much better!

I think that's it! I'll be back with one more post tomorrow about the labels I used on everything in this closet. If you like them, you're in luck, because I'll be sharing them as a free printable you can use for your own organizational pursuits!

Before I head out, here are a few takeaways from this reorganizing project:

  1. Think creatively about how to store items. As you can probably tell, I now have a love affair with using shower curtain hooks for lots of things other than hanging shower curtains, and that tension rods and I are now BFFs. Fun fact, I found both of those tension rods near the dumpsters behind our building. I'm not shy about dumpster diving (much to my husband's dismay and embarrassment) if it's something I useful!
  2. Use what you have. Shop your house. You don't need a ton of money to organize well. I had everything you see in this closet already except for the coat hangers. I bought a set of those so that they would match and take up as little space as possible (they're those thin felt hangers you see everywhere), but they weren't a necessity.
  3. Do what works for you. I mentioned this yesterday as well, but it's worth saying again. Pull ideas from lots of people, use Pinterest and other blogs (IHeart Organizing is one of my faves) to get you going. It may take a few tries to get it right too. Don't feel like you can't change something once you "finish" organizing it. In fact, that's what Operation {Re}Organization is all about. If it's not working, change things up!
Have a great Wednesday!


Psst! This post is a part of the series "Operation {Re}Organization." To see other posts in the series, click the tab at the top of the page.

Pin It!

5.21.2013

Operation {Re}Organization: Front Hall Closet {Before}


As I mentioned yesterday, on Saturday, I had a nice chunk of time to devote to organizing our front hall closet. It's so rare that I have enough time to clean out, purge, AND organize a whole space all in one day. Talk about a good feeling! My bathroom organization project took several days, and it's pretty much the same size...sheesh. Similar to the way I've posted about my other organizing adventures, I'm going to break up this project into a few separate posts - otherwise this thing is going to turn into a novel.

Today you'll have the pleasure of seeing the "before" state of our closet, and I'll talk about my goals for organizing this space. Before getting started on any project, I always need to remind myself of the basic principles of organization I talked about in this post from way back in January. (Head on over if you're looking for some guidance on your own organization project!)

Without further adieu, here's what our closet looked like before I got my hands on it Saturday morning:


That's from the front. Let's not leave out the area to the right though. It's shoved full of stuff too! See?


Yikes. Oh, and how 'bout a closeup of the poorly utilized shelf at the top of the closet?


What's going on up there?

Lookin' good, front hall closet, lookin' good. Every time I opened that lovely bifold door, I think my blood pressure went up a notch. Needless to say, it was a mess. Since we moved into this apartment, it has always been the default dumping ground for stuff that didn't have a good home. The excuse was always something along the lines of: "Oh, I ran out of space for ____ in the normal storage area, so just put it in the front hall closet - wherever you can find room." I deserve a slap on the wrist for that statement. Go ahead and shake your head.

If I had to go digging for something in here, it turned into a huge time suck. I could hardly ever find what I was looking for, or it was difficult to access. This became a tad (ok, very) frustrating over time. I finally got fed up, and that's when I started plotting my reorganization plans.

As much as I would like for our front hall closet to only store coats and a couple of items like the vacuum, that's just not possible when we live in under 700 square feet. Since this is our only closet outside of the bedroom, it has to work hard and multitask. Every square inch needs to be fully utilized. That doesn't mean every corner is jam-packed, but it does mean I need to be smart about my organizational systems. Since this is a basic builder closet (rectangular with a clothing rod and shelf on top), I knew I would need more shelving, bins and boxes to really make it functional. For reference, this closet measures 48" wide by 28" deep.

I started this project by emptying the closet of all of its contents and cleaning it well - and it was dirty. It's not easy to clean a space when it's jam-packed full of stuff. Dust bunnies had no problem hiding in our closet :).

Hey there clean closet...


All that stuff had to go somewhere though, right? Yep. How about in our kitchen?


Check.

Or the living room?

I spy a Jackson bottom (not to be confused with the ropes to his left).

Check.

It's absolutely amazing to me how much stuff I had in that little closet. It just kept on coming. It looked like moving day for awhile on Saturday.

Alright, enough embarrassment for today. Let's move onto the plan for this space.

Items that need to live in the closet:

  • Coats
  • Tools (like my belt sander, hammer, screwdrivers, etc.)
  • Paint
  • Household maintenance items (light bulbs, etc.)
  • Vacuum
  • Grocery cart
  • Wrapping paper and gift bags
  • Sporting goods (bike helmets, tennis rackets, etc.)
  • Paper products (plastic plates, spoons, bowls and cups) 
  • Spices
  • Jackson's stuff (grooming items, shampoo, treats, etc.)
  • Games
  • Recycling
  • Coolers
  • Toaster oven
Goals for organization:
  • Utilize the space better (duh) by using multiple types of storage items including bins, baskets, shelving, hooks.
  • Make everyday items easily accessible. For example, I need to access spices on a daily basis, but tennis rackets only on a monthly basis.
  • Consolidate "like" items.
  • Labels, labels, labels.
  • Spend as little money as possible by using what I have on hand.

Did I mention this closet needs to multitask? 

One thing I do want to mention is that there is no "wrong" way to organize. You have to do what works for you - so if the idea of keeping spices with sporting equipment is messing with your head because they usually don't go together, have no fear, this is just what works for us. The important thing is to make sure you know where everything is and that others can use the systems you put in place (if it's an area that more than one person uses). 

If you're not sure something is working, bring in a fresh set of eyes to take a look and give you some ideas. If you're the only one who can use your system, that's usually an indicator that it something's not working. That's what was going on with our front closet. I knew where most things were, even though it was a mess, but C couldn't ever find anything. That's when you know it's time to take action!

Alright, I think that's enough for today. If you made it to the bottom of this post, I think you deserve a reward. Here's a sneak preview of the "after" - I'll be back tomorrow with a full post and details about our freshly organized closet!


--------

This post is a part of the series "Operation {Re}Organization." To see other posts in the series, click the tab at the top of the page.


Pin It!

5.13.2013

Operation {Re}Organization: The Front Hall Closet {Inspiration}


Hello lovely people! You may have noticed I took a short hiatus from Operation {Re}Organization over the past couple of months, but don't worry, it's back! I unintentionally took a little break after the bathroom makeover because our weekends have been full of travel and hosting out-of-town guests (all good things, but it leaves less time for larger projects :) ). I think we're settling back down though, and I can't wait to tackle this next part of our home - the front hall closet.

Just like I've done for the other areas of our apartment, I'm planning to divide this project into different parts and different posts. Today I've got some pretty inspiration photos to help motivate me (and you?), give me ideas and guide the process, and over the next couple of posts you'll have the pleasure of walking through my organization process with me. I know you can't wait to see those before pictures, right? This closet's in pretty bad shape right now. Get ready.

Let's not get bogged down in that stuff on a Monday though, ok? We'll ease our way in with these lovely front hall closets that have been organized beautifully and I'll point out some things I like about them. I'd love to hear what you like too, so feel free to comment away at the end of the post!

Let's start with this one from the House of Smiths:


I love how Shelley mixed different types of storage and organization techniques to meet her needs. By using a combination of baskets, open shelves, hooks and large drawers, she has a place for everything from mail to coats to lightbulbs. And though we won't be able to put a bench like hers in our closet, I do love the idea.

Onto the next space from Oak Ridge Revival:


Talk about multipurpose storage. I spy hooks for winter scarves, a round basket containing gift wrap and a large bucket corralling sporting goods. Our hall closet needs multipurpose storage to the max. We've got a wide range of items that need a designated home in this space, so I love seeing a great example of one done well.

This next closet has a similar layout to ours, and probably many of yours if you've got a standard builder-grade closet...


...with a clothing rod across the entire width. Ours also has a shelf across the top. What I like here is that they've added shelving across the bottom too to get rid of that dead space that can so easily become a cluttered mess. Shelving plus baskets and bins equals no messy pile on the floor! And of course the hooks on the door are great for bulkier items like these totes.

One more similar one from Martha (she's good, isn't she?):


This one really is just like ours, but I like how they divided the space with a hanging organizer. With that, you have plenty of room for coats (especially if you add that double hanging rod!), but also a good way to organize smaller items like hats. Those baskets on the top shelf are great for storing bulkier items as well.

Last, but not least, Real Simple did a great job with this entryway closet makeover:


That shelving unit on the left is awesome (looks like an IKEA Expedit) because it can hold all kinds of different storage bins for different organizational needs. The shorter clothing rod is perfect for storing coats, and doesn't take up any unnecessary room.

Alright, so with that inspiration in mind, what are some common themes and takeaways here?

  • Use a variety of storage items. Bins, baskets, storage drawers and boxes of various sizes are your friends. Choose the appropriate size and shape for the items.
  • Hooks aren't just for coats - use them for scarves, bags, and other hanging items. Think outside the box.
  • Keep the floor clear of clutter.
  • Store "like with like." For example, if you need a place for home repair/maintenance items, group all of those items together in a couple of plastic bins or drawers. If you've got gift wrapping items, place your gift bags, tape, ribbons, etc. together in a container and put all gift wrap in a basket.
  • Designate a place for everything.
  • Label baskets and bins to make it easy for you and others to keep things organized.

Feeling inspired yet? I certainly am. I'm ready to go...looking forward to a good clean-out/purge as my first step. I hope to have an update for you soon.

How about you? Want to get in on this? It'll be lots of fun!


--------

This post is a part of the series "Operation {Re}Organization." To see other posts in the series, click the tab at the top of the page.

Pin It!
Related Posts Plugin for WordPress, Blogger...
Blogging tips