Showing posts with label DIY baby gifts. Show all posts

3.13.2014

Hand-Stitched Monogrammed Onesies


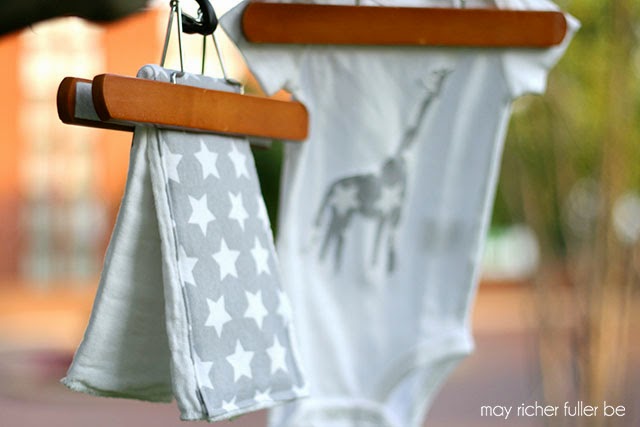
The baby boom continues, my friends, which means I'm always brainstorming new and creative ways to welcome these little lives into the world. It's been nine months or so since I showed y'all how to applique onesies and make cute burp cloths, and today I've got another fun onesie tutorial to share!

This time, I decided to hand-stitch a little monogram onto the backside - yep, literally on the bum. I thought it would just be so stinkin' cute to personalize that area and keep the rest of the onesie plain jane so the little one can wear it with any outfit ('cause you know they think about that sort of thing, right?). And bonus, the threads on the backside will sit against the diaper and not rub against any skin :).

Let's call this the lazy gal's version of monogramming, ok? You'll see why in a minute :).

First, the materials you'll need to do this are:

  • White onesie
  • Embroidery thread
  • Embroidery needle
  • Scissors
  • Embroidery hoop (or if you don't have one, I've got a solution for you!)
  • Printout of the lettering in your choice of font
I keep a stash of white onesies around for baby gifts like this, so I grabbed one out of there and made sure it washed already so it didn't shrink later and make the monogram all wonky.


I flipped it over and eyeballed where I wanted to put the monogram. I'll be sending this to a baby boy, so I printed out the letters of his monogram in a size that would fit the area (I used Illustrator, but you can do this in Word too) and chose some blue embroidery thread to stitch it with.


Then came the tricky part - I had to stabilize the fabric so I'd be able to stitch the monogram without it stretching in weird ways, but I didn't have an embroidery hoop on hand. Yikes! Thanks to Google, I found a perfect substitute that didn't involve me going out to the store: a mason jar lid and some rubber bands!


It worked perfectly. I just slipped it under the backside of the onesie in the area I wanted to stitch on, and secured it to the fabric with rubber bands. 


Then I used the printout monogram as a guide to stitching the the letters by hand. If you have a washable fabric marker on hand, you can trace the letters first and then stitch, but I didn't have one (lazy gal's version, remember?) so I just did it freehand.

I used a simple backstitch to make the letters one-by-one. I think it took about 20 minutes max. Here's the front-in-progress as I was stitching the Y of the monogram:


And the backside:


Once I finished stitching all the letters, here's what it looked like still attached to my makeshift mason jar lid hoop:


All done! What a cute little monogrammed bum!


Since it's hand-stitched, it's not perfect, but I actually love that it looks hand-sewn. What do you think?

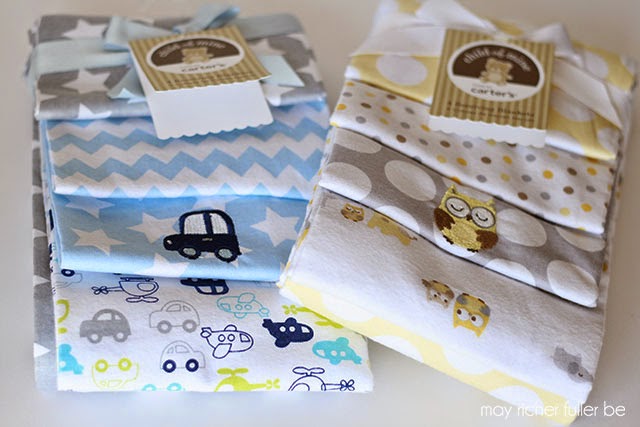
It would make a perfect gift paired with one (or a few) of these customized burp cloths, yes? I made the yellow and white polka dot one below using that method from that post.


Now it's time to pop this little set into the mail to its new owner! If you're reading this, Laura, sorry I'm spoiling your surprise if you hadn't guessed it was for your little man!

Do y'all have any favorite hand made baby gifts that you've received or given?

Or, in case you're not into making gifts, but would rather buy something, you might want to check out my line of modern patterned onesies right over here!


---------


Pin It!

6.05.2013

Customized Burp Cloths Tutorial


**Announcement: Looking for a unique baby gift (that you don't have to make yourself!)? Take a look at my new line of onesies from CSW Designs! Choose your animal, color and pattern (chevron or polka dot). Perfect for the little ones in your life! 
---------
Happy Wednesday, y'all! I hope you enjoyed yesterday's appliqued onesie tutorial. I know I left you in total suspense yesterday by not showing you how to make the matching burp cloth (ha!), but don't worry, today's the day. This project is much easier than the onesie, so if you were a little intimidated by all the intricate stitching yesterday, I think you'll have no problem with these - it's all straight lines.

Let's get to it, shall we?

Supplies Needed: Customized Burp Cloths

  • Prefold cloth diapers
  • Fabric
  • Measuring tape
  • Sharp scissors
  • Iron (optional)
  • Sewing machine
  • Thread

Prefold cloth diapers seem to be the material of choice for these burp cloths according to other similar tutorials I've seen out there in the blogosphere. They're a great size, absorbent (you'd hope!), and the prefold makes it easy to fold and stack them. I bought a ten-pack of Gerber prefold diapers from Target for this project.

 And as you saw yesterday, I used these Carters receiving blankets for the fabric (more on that choice in yesterday's post).


After I washed, dried and ironed all the materials, I got to work cutting out a rectangular piece of fabric for the burp cloth.

I measured the width and length of the middle area of the cloth diaper to determine the size of my fabric. The middle section is thicker and more pad-like (since yes, it's a diaper!), and I chose to sew the fabric just down that section. It measured about 18" by 4". I cut a slightly larger (19" by 5") piece of the gray and white star fabric so that I had a little extra to fold under for a clean edge.


The next step is optional, but I recommend it because it'll make your sewing simpler and you'll get a nice,  straight edge.

Take your fabric and lay it down on your ironing board with the wrong side facing up. Fold one of the edges over about 1/4" to 1/2" and iron down. Repeat this on the remaining three sides. The photo below shows an example of one edge folded and ironed flat:


Lay your fabric with its nicely ironed, flat edges down on the middle of the diaper. Line it up so that it runs right down the thick middle area. Start sewing in one corner, placing the needle down about an 1/8th of an inch from each edge. You're basically sewing a continuous rectangle around the inside edge of the fabric. I didn't take a great photo of this, but here's a diagram to show you what I mean:

In this photo, you can see how close my needle is to the edge:


Once you finish sewing that one rectangle, you're done! That's it!

When you finish, fold the diaper up in thirds, and then in half,  keeping the pretty fabric on the outside, and you'll have yourself an adorable little burp cloth! Folding it up like this makes for a pretty presentation :).

Here's one with the blue and white chevron pattern by itself...


 ...and with its matching onesie...


...and here's the one with the gray and white star fabric complete with its matching appliqued onesie in the background. 


That about wraps it up for these two DIY baby gifts. Hope you enjoyed these little tutorials. As always, let me know if you have any questions. If you make one of these yourself, I'd love to see it!

---------


Pin It!

6.04.2013

Appliqued Onesie Tutorial


**Announcement: Looking for a unique baby gift (that you don't have to make yourself!)? Take a look at my new line of onesies from CSW Designs! Choose your animal, color and pattern (chevron or polka dot). Perfect for the little ones in your life! 

---------
Last week I mentioned that seven (count 'em!) of my friends are pregnant right now, and two more delivered baby girls a couple weeks ago. That means there's lots of celebrating to do, so I've been thinking about some budget-friendly gift ideas to welcome these little ones to the world over the next few months. I love the idea of handmade gifts, and one of my favorite ideas so far is "customized" onesies (you can read about several adorable versions in this post from last week).

After writing up that post, I got the DIY itch and wanted to try my hand at my own version. So over the weekend, my sewing machine and I had a date and I got to work on a couple of sets of appliqued onesies and burp cloths. This was my first try at appliqueing anything, but I think they turned out mighty cute, so I thought I'd share a "how-to" in case you're in the market for some handmade baby gifts.

I took the majority of my photos with the onesies and burp cloths together (because they're just so darn adorable next to each other), but I'm thinking that today's post will turn into a novel if I write up both tutorials in one post. So let's consider this Part 1 and I'll share the tutorial for the burp cloths tomorrow. Sorry for the teaser title in the first photo! (*Update: the tutorial is up! You can find it here.*)

Supplies Needed: Appliqued Onesies

  • White onesies
  • Fabric for applique
  • Template or pattern for applique
  • Double stick tape
  • Sharp scissors
  • Iron-on hem tape (fusible webbing)
  • Sewing machine
  • Thread

As far as materials go, I bought a four-pack of white size 6-month onesies (Carters "bodysuits" from Target - similar to these). Gosh, I can't get over how tiny these things are - and therefore how tiny the bodies are that go in them!


For fabric, I picked out two sets of flannel receiving blankets from Walmart. I can't find a link to these particular ones online, unfortunately. The fabric is super soft, and the patterns are adorable and very baby-appropriate without being too baby - you know what I mean?

I washed, dried and ironed everything before starting to avoid any possible shrinkage later on and of course, to make sure they were clean.

I chose a giraffe for the applique and found a template using Google image search. Try searching either "giraffe coloring book page" or "giraffe clip art" for best results. The key is to find a simple shape, even if your shape is inherently complicated (hello spindly giraffe legs). A giraffe was rather ambitious for a first-time applique-er like myself, but I found a simplified one that ended up working out nicely.

Once you find your shape, print it out at an appropriate size and cut it out. This will be your template. Take your fabric (I chose this gray one with white stars) and cut off a piece that's just a tad larger than the template. It'll be easier to work with than a large piece.

Put a couple of pieces of double stick tape on the backside of the template and stick it to the fabric. This will keep the template in place while you cut the shape out of the fabric.


Use sharp scissors to cut the fabric out along the lines of the template. (You could also trace the outline of the template onto the fabric first and then cut it out. Whatever works best for you.)

Here's my fabric giraffe next to the template after I finished cutting it out:


Line your fabric shape up on the center of the onesie. You can measure this out, but I just eyeballed it since a giraffe isn't symmetrical anyway.

Take some iron-on hem tape (or fusible webbing) and cut small pieces to fit the lines of your shape. I used light duty hem tape, which is practically invisible because it's so light - and I don't have any photos of this step because of that! It doesn't show up well. The light duty stuff worked fine because I knew it wasn't going to be the only thing adhering the giraffe to the onesie. It's really just a way to keep it in place while sewing. Place the pieces between the fabric and the onesie by holding down one area of the shape and lifting up another area to keep it in the right position (i.e. hold the body down while lifting the neck of the giraffe). Following the manufacturer's instructions, iron on the hem tape.

Then comes the fun part - sewing!! Actually, this is the trickiest part, but once you get the hang of it, it goes pretty quickly. You do need some basic sewing skills here, so if you're a beginner, I'd suggest starting with an easier shape than a giraffe. Not that I don't think you could do it, but I'm just trying to prevent potential frustration :).

First off, the goal here is to sew along each edge of the shape as closely as you can so that it's securely attached to the onesie. For the giraffe, I sewed up and down each leg and around the rest of the body. You'll be able to see the thread clearly the next couple of photos.

As I was sewing, I came up with three tips to help this step go as smoothly as possible:
  1. Make sure you DO NOT sew the front and back of the onesie together. This would make it very difficult for a baby to wear :).
  2. Sew continuously around the entire shape. This will provide the most "finished" look.
  3. The easiest way to turn corners is to keep the needle in the down position (inserted into the fabric), lift the foot, turn the fabric, put the foot back down again and continue sewing normally. 


After about 15 minutes of careful sewing, my onesie looked like this:


Success!

I made a total of two onesies and two matching burp cloths this weekend. All in, I'd say it took me about three hours total, not including the prewashing/ironing step. Definitely worth it for this adorable outcome!

Here's the set made from the gray and white star fabric...


And the one made from the blue and white chevron fabric...


I can't wait to give these as gifts!

Like I said at the beginning, the tutorial for the burp cloths is coming tomorrow (*update: the tutorial is up! You can find it here.*). These are WAY easier than the onesies. If you can sew a straight line, you can sew these. Promise.

Let me know if you have any questions or if I can clarify anything!

---------

featured on:


Pin It!
Related Posts Plugin for WordPress, Blogger...
Blogging tips