Showing posts with label Valentine's Day. Show all posts

1.15.2015

Himmeli Hearts: A Valentine's Day Craft {Blog Hop!}


Hello, friends! Today I'm joining five of my blogging buddies for a fun post on Valentine's craft ideas. We're just under a month away from this holiday of love, so we thought it would be fun to share a few of our ideas with y'all. Thanks to Linda (from It All Started with Paint) for organizing this!


As you can tell from the title and the opening photo of the post, I made a couple of Himmeli hearts for my craft. Are y'all familiar with Himmeli-style art? I'm kind of obsessed with it right now, and this was my first time making something in that style. It's a type of geometric art made of straws that originated in Finland, and is typically used to make simple Christmas ornaments. People have started becoming more and more creative with their Himmeli crafts and I've definitely noticed it's trending in the design world! The possibilities are endless. I'm not big on seasonal decorating for the little holidays like Valentine's day, but this modern take on the quintessential VDay symbol? Yes please.

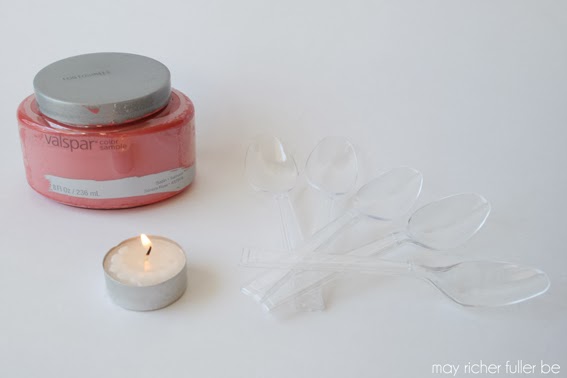
Here's what you need to make these hearts:
  • Straws (I picked these cute striped ones from the dollar section at Target)
  • Thin wire (all I could find was the green floral wire below. I removed the green plastic to expose the wire. It was a pain - so if you can find thin wire, use that!)
  • Scissors
  • Ruler

Once you get the hang of how to do this, they're really easy to make. I followed this amazing tutorial from Oleander and Palm that was posted on Vintage Revivals, and I'm not going to reinvent the wheel today and rewrite my own. She does a much better job than I could do, and so if you like what you see today, head on over to Vintage Revivals and get the full details. Consider this post a birds-eye-view summary of how to make these Himmeli hearts :).

It's handy to get your straws in order before you starts so they're ready to go. You'll need 12 straws cut in half (so that's 24 total after cutting them), six full-length ones, one 2 inch straw and one straw with about an inch cut off the end.


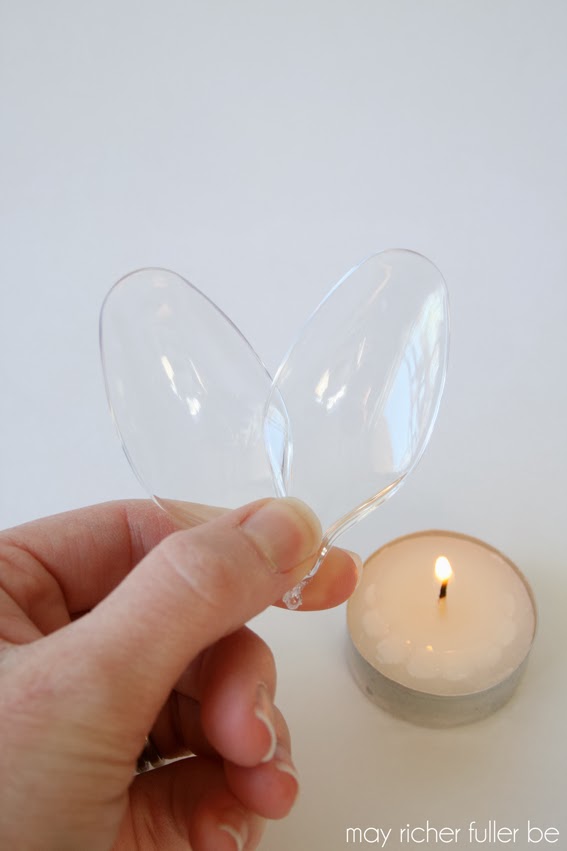
As you start to put the heart together (following the directions above), it will start to take shape:


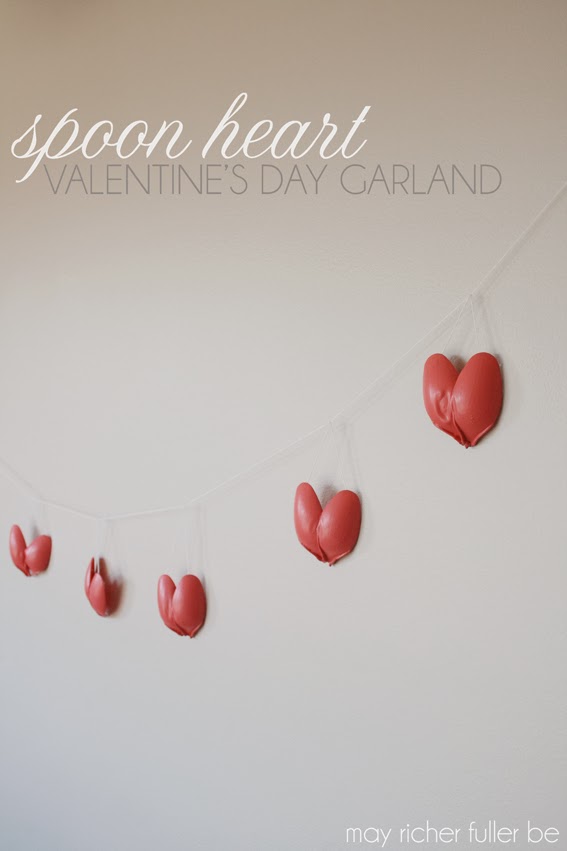
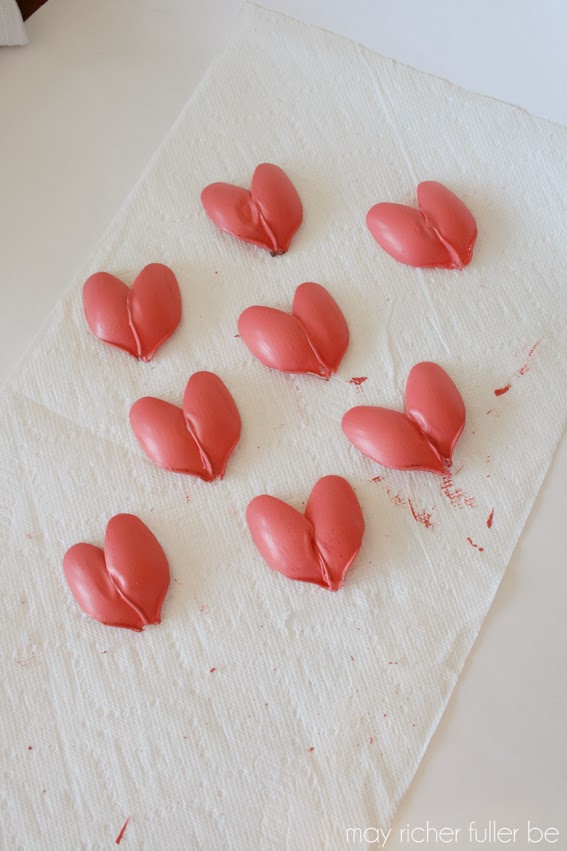
And eventually, it will look something like this!


Halfway through my first attempt at one of these, I was getting really concerned that it was going to look all janky and weird, but in the end, it all worked out. Phew! I was so proud of my handiwork that I made one more big one (like the one above) in black and another tiny one in red. 

I think they look mighty cute together, don't you?


Now I want to Himmeli all the things! Perhaps a wreath? Or a light fixture? It would be fun to make something that can hang around all year round!

Be sure to check out the other projects from these lovely ladies below!

valentine-craft-ideas
Recycled Beaded Hearts by Remodelando la Casa
Paper Flower Bouquet by The Happier Homemaker
Mr & Mrs. Stamped Forks by It All Started With Paint
Easy Non-Candy Valentine by Serendipity Refined


Enjoy what you read today?  Enter your email address below to subscribe to May Richer Fuller Be!


Delivered by FeedBurner


Pin It!

2.06.2014

Favorite {Non-Red-and-Pink} Valentine's Day Finds


Hey friends! As I'm sure you know, Valentine's Day is coming up next Friday. Whether you like it or not, pink and red items are popping up everywhere for this little holiday (or have been since New Year's if you're a big box store!). I'm kind of "eh" about the holiday of love, but think I do think it's kind of a fun excuse for a date night!

Anyway, since there's no shortage of pink and red decor, crafts and other fun V-day-related things out there, I thought I'd round up a few of my favorite less traditional finds from around the web to buck the conventional pink and red trend. There's a little something for everyone here - Etsy items, a recipe, and a few crafts!

Ready? Ok. (Excuse my inner-wannabe-cheerleader coming out there...)

1 | DIY Rustic Wood Letters - XOXO


2 | Awkward Love Card


3 | Mint Heart Stud Earrings


4 | Easy Valentine's Day Art


5 | How to Make a Gilded Arrow


6 | Love and Hearts Garland


7 | Hand-Lettered Chalk Art Valentine's Day Labels


8 | Cream Filled Chocolate Heart-Shaped Cakes


How do y'all feel about non-traditional Valentine's Day ideas? Kind of fun to change it up a little, huh?

Pin It!

2.03.2014

Spoon Heart Valentine's Day Garland


If the title of today's post made you furrow your brow and go, "huh?" I wouldn't be surprised :). What the heck is a spoon heart garland you ask? Well, allow me to give a little background and explain. Remember last year when I made plastic spoon flowers and attached them to a vase a-la-Anthropologie?


And I got to thinking...maybe plastic spoons could be made into other shapes too. Since Valentine's day is coming up and all, how about making them into some hearts? Then, to take it a step farther, since I have a love affair with garlands (as evidenced by this book page one and last year's recycled magazine page heart one), I decided to string these guys together and make them into a garland too.

Want to make one yourself? It's pretty simple!

Supplies needed:
  • Plastic spoons
  • Tea light or candle
  • Matches
  • Paint
  • Paint brush
  • Twine or string
  • Scissors

Step 1: Gently heat the spoon over the tea light to melt the plastic at the intersection of the handle and bowl in order to remove the handle. 


Obligatory disclaimer: be careful when working with open flames. Plastic is flammable and will catch on fire! I slowly heated the spoon so that the plastic would melt, but not burn.

Once the plastic gets hot enough, you'll be able to twist the handle off of the bowl easily.

Step 2: Melt two spoons along one edge until plastic starts to melt, and then stick them together in a heart shape.


It can take a little finessing to get them to stick together properly, but after making a couple, you'll get the hang of it!

Step 3: (Optional) Melt outside edges slightly to mold spoons into more heart-like shape.

Step 4: Paint spoons.


I used some coral paint I had left over from a Valspar test pot and a cheapo paintbrush to paint these guys. I painted both sides and really only needed one coat to get good coverage. This paint job wasn't meant to be super durable, so I wasn't very precise with it. :) If you need a more durable finish on plastic, there are paints made specifically for that purpose - this latex paint isn't one of them!

Step 5: Hot glue string to backside of hearts and hang.


I used embroidery thread, but you can use any string for this. I put a dab of hot glue on each side of the heart and then pressed the string into the glue. By doing it this way, the string formed a loop at the top, which made it easy to make sure they hung evenly. I lined them up on another long piece of embroidery thread and once I had the spacing right, I tied a knot in the string to keep them spaced out evenly.

The garland looked like this once I finished it:


Pretty cute, huh? The melting process made the spoon hearts a little bit imperfect, but I actually like that! They're certainly not store-bought :). I'm totally digging my unique little piece of inexpensive Valentine's Day decor!

Are you decorating for Valentine's Day? I think it's fun to add little touches of pink and red around the house and buy into the sappy romantic feel for a couple of weeks each year!

---------


Pin It!

2.15.2013

Blagden Alley Social Club {Valentine's Day Recap}

Remember when I told you about the last-minute change to our Valentine's Day plans? Well I'm happy to report that the outing was a smashing success. (If you haven't read my Valentine's Day post, I suggest you start there, and this post will make a lot more sense!) It was such a unique experience that I feel like it deserves a detailed recap here on the blog. I really, truly had no idea what it would be like. Based on the uh-mazing photos and story about the carriage house in Garden and Gun, I had high hopes that the food and the people would be equally as amazing as the home. 

Before we get started, I first have to say that my parents are the coolest. They're the ones who found out about this and gave us the opportunity to join them. So thank you, mom and dad!

Alright, here we go.

The setting for the "Blagden Alley Social Club"

The night began with our party of four wandering down a quiet, dark alley - Blagden Alley, that is. Oddly enough, this didn't feel strange or scary. We knew we'd found the right place once we spotted the huge "Huntress Coal Oil" mural painted on the second story wall of Dan and Anna Kahoe's home.  

Dan greeted us at the sliding garage door entrance and ushered us into the dining space (you can see it behind him in the photo above). After taking one look at their home, I knew Garden and Gun was spot on when they called it a "Bohemian Carriage House." That's exactly what it is. And their home is more stunning, if you can imagine that, in person than in the pictures. It is full of unique pieces of furniture and art, and has amazing architectural features. You can tell that every little thing, from the wallpaper to the lighting and accessories, was thoughtfully chosen. I would even call it curated. Their style is a unique mix of rustic, modern, vintage and eclectic. It certainly has a "collected over time" feel, and it's comfortable and welcoming. That's no easy accomplishment!

We certainly felt welcomed by the Kahoes on a chilly Valentine's evening. They entertained our dozens of questions so graciously and truly made us feel at home.

Where we dined

Since moving in and renovating the space just a year ago (I'd love to see the "befores"), they've started hosting semi-regular gatherings they've appropriately dubbed the "Blagden Alley Social Club" - thus the title of today's post. They host these intimate gatherings at their communal 14-person table, and invite a chef to come prepare a multi-course meal. In this case, a former Top Chef contender, Jeffrey Jew, was our food-preparer extraordinaire.


He's good, y'all. And such a nice guy as well. Everything I tasted was delicious. We had goat cheese canapes, winter vegetable salad, lamb tenderloin with Israeli cous cous, and peanut butter pot de creme, just to name a few. Listing the dishes doesn't do them justice though - each plate was a work of art. Man, I wish I could cook like that. Jeffrey, you rock. Wanna come be our personal chef? Just kidding. Sorta. Not really.

Oh! And the people we met were fabulous. We had so many great and interesting conversations that night. I kept pinching myself and saying, "Are we really here? Is this actually happening?" We had so much fun. We really only have one photo (that unfortunately, didn't turn out, otherwise I'd share!) from the night because it didn't feel like a photo-taking kind of night. Do you know what I mean? Plus, Garden and Gun did a way better job than I ever could. We just soaked up the mental images instead.

Before we left the Kahoes were kind enough to let us take a tour of the upstairs of their home as well. That part of their home includes a living area, bedroom and full bath. Again, stunning. I mean, just look at that chevron-painted floor!


Many thanks to the Kahoes for their hospitality and for putting together such a fantastic evening. It turned out to be the most wonderful place to find ourselves on Valentine's Day!

Before I go, I've got one last thing to mention about the Kahoes. As if this whole Blagden Alley Social Club thing isn't enough awesomeness already, they also own a shop in DC called Good Wood, which they describe as an American mercantile and dry goods store. Many pieces in their home came from there. I'm definitely planning a visit in the very near future. Some of the other dinner guests who were with us are regular visitors, and they couldn't say enough good things about it. If you're a DC local, you might want to pay the shop a visit!


Pin It!

2.14.2013

Happy Valentine's Day!


I hope y'all have a lovely Valentine's Day today. Regardless of your relationship status, this day provides a lovely excuse to eat a little extra chocolate, indulge in some conversation hearts, or hug/squeeze the ones you love a little more often. 

Valentine's Day has never been that big of a deal to C and me (yep, "me" is the correct grammar). I do like to make sure we set apart time to have significant conversation, a good meal, and be away from the hustle and bustle for a couple of hours. Originally, we were planning a casual date night at home with an indoor picnic-style dinner (of delicious takeout). Maybe play some music, maybe some candles...you know, to up the romance factor :). Sounded lovely.

Then yesterday afternoon, C got a call from my dad, who got a last minute reservation for dinner at this amazing carriage house in DC, and, bonus! another spot had opened up - did we want it?

Um, yes? Definitely. Sign us up now.

You might be thinking, "What's the big deal? Who cares about a dinner at a carriage house?" Well, there's a reason I got so excited about this. It's because this particular carriage house was featured in this month's issue of Garden and Gun magazine. (Side note: if you haven't read this magazine, go get yourself a copy now. You can thank me later. The writers/photographers/stories are uh-mazing.) I've been salivating over the idea of visiting it in person ever since reading the article about it and drooling over seeing the photos. I even mentioned to C that I was going to find a way to go see it in person. Promise I'm not a stalker. It was just love at first sight. I mean, take a look at this beauty...


{all images courtesy of Garden and Gun}

Now tell me, don't you want to come too? 

I'm dying here. I don't even care about what we eat - although I hear it'll be good since a former Top Chef contender will be at the helm in the kitchen. You can read more about the house, its history and the current owners' story in  this article.

I'll be back soon with a full report (and hopefully some photos if I can take them!).

Oh, and of course I want to wish my hubby a very happy Valentine's Day. Love you babe! You're my favorite :).

{engagement photo c. 2009}


Pin It!

2.04.2013

Valentine's Day Heart Garland


Happy Monday!

Who's excited about the holiday that's coming up in a couple of weeks? And no, I'm not talking about President's Day, although that one does equal a day off of work... I'm talking about Valentine's day! 

This infamous holiday is typically one that people either love to hate, or embrace whole-heartedly (double pun intended) for its excellent excuse to be oh-so romantic. Personally, I do like the excuse to be romantic, but I'm not a huge fan of the pressure that comes with it. 

I also love conversation hearts - but that's a story for another day.

Today, I'm embracing the holiday and bringing you a fun, easy Valentine's Day craft. As you saw in the title, it's a heart garland. Made of paper. I "upcycled" some old magazine pages, along with some plain white printer paper, to make some three-dimensional hearts. Then I strung 'em up on some baker's twine and called it done.

Here are the details if you'd like to make one yourself:

Supplies needed:
  • Predominantly white and/or red magazine pages (what you use is really up to you though!)
  • White printer paper
  • Scissors
  • Double stick tape
  • Baker's twine or string


Here are a few of the magazine pages I used:


Take three similarly colored pages (I'm using three white ones to demonstrate here), stack them on top of each other, and fold the pile in half length-wise. Make sure the part you want to face out on the finished heart is on the inside of the fold. You can see the white, furry hat from the image above is on the inside of the fold below because I want to be able to see that on the finished heart.


Cut out a half-heart on the side of the paper with the fold. I freehanded mine, but you can draw an outline first if you're more comfortable with that. By cutting three at the same time, you'll have three of the exact same, symmetrical hearts.


Continue this process for as many hearts as you want. Vary the sizes for a more interesting final product. I ended up with nine sets of three hearts in total.


Take one set of three hearts and lay them out side by side, keeping each folded in half. Put one piece of double stick tape near the edge of each heart.


Stick "matching" sides to one another in a circular fashion so that you eventually end up with a three-dimensional heart shape. Now you can see that what was on the inside of the fold is now facing out.


Once you've made your hearts, thread a needle with your baker's twine (or string), and "sew" your hearts together. If you look closely at the photo below, you can see that I "sewed" my twine through one side of each heart. I didn't take a detailed photo of this process because I figure it's pretty self-explanatory :).

There's no right way to do it. Just experiment and see what you think looks best!


One you've strung all your hearts together, your garland will look a little something like this:


Try to ignore the creepy baby eye on one of the hearts...that wasn't intentional...


I love how they look a little different from each side with different parts of the magazine pages showing.


Now you've got a fun little heart garland for Valentine's Day! It's not over the top - just a little touch to remind you of that special little day in February ;). And since it's probably made of materials you already have around, it's practically free. Love that. This one could be fun to do with kids too, since they probably know how to cut out paper hearts like pros (as long as they can wield scissors safely). I feel like that's an elementary school requirement?


So tell me, have you done any Valentine's Day crafts yet? Or are you avoiding them all together in protest of this day? ;)

---------------

linking up at:

House of Rose

Home Stories A2Z


Pin It!
Related Posts Plugin for WordPress, Blogger...
Blogging tips