Showing posts with label Expedit. Show all posts

11.12.2013

IKEA Hack: Transform An Expedit Using A Panel Curtain


Ah, the iconic IKEA Expedit. So useful, such awesome storage, but so not unique. I'll bet many of you have at least one of these in your home. Not that there's anything wrong with its look as-is, but after living with my big, dark, black-brown one for nearly four years, I was ready to update it and give it a little refresh - especially once I decided to go light and bright in my mini home office makeover.

I left you hanging at the end of yesterday's post when it came to details on how I transformed this dark Expedit to a lighter and brighter (dare I say happier?) version, so today I'm back to share all the nitty gritty details! And I do mean all. Long post coming!

Let's start with the before:


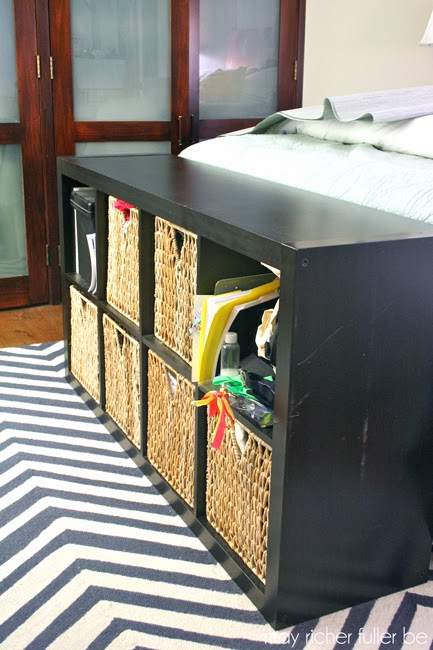
It's a classic black-brown 4x2 unit. It was fine, but man it was visually heavy - if you know what I mean. We didn't buy it for this space and I didn't love it there, but I decided to make it work rather than buying a new piece of furniture for an apartment we wouldn't live in forever. It does a great job of providing the extra storage we need in the bedroom, but I was itching to make it prettier and a tad more organized.

I debated with myself for what felt like an eternity on what to do with it. Should I Craiglist it and use that cash towards a new white one (that would certainly qualify as light and bright!)? Paint it (ugh, all those cubbies...)? Just be content with it (uh, no.)? Then I remembered how much I liked Sarah's fabric covered console table and thought I could do something similar with this piece. Around the same time, I spotted this post on using IKEA's Anno Sanela panel curtains as a grasscloth-esque wallpaper since the texture and material is very, very similar to grasscloth, but without the hefty price tag. Merging those two ideas in my head, I realized that I could try to "upholster" the Expedit using an Anno Sanela panel curtain and have a "grasscloth"-covered piece!

After taking a few measurements to make sure the panel would be the right size to cover the Expedit, off to IKEA I went for one panel in gray, which was all I needed to cover the entire Expedit. (Side note - the IKEA photo of that panel curtain makes it look like a really dark color. It's not. It's much lighter in person and it's actually predominantly a blue-gray color.)

Let's get to some details on how the project went down.

First, I unrolled the entire curtain and laid it across the Expedit to make sure I liked the look and that my measurements were correct. I LOVED it, and my measurements were correct - yay! The only issue is that the panel curtain is about two inches too short to cover the Expedit from one side to the other, but that was an easy fix. More details on that in a minute.


Obviously, the panel was too wide for the unit, so I trimmed it down once I had adhered the panel to the piece using - wait for it - Mod Podge! Honestly, I wasn't sure if Mod Podge would actually work or not, but I'm happy to report that it worked beautifully. I had it already, so it was worth a shot. I'm sure there are lots of adhesives that would work for this including things like spray glue, but since this worked for me, I didn't try anything else.


I did find that I needed to slather it on pretty heavily (it dries clear, so no need to worry about the fact that it's white in the photo above) to get it to stick well. I used a cheap foam paintbrush to spread it out, which worked well. Work in small sections and smooth it down with your hands as you go to avoid any bubbles or puckering.

I did the sides and top first with one long, continuous piece of the panel curtain. Once it was solidly glued down, I trimmed off the excess overhang in the front using regular scissors. The panel is made mostly out of paper (82%), so it's easy to cut. I just trimmed as closely to the edge as I could, and it worked out nicely.


As I mentioned earlier, there's about a two-inch section at the bottom that wasn't covered by that first long piece since the panel wasn't quite long enough to cover it all (the panel is 118" long and three sides of an Expedit equal about 120"). Not a problem. I just measured a couple of small pieces of the leftover material I trimmed off and glued them right on there. You don't even see a seem since the fabric has so much variation in it. The photo below shows it all finished up with those two small pieces at the bottom.

For the front, I decided to cover the four wide edges and leave the thinner inside areas as is. I kind of like the two-tone look, and honestly, it saved me a lot of frustration and time to not measure out and glue down all those thin pieces of material.


I measured the front edges and cut pieces of the panel curtain material accordingly (two 58" pieces and two 31" pieces). I glued them down just like the other pieces.


When it came to the corners, I decided to overlap the vertical pieces on top of the horizontal pieces to make it as seamless as possible. I purposely left the vertical pieces a little long so I could trim them to the exact length I needed once I glued them down.


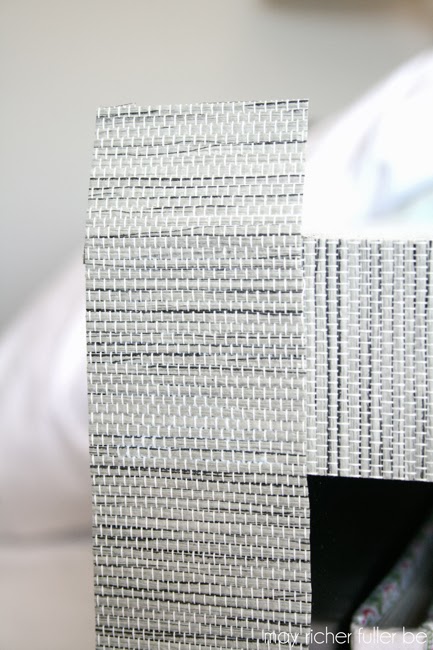
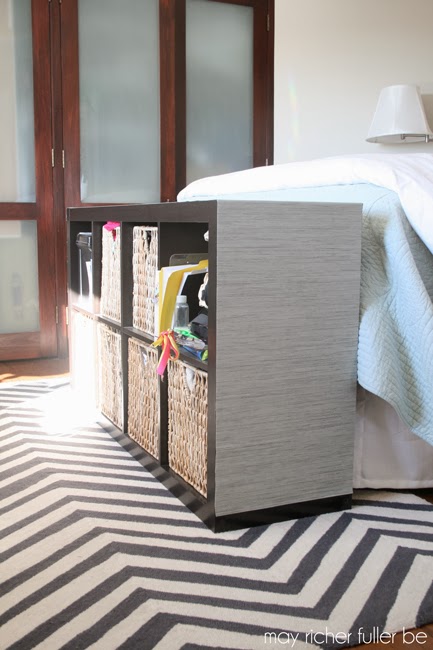
You can see how pretty that material is up close and how well it blends with both the black-brown color and the color of our bedspread in those two photos! Looks just like grasscloth, huh?

After all the pieces were glued down, I left the whole thing to dry for awhile. While that was happening, I decided that such a pretty piece like this should also be well organized, so I took out the contents of all the cubes, reorganized some of the baskets, cleaned out a lot of the random junk you see in the nearest cube and made room for some future office organization items.


(It looks like a black hole in there without all the baskets!)

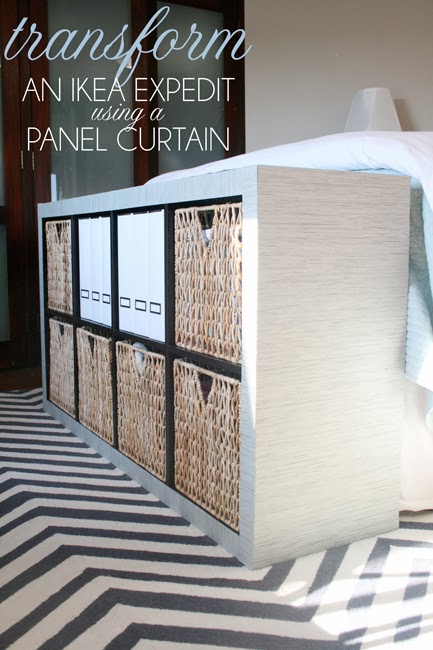
Once I put everything back in the cubbies, the final version ended up looking like this:


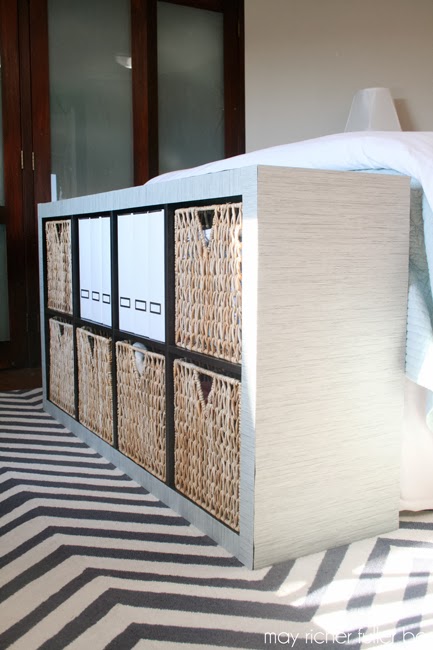
SO nice and clean-looking - and well organized! I already had those magazine files (also from IKEA - I promise this isn't a sponsored post, ha!). Those are old versions of the Kassett magazine files, and I'm planning to use them for filing work-related items once I start accumulating those.

I'm so pleased with how this all turned out. It puts a big ole smile on my face. It's the first thing you see from the doorway to our bedroom, so it's nice not to stare at a big dark piece of furniture every time I walk in there.

Let's take one last look before and after:


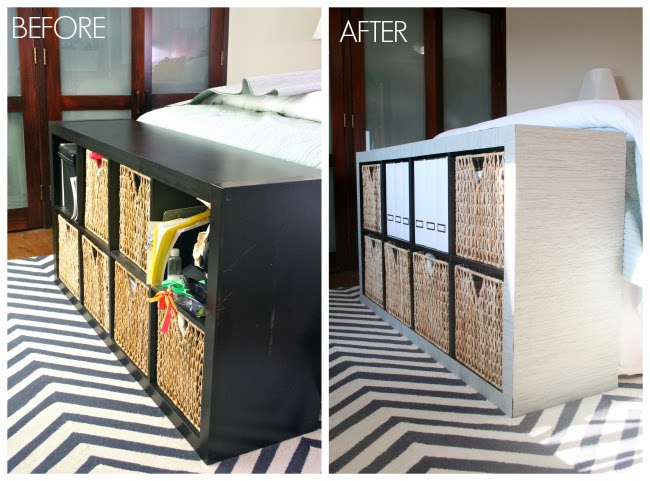
Such a difference. I hope y'all like it as much as I do! :)

Total cost of this project: $15 for the Anno Sanela panel curtain. That's much better than spending $70 on a brand new Expedit, and I LOVE the custom look I got out of it!

---------


Pin It!

11.11.2013

Office Nook Mini-Makeover

DIY sawhorse desk with upholstered top

Good morning friends! I'm excited to share my mini-makeover for the office nook in our little apartment. If you missed the introduction for why I'm giving this area a refresh, head on over to this post and then come back and read this one :).

After the work I did on this area over the past week, I feel much more prepared to start working from home next month. It's feeling a lot more like an office area and less like a dumping ground for random stuff, which is certainly an improvement! I haven't received any of the equipment for my new job yet (like a scanner/printer, computer, etc.), so I'm sure that I'll need to make some adjustments once that stuff arrives, but for now, I'm really pleased with how things are looking.

Let's take a tour, shall we?

The desk is a piece that I DIY'd in January year using some of my grandparents' old sawhorses and a piece of plywood I upholstered with an old shower curtain. You can see lots of photos of it in this post and read about how I made the upholstered desk top in this post. It's continues to be one of my favorite projects because I could customize it to fit our needs and it was inexpensive to do.

DIY sawhorse desk with upholstered top

I didn't do a whole lot to the desk, but I did make a happy-looking silver and gold mouse pad (tutorial coming later this week!) and added a few office organization items.

Desk vignette


Desk with DIY Mousepad

A new addition to this area is that small piece in the corner, which is something that my amazingly talented father-in-law built for us using an old window last year.

Old window turned side table with books

I found that old window near our old apartment in Richmond. I was at a loss on what to do with it, so he took it and said he'd make something for us out of it. He ended up building this cool side table and I LOVE it - the light colors of the chippy paint are so pretty to me, and the top makes for a perfect bookshelf next to the desk.


And yes, that's a piece of shellacked-on burlap on the tabletop. Such a creative touch.

I borrowed a couple of books from our living room to act as placeholders until I bring my genetic counseling reference books home from my current job because I wanted to show off these awesome brass ram's head bookends I took from my parents' house(!). My mom was planning on selling them in the yard sale we had a month or so ago, but I claimed them instead. Aren't they cool?

The best part of this office update though is the new look of our Expedit bookshelf. I took it from heavy and dark to light and bright. Before, it was very functional and had great storage, but it was a bit of an eyesore and was no longer in great condition...

Expedit panel curtain makeover - before

Now that I've updated it, it's not just functional, it's functional and pretty! It fits much better with the "light and bright" look I am going for with this update. And I'll bet you'll never guess what I used to update it - a grasscloth-esque panel curtain from IKEA!


Expedit panel curtain makeover

Much better now, huh? Not only did I "upholster" this piece with a panel curtain to give it a new look, I also took some time to reorganize those baskets in the cubbies to make some room for more office items. I'm going to leave you in suspense on details though today - a longer post with specifics on this whole makeover is coming tomorrow! :) {UPDATE: Here's the post!}

That wraps up the office nook mini-makeover tour. If you have any questions about what you've seen so far, please leave me a comment and I'll get back to you!


Pin It!

3.26.2013

Eight Favorite IKEA Hacks

Hey y'all! Sorry about going dark yesterday - the day got the best of me and I totally ran out of time to post. I'm back though (I know you were worried, ha!), and today I've got a fun post full of ideas for you to customize your IKEA furniture ('cause we all have a little bit of that, right?).

There's a reason IKEA furniture is so popular - it's inexpensive, good (enough) quality, functional, and it's easy to find pieces that will fit pretty much anyone's style. Those are all good things, right? But why not take their simple designs a step further and customize them - "hack" them, if you will - to make them a little more you? Custom pieces for a fraction of the normal cost? Yes please! The hacks these bloggers completed are so creative, and I've gotta say, I'm incredibly inspired by the results. Makes me want to break out some paint and tools and take on something like these myself!


These eight pieces are my current faves. Some have been on my Pinterest boards forever, and some are recent additions. Let's go through them, shall we?

1 | This barn light makeover from At Home on the Bay is really simple. Take a $14.99 ready-made pendant, give it a shiny coat of paint in a bright color, and you've got a statement light fixture. (Compare the price to this one and you'll be glad you took some time to DIY.)

2 | You know those library card files that are so popular? While we all wish we could have the real thing, this mini version from The Painted Hive makes for a great substitute.

3 | Meg Made Designs turned this Expedit into a cool printer's cabinet. This is the most "involved" DIY of the group, but if you're handy and have the right tools, I'm sure you could take this kind of project on, no problem.

4 | The Sweet Beast's Svalbo sideboard with dipped legs is such a fresh-looking piece. I love the happy color, and the fact that she felt free to remove the bottom (which didn't prove to be as simple as it sounds!) shelf to make it fit her style and needs.

5 | I love happy-colored lamps and Jessie's painted Bran lamp certainly fits that bill! All she did was swirl a little paint on the inside of the base and she was all set.

6 | This barnboard coffee table was a lesson in persistence and patience for Jen at City Farmhouse. The result is a lovely, rustic table that she loves. She also shared a great tutorial on the homemade stain she used to "age" the boards on top.

7 | The campaign-style furniture trend continues to stick around, and this Hemnes dresser by Lacquer and Linen echoes that style - but with a fun twist. Instead of campaign-style drawer pulls, she used some gold knot pulls. You'll have to head over to her post to see those up close. Love 'em.

8 | This desk with trestle-style legs and a lacquer top by White and Gold Designs (via Little Green Notebook) reminds me of our DIY desk, but with an extra dose of shininess. Look at those legs!

Feeling inspired to hack your own IKEA pieces yet?

One thing you might notice (or maybe I'm just aware if it!) is that I only mentioned one hack of the ever-popular Expedit bookcases...that's because I wrote a whole post on my love for and a couple of awesome uses of that iconic IKEA piece here. Check it out, or follow my Expedit Pinterest board if you're looking for a little more inspiration for those.


P.S. I'm putting the finishing touches on a little project I've been thinking about and working on for awhile, and I'm excited to share it this week! Hint: it involves my first-ever adventure in staining, and some hand-painted letters. Any guesses on what it is?

Pin It!

1.18.2013

IKEA Expedit Shelving

"Multi-functional." "Inexpensive." "Lots of storage space." "Stylish."

Those are words and phrases I often read and hear people use to describe what they're looking for in a new piece of furniture - at least in my world! Anyone else? One such piece that fits that bill is the - dare I say iconic? - IKEA Expedit shelving unit. These babies have been used in countless ways, and I continue to see them all the time on blogs and in shelter magazines. Does this mean they've been overdone? I don't think so. I think it just means that they're fulfilling a need that many people have in their homes. When styled well, or even modified ("hacked," as they say), they can fit right in to anyone's decor without screaming, "Hey! I came from IKEA and I was cheap!" (not that there's anything inherently wrong with that). Mixing an Expedit with more unique pieces from other stores and time periods (i.e. vintage or antique) makes it feel like a purposeful addition.

We own three Expedit pieces. One of these with 8 openings and two of these with 5. The latter two are currently living in my parents' basement due to space issues, and one lives at the foot of our bed. See?


Multi-purpose storage is the name of the game here. Those baskets hold everything from shoes to my hairdryer. Things that you don't necessarily want on display, but need a good, accessible place to live. The other shelves hold things like office supplies (but those are in the process of moving thanks to Operation {Re}Organization).

In our old apartment, we used the three units together in our living room to make an entertainment center. It was great because we used it to display books, little collections and pictures, as well as store things that didn't need to be visible (including my ridiculous magazine collection). There, the baskets held items like table linens, DVDs and out-of-season decor.

{clearly this photo is from last Valentine's day!}

Bottom line? They're really hard-working pieces of furniture that can easily be integrated into any room of the house.

This week, a couple of my favorite blogs posted about their love for Expedit units. They continue to inspire me to be creative about how we use ours. Kirsten (of 6th Street Design School) has a beautifully styled and organized one that she has in her home office:


And Young House Love just got one for their sunroom for storage and display purposes:


Head on over to their sites if you'd like more info.

Great, aren't they? Endless uses, and you can't beat their prices. I could post pretty pictures of them all day, but I think I'll let Pinterest do the talking on that one :).

Have a great weekend!

Pin It!
Related Posts Plugin for WordPress, Blogger...
Blogging tips