Showing posts with label office. Show all posts

4.20.2016

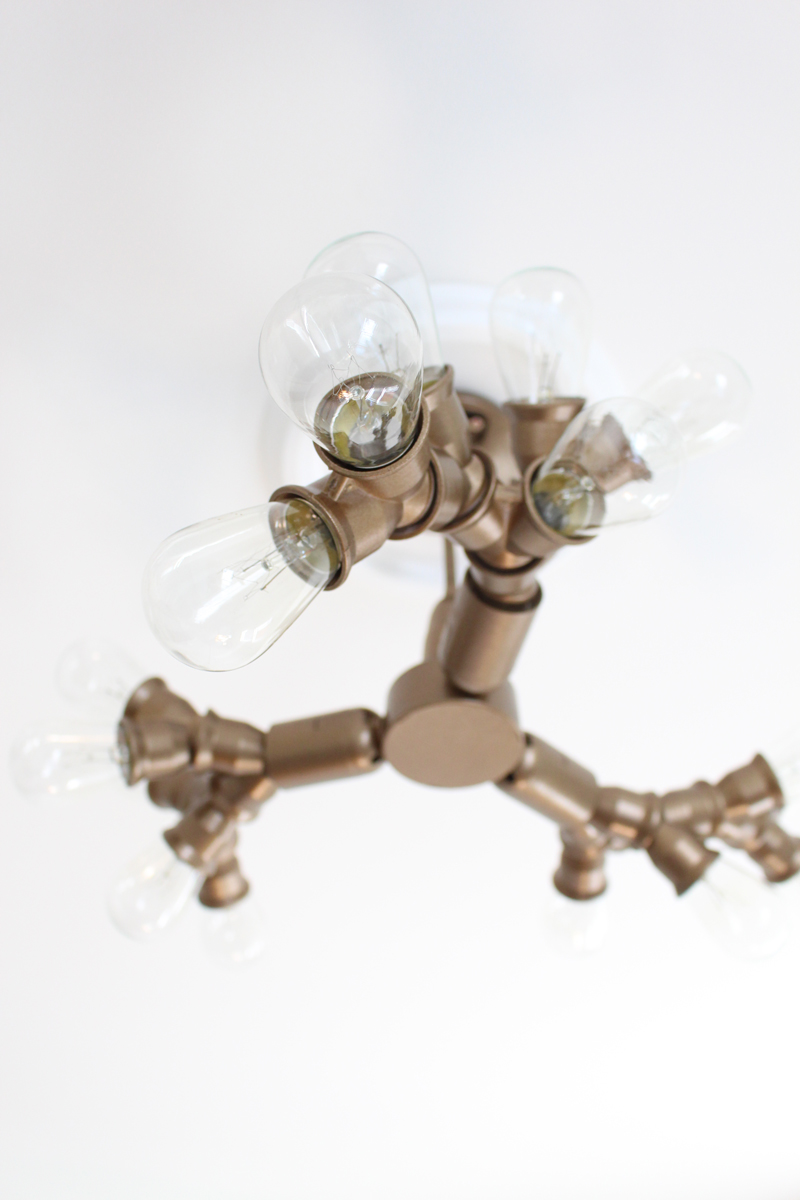
Make It: DIY Sputnik-Style Light Fixture

*Psst! Thanks to everyone who entered Mix & Match Design Company's e-design giveaway! I'm hard at work going through the submissions and it's going to be SO hard to choose just one. Y'all have such awesome homes and I can't wait to work with one of you!


If you saw my Instagram from last week, you'll know I've been working on a fun little DIY light fixture for my office. It's been way too long since I've DIY'd something and shared it here, so I figured it was high time to get 'er done to show y'all!

https://www.instagram.com/p/BEHbwwQyWE7/?taken-by=mayricherfullerbe

I've been a fan of Sputnik-style light fixtures for awhile now. They're modern, kinda funky and fixtures with exposed bulbs are definitely "in" right now. I needed a ceiling fixture to replace a sad-looking fan in my office, but wasn't ready to commit to spending the big bucks on a new fixture just yet.

Then on Pinterest (of course!) I spotted Little Green Notebook's DIY branch light and I thought a variation on that would be the perfect thing! I made a couple of modifications to make it work for my space and the step-by-step is below in case you want to make one yourself.

Supplies needed: (* Denotes an affiliate link. That means I get a tiny commission when you purchase through my link. There's no cost to you - thanks for supporting this little blog. :))


Putting this light together is a little bit like building with legos - it's super straightforward and you really can't mess up. You get to be as creative as you want!

Start with the 3-in-1 socket adapter and screw a Y socket splitter into each end.


Keep adding additional Y socket splitters to open ends until you get to the look you want. I ended up using 15 and gave it a pretty symmetrical look. What can I say - I like balance!


Once you finish attaching the Y splitters in a pattern you like, add lightbulbs to the remaining open sockets. You'll take these out to paint the fixture (unless you want to leave it white, which is pretty too!), but I liked seeing how it would look in its final form before heading to that step.


Finally, screw on the flexible extender and outlet box mount to finish the assembly before painting. Here it is before I got my spray paint on.


Before taking it out to paint, I installed it temporarily to make sure I was really happy with the scale and amount of light it gave out. My office isn't huge, but I found that with my original design, it wasn't quite bright enough. No big deal - I just added a few more Y splitters and bulbs to increase the amount of light.


Onto the painting!

But, here's one other pre-painting step that's very important!! Make sure to stuff the sockets with some newspaper to protect the light bulb contacts. It would be a shame to finish painting, screw in those bulbs, and then have the fixture not work!


I decided to spray my fixture metallic coppery-gold and since it was a tricky fixture to paint, I used a cardboard box as a makeshift paint shed - it worked perfectly to prevent overspray from getting on the concrete and helped it stand up for painting and drying purposes. I made sure to use multiple light and even coats and rotated the fixture several times to make sure all surfaces were well-covered.


(Side note: for those who are wondering about priming prior to spraying the metallic paint...I skipped that step. Should I have? Probably not, but since this fixture is installed on the ceiling, durability isn't an issue and I decided to be a total rebel and not prime. Many of these pieces are plastic though, so it will chip if you scratch at it. So far so good though!)

Now let's get to the good part - seeing it after installation! (Outlet mount boxes are super easy to install - just follow the directions in the box. If you don't feel comfortable with that, definitely hire an electrician!)


I added a ceiling medallion to really finish it off around the outlet box and I think it looks great. Here's how it looks with my office area in the background:


Love all those fun bulbs!


I'm thrilled with how it turned out. It brings such unexpected personality to the room!


Hooray for successful DIY projects! What have you been DIYing lately?


Enjoy what you read today?  Enter your email address below to subscribe to May Richer Fuller Be!  Delivered by FeedBurner

Pin It!

11.11.2015

New House Renovation Progress

Happy Wednesday, friends! Thanks for all your kind words about our new home last week! In case you missed it, catch up here with the empty house "before" tour and real estate photos (there are some gems in there...). We have been hard at work over the past several weeks getting the place into shape so we can move in THIS weekend. Yep, this weekend! It's crunch time. We'll see how much we can finish between now and then - I can't wait to see it all come together. SO much work has been done (I've been calling it our month-long renovation blitz), but there is still plenty to do and we've already got plans for future projects.

Let's walk through some progress photos today, shall we? Also, please forgive the crazy lighting and slight graininess of some of these photos - construction work doesn't always wait for perfect light and camera setups so I had to snap some quick shots with my iPhone along the way!

If you follow me on Instagram (@mayricherfullerbe), you already saw a sneak peek of the very first project we did when my father-in-law (FIL) arrived: rip out the two closets in the dining room (below).


Goodbye, closets! The reasons we removed them were two-fold: one, they made the dining room feel really small, and two, they had to go to make way for our plans to open up the dining room to the kitchen. We have plenty of storage elsewhere in the house, so we weren't worried about losing that space.


Soon after that we turned our attention to the second floor. Room by room, we ripped out nasty carpet, prepped the floors (oh how I dislike you, carpet tacks, staples and old flooring nails) and started laying the new, beautiful hardwood floors. The next few photos are from the installation in our master bedroom.


In case any of you are in the market for new flooring, we went with 2.25-in wide prefinished oak hardwood from Lowe's (Bruce Addison Oak Hardwood in Spice to be exact). I'll probably dedicate a separate post to our hardwood floors, but so far we are happy with them. They're perfect for the more traditional style of our home, and many of the other homes in our neighborhood have similar hardwood floors, so trading the carpet for them is one way we're bringing this house back up to snuff :). And yes, we did install them ourselves with the help of my FIL. Installing 1000 square feet of hardwood is not for the faint of heart!


In the photos above, we had also primed and painted the walls (Behr Premium Plus color matched to Benjamin Moore Winter White). Shall we compare this to the before of this bedroom for a sec?


So fresh and so clean!

One fun surprise we found when we pulled the carpet in the hallway and other bedrooms was the original hardwoods. They had the coolest band of dark wood inlay along the edges. They just don't make 'em like that anymore, do they? It would've been cool if we had been able to refinish them, but this house had a major fire 10 years ago and many of the floor were ripped up due to fire and water damage. The ones that remained were badly warped and stained.


Off we go with the installation down the hallway!


See the original hardwoods to the left of the new ones? This is the back bedroom (and also my office). Someone had a field day splattering and/or tracking paint on them at some point!


Here's my office from the other side with the floors finished.


It's amazing what a huge different new floors and fresh paint can make.

I think I'll save the first floor progress for the next reno post since this one is getting super long! The house is coming along, that's for sure, and I can't wait to get in there. We've got lots of little things left to do, but ready or not, we're moving this weekend!

More to come!


Enjoy what you read today?  Enter your email address below to subscribe to May Richer Fuller Be!  Delivered by FeedBurner

Pin It!

9.17.2015

DIY Easy Faux Roman Shade


A little over a month ago, I had the pleasure of guest posting for Carrie at Lovely Etc. while she was spending time with her new little baby boy. I love guest posting and Carrie's blog is awesome, so it was a win-win! In case you missed that post, I thought I'd share my project - an easy DIY faux roman shade - over here too.

I work from home for my day job in healthcare, so that means I spend about eight hours a day in my office. Over the year or so we've lived here, I've had a blast turning it into a space that I love. It's light and bright - my favorite combination! And while bright is almost always a good thing, for a couple of hours in the afternoon the sun shines so brightly that it's blinding. I was in desperate need of a window treatment that would filter that bright sunlight, but not take away too much of that precious natural light from the one window I have in there.

To see more of my office, check out this post!

Since my desk sits under that window, traditional full-length curtains weren't an option, so I decided to DIY a simple faux roman shade for it. Y'all, this was such an easy project - and it's renter friendly for those of you in that category! This faux roman shade is perfect for a window where you don't necessarily need privacy, but do need to block some light. You'll see why in a minute.

Here are the supplies you'll need to make a faux roman shade:
Step 1: Hem your fabric on three sides so that it fits snugly inside the width and height of your window. I used a sewing machine, but if you're sewing-averse (or don't have one), iron on hem tape works great too. 

For the fourth side, create a small pocket that is slightly larger than the diameter of your small tension rod. You can see the pocket I made below on the right side of this photo and the next photo below. 


As a side note, I picked this piece of fabric up from the remnant bin at one of my favorite local fabric stores. The remnant bin is a great way to get a pretty piece of fabric for a deep discount for small projects like this!

Step 2: Lay your fabric down and create the folds for the roman shade. I didn't measure these - I eyeballed it and created two folds for the look I wanted. Adjust the folds according to how much of the window you want to cover in "default mode." Remember, this faux shade only has two settings - fully up or fully down - so plan your folds accordingly!


Step 3: While the fabric is laid flat and folded, take your adhesive velcro squares and stick them to the inside tops of the folds along the edges first (make sure you stick them in the areas that hold the weight of the folds!). These Velcro squares keep the folds in place once it's hanging up. Then add two or three more squares across the middle areas to support the rest of the width of the fabric folds. I used four squares total across each fold and that holds up the shade beautifully. The Velcro packaging says the adhesive is not made for fabric, but I decided to throw caution to the wind and try it ;). It's working great so far! If I ever feel like the adhesive isn't strong enough, I'll just add a dab or two of fabric glue to make 'em stick. (**Update! The velcro adhesive didn't end up being strong enough for the fabric, so I just dabbed a little fabric glue on them and they're good to go. Nothing like a little trial and error to get it right!)

I realize it's hard to understand where to attach the velcro in words, but here's one example of where I attached mine - hope this helps you visualize it! This is the view from the backside of the fabric.


Step 4: Insert your small tension rod and hang your pretty new faux roman shade! Here's my finished project:


I love how this turned out. It's perfect for my needs (and I hope a few of yours as well!) and it's simple - no fancy lining and sewing is optional! I used Velcro so that I'd have the ability to pull down the shade if I need to, but that's a rare need for my situation. Nearly all of the time it'll stay just like you see in the photo above. This project only took me about an hour, which was time well-spent for some much needed function and style for my naked window :). I hope y'all will try this project out next time you need a roman shade as a window treatment!


If you enjoyed this project, check out a few more of my favorite DIYs!

Pin It!

2.11.2015

Home Office Tour

Hello friends! On Monday, I shared my thoughts on my new rug pad from RugPadUSA and in the midst of writing up that post, I realized that I haven't shown y'all a true update on how my office is looking nowadays. The last photo of the whole room I shared was back when we moved in - ack! Bad blogger. I guess since I've been making this room over little by little, project by project, I lost track of the last time I did a "real" post about it.

Since it's high time for an update, let's just dive right in. One thing I love about this room is that I've poured a lot of sweat equity into getting the right pieces into it...there are so many DIYs, which is just how I like it! I'll link to them as I go if you want more details on a specific project.

For those of you who are new around here, I work from home full-time as a genetic counselor, so I hang out in her a lot. I've really come to love this room though, so I don't mind being in here eight hours a day. This room gets the most natural light in the whole house, which I really appreciate, especially during the short winter days.

The sawhorse desk was a DIY from two years ago when we lived in DC. My office there was in our bedroom, so needless to say I was pumped to be able to move my desk into its own small room (it's only 8'x9') and call it my own. This summer I added washi tape greek key trim to the desk top and I think that adds a little bit of fun sophistication to it.


The open shelf with the gold brackets is one of my favorite additions to the room. I painted some inexpensive brackets from IKEA with gold craft paint (they used to be white) and put a simple white shelf on top. It's amazing how much organization and function one shelf can bring to a room. Plus, it fills up what was once a very blank wall. You can read more about that DIY shelf here in this post. I like to change up the decor on that shelf - it's a revolving door of accessories!


Below that shelf is a favorite project from this past summer. I picked that 3-drawer card catalog up off the side of the road and gave it a makeover (you should see the rusted out before photos!). It's the perfect height and size for my massive and not-so-pretty work printer. Will someone out there please design a pretty printer?


A very recent addition to the office is a little gallery wall. The big wall next to the gold shelf was looking so sad and empty! I'd like to switch out a few pieces up there, but I'm just glad to have some color on the walls for now!


That's pretty much it! Putting this post together makes me realize how much progress has been made and how happy I am with how far this tiny room has come in a matter of a few months. It's my little light and bright haven in our home.


Thanks for reading! I hope you enjoyed today's office tour!

Enjoy what you read today?  Enter your email address below to subscribe to May Richer Fuller Be!


Delivered by FeedBurner

Pin It!

2.09.2015

A RugPadUSA Review and New Rug for the Office!


Ever since we moved into this little house last year, I have known I'd eventually need a new rug for my office to cozy it up and take the focus off the cherry laminate wood floors. It wasn't high on the priority list though since I had a makeshift rug made out of these FLOR-like rug tiles that I found at the dollar store nearly two years ago. They definitely weren't right for this space (they moved around under the casters on my office chair and the overall size is too small), but they got the job done. 

Here's a photo of my office right after we moved in with the rug tiles. Sadly, I think this is the last full-view photo I showed y'all of my office - yikes! It's clearly changed a lot in about six months!


I finally got a kick in the pants to find a real rug for my office when Will from RugPadUSA contacted me to see if I'd be interested in reviewing one of their high quality (but affordable!) rug pads*. You bet I was! In order to review a rug pad though, I actually had to have a rug to put on it, right? Well, while on the hunt for something else, I stumbled onto the home section of Urban Outfitters and saw they were having a major sale and what do you know? The perfect rug happened to pop up for more than 50% off. It's sadly not available anymore, but it's the Magical Thinking Mirror Dot rug in gray for reference.

It's a flat-weave cotton rug and I wasn't sure what kind of pad would work best since I would be rolling back and forth on it with my office chair. The last thing I wanted was for the rug to move around and bubble up every time I moved my chair. I also wanted to make sure it would stick well, but not damage the laminate hardwood floors in our rental. Thankfully, Will helped me out on my selection and recommended the 1/4" Premium Lock Felt Rubber pad

{Side note: they have a huge selection on their site and lots of details about what pads work best for different kinds rugs and floors, so the decision can be pretty straightforward, but you can always give them a call to double check you've chosen the right one.}

The rug pad arrived tightly rolled up and I was a little worried it wouldn't lay flat right away, but there was no issue with that. Amazingly, there were hardly any wrinkles in it by the time I put it on the floor.

One side of the rug pad is felt, which is designed to grab onto the rug and keep it in place.


The other side is natural rubber (not latex, which can start to disintegrate and lose it's grip over its lifetime).


Once I got the rug pad into position, I laid my rug down right on top of it and had a little bit of a hard time putting it into the right place since the felt grabbed right onto it - which was exactly what was advertised, right?! It was a good problem to have :).


After a few days of use, even rolling my big office chair back and forth a ton, I'm happy to report that the rug has stayed in exactly the same place where it started. It bubbled up the tiniest bit in one spot where the casters go under my desk, but I only really noticed because I was trying to find something wrong ;). Overall, I love this rug pad. I'll admit - I've never thought much about rug pads until now. Now I'm a firm believer that a high quality one makes a huge difference. No rug movement = no frustration.


I think I've officially professed my love for RugPadUSA's rug pads. If you're in the market, check them out. They've got a fantastic buying guide so you can compare the different kinds of pads. You can even get 15% off your order using the code 'pr15off' and their rug pads typically ship the same day your place it. How's that for service?


Bit by bit, my office is becoming one of my favorite places in the house. It better be, since I spend all my time there during the weekdays, ha! I love the natural light I get in there, and my new rug brightens up the space even more. I'll be back on Wednesday to share more photos and details!

*Disclosure: RugPadUSA was kind enough to provide this rug pad for my review, but I was not compensated in any other way for this post. As always, opinions are my own and I only endorse products here that I truly love!

Enjoy what you read today?  Enter your email address below to subscribe to May Richer Fuller Be!


Delivered by FeedBurner

Pin It!
Related Posts Plugin for WordPress, Blogger...
Blogging tips