Showing posts with label creative bits. Show all posts

8.09.2013

Creative Bits | 25: Tobi Fairley's Living Room Bar

I'm not sure why, but I've had party decor on the brain lately. Maybe it's because I've been loving the 30 Days of Garland series from Hank and Hunt, or maybe it's because my birthday's coming up this month, but I've been daydreaming about throwing a smashing party. So when I came across this fun and elegantly styled bar area from Tobi Fairley, I started planning an imaginary party with this look in mind. It's got so many little creative bits to it, making it perfect for this series! Take a look...

{photo source: Tobi Fairley}

Let's see, what do I love about this...

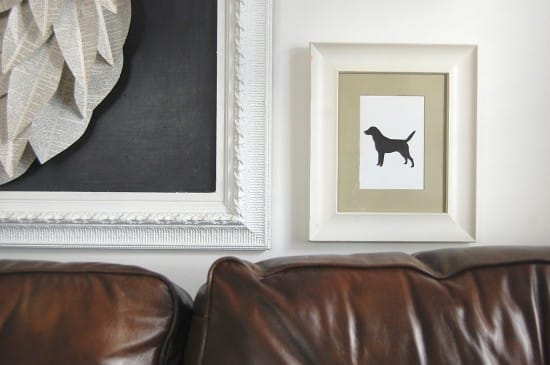
How about this mix of green throughout? Repeating similar colors really brings all the little objects in this area together. There are so. many. things, but it doesn't look too crowded or messy. (Now by the end of the party, that might be another story!). Even the lamp, the leaves on the flowers, the print, and the chair monogram play into this green theme. You could easily replicate this look with another color too.

Next, I feel like I say this every time I show off another pretty photo for this series but...bring in something fresh! Flowers, a plant, something alive, really brings a space to life.

And lastly, mix old and new. Let's say you have a more traditional piece you inherited from your grandparents that you love, but you're drawn to more modern styles too. Don't be afraid to put them together! It can really give some depth to your style, and in my experience, mixing traditional with modern can give a really warm, inviting feeling to a room.

You ready to throw a party too now?

A couple of announcements before I jet off this weekend:

  1. Don't forget to enter the giveaway for a onesie from CSW designs. Yep, I'm going to keep reminding you until it closes on August 15th at midnight!
  2. I've got a really fun series coming up next week that I hope you'll love: 5 days of book page crafts! I've been prepping these guys all week, and I think it's going to be a lot of fun. You can use many of the things I'll show you as party decor too, so maybe that's part of my party-throwin' mindset these days!

---------

Creative Bits is a semi-regular series here on May Richer Fuller Be where I share little tips, tricks and simple do-it-yourself projects from other creative bloggers' minds. I figure if it makes me say, "wow," it's worth passing along to you! And remember, if you want to pin any images that don't belong to me, please click through and pin from the original source!

Click the "Creative Bits Series" tab at the top of the page to see more posts like this.


Pin It!

7.26.2013

Creative Bits | 24: Beautiful Kitchen from Beneath My Heart


Happy Friday, y'all! I'm definitely ready for the weekend - are you?

Before we split for the weekend, I wanted to share a photo of this beautiful kitchen from Beneath My Heart. Traci renovated her kitchen a couple of years ago, and the before and afters are just stunning. Check out this post for more photos. If you like my style, I guarantee you'll like hers :).

So what are the "creative bits" I like most about this little corner of her kitchen? Let's start with those open shelves. The pretty white shelves and corbels make a perfect backdrop for displaying her pretty dishes, glassware and other kitchen items. They really pop against that white, don't they? One hint I've heard over and over is that you should store your everyday, most-used items on open shelves. That way, you avoid the "dusty dish effect."

But don't worry, you can still keep less than pretty items on open shelving too - just use a basket to corral them! The basket looks great up there, and has the advantage of providing some great texture and depth to the shelves.

And lastly, I believe that you can't go wrong with a predominantly white kitchen. I will say that this is totally personal preference though and you may disagree with me (which is fine!), but I just love the classic look. I like how Traci paired the white cabinets and tile back splash with those gorgeous butcher block counter tops too. The fact that you can bring in any color you want through the dishes and accessories make it so that all-white kitchens can fit with nearly anyone's style. You can change things up without having to redo your whole kitchen :).

So what do you think? Are you in love with this kitchen as much as I am? 

Hope y'all have great weekends!

---------

Creative Bits is a semi-regular series here on May Richer Fuller Be where I share little tips, tricks and simple do-it-yourself projects from other creative bloggers' minds. I figure if it makes me say, "wow," it's worth passing along to you! And remember, if you want to pin any images that don't belong to me, please click through and pin from the original source!

Click the "Creative Bits Series" tab at the top of the page to see more posts like this.

Pin It!

7.12.2013

Creative Bits | 23: Living Room from House and Home

Happy Friday, y'all! I don't know about you, but I am so ready for the weekend. Since I was away at the end of last week, I skipped last week's installment of Creative Bits - oh the tragedy! We're back on track though this week, and I have a beautiful living room to share with you today. Usually I like to share spaces from other bloggers, but I fell hard for this Muskoka Cottage room from Canadian House and Home. I felt like it had so many wonderful little design takeaways ("bits") making it a perfect fit for this series. Let's discuss, shall we?


The more I get to know my design style, the more I've realized I love light and neutral spaces with layered color. I'd much rather start with a neutral palette and add to it from there than start with bright colors - does that make sense?  This room captures that idea so well. If you keep the major pieces in the room neutral, you're much likely to get sick of it and you can always switch out the less expensive elements (think pillows, throws, lamps, accessories) when you're ready for a change. This is all totally personal preference though. This idea of a neutral space may not look like "you" at all and that's fine!

The scale is also really important. A room like the one above calls for a large sectional or two sofas. No dinky furniture here. And because the space is so large, they even had room for that giant square pouf - which I love. Since the furniture is the right size, the room feels full but not crowded at all. If I tried to put something like this in our apartment, man would it feel stuffed.

The last thing I noted in the room was that the designers made sure to add warmth to the room using textured baskets, woven materials, and natural elements like the flowers. These are the things that make a room feel like a comfortable and lived in rather than sterile and cold.

Can you tell I love this space? Enough about me though, what are the things that you love about it? 

This creative bit is the perfect segue into the next post in my "Defining My Style" series - which is going to be all about living rooms that I love. It'll be coming sometime in the next couple of weeks!


image courtesy of House and Home

Pin It!

6.21.2013

Creative Bits | 22: Entryway from The Sweet Beast

Well well. This turned into a week full of entryway talk! Are you tired of it yet? No? Oh good, because I saved the best for last today. While scanning my Pinterest images for inspiration, I came across an image I had pinned under DIY, and realized it was the perfect candidate for the next Creative Bits post! Emily, who writes the blog The Sweet Beast, made over her entryway space with so many fun, fresh pieces and accessories I just had to share it. She hit on so many of the important elements for an entryway that I talked about earlier this week. Take a look:


First of all (I know I listed it as point number three, but...), can we just take a moment to admire that dipped console table? I'm smitten by it. I know the "dipped" furniture trend has been around for awhile now, but wow, this version really is awesome. Emily posted all the details about her IKEA Svalbo hack here if you're interested in taking this one on yourself. This is a perfect piece of furniture to take a chance on design-wise. Major impact with minimal effort.

I also love the fact that she added a mirror here. Its large size has the effect of acting as another window for the entryway, making it feel larger and more spacious.

And lastly, how fun are all those accessories she added? She did a wonderful job of adding color and visual interest without making it look cluttered. Plus, she still has a place to drop her keys and other items without having to move anything out of the way.

What do you think of this entryway? I'd love to walk into this happy space every day. 

Have a wonderful weekend, y'all!

In case you missed any of the other entryway posts from this week, you can catch up here:

Pin It!

6.07.2013

Creative Bits | 21: Tips on Styling Shelves from Nalle's House

Have you ever run across a blog that just draws you in? That's beautiful and inspires and keeps you wanting to come back for more? If you're an avid blog reader, I'm sure this is familiar territory to you. It is to me, which is why my Google Reader list keeps growing! Most recently, this happened when I came across a blog through a few link parties I browse and submit to every week. I found myself clicking on Anu's (the author) links and saying to myself, oh, it's THIS blog again? (In a really good way.) Her projects, style and home are all so inspiring to me. So allow me to introduce you to Nalle's House if you don't know it already.

Anu has graciously allowed me to use one of her photographs for the Creative Bits series so I can point out a few creative tips on styling shelves. And these tips aren't just for shelves - they translate to styling most any space in your home.


I love the way she incorporates so many different pieces into the space without overwhelming or crowding it. The variety keeps it interesting (did you see the toy car on the second shelf?), but everything flows from one shelf to the next. It's just plain nice to look at, wouldn't you agree? 

Oh, and if you're curious about that pretty square plate on the bottom shelf, that's a DIY project. She wrote about it, instructions and everything, over on this post. Take a look! And while you're there, be sure to browse through her home tour and other projects. She does beautiful work.

Have a wonderful weekend!

photo source: Nalle's House


Pin It!

6.03.2013

May Project Round-Up


I feel like I say this every month, but man, May flew by in a flash. Welcome, June! I'm excited summer is here - are you?

Before May is a distant memory, let's take a few minutes to look back at the projects I posted about on the ole blog this past month, starting with this fun way to display printed Instagrams using pants hangers. (I print my Instagrams to Walgreen's One Hour Photo using an app called Printicular. It's so easy and inexpensive.)


My favorite project of the month (and the most popular one with y'all as well) was the wood shim pendant light. Though it ended up being a little more challenging than I anticipated, I love how it came together in the end, and seeing it hanging over our dining room table really makes me happy. If you missed any of the posts about it, you can catch up here: one, two, three.


I revamped the every-other-Friday Creative Bits Series a bit, and shared a really pretty office space and a beautiful living room this month. This has been a fun way to connect with other bloggers, so if you have a space you think has a few Creative Bits of its own, send a photo of it my way and I might use it in a future post!


Operation {Re}Organization continued this month. This time I tamed the chaos of the front hall closet in a series of three posts (inspiration, before/strategy and after). What was a disaster area is now sooo much more functional and even has secret storage for sporting equipment. Did any of y'all tackle an organizational project this month?


And of course you can't have "function" without "fun" (bad pun, sorry), so I added these blue watercolor-y/painterly labels to make sure things are easy to find and are returned to their proper homes. There's a link to download a free set of blank labels too if you need some!


I also took on a new cleaning plan in Operation {Re}Organization this month. The first week has gone pretty well so far. Since I technically implemented this plan last Tuesday, I technically have one more day to do my last weekly task...clean the bathroom...ugh. At least once it's done I'll have the satisfaction of checking that box once I'm done though - thanks to my handy list here :).


Are you a Kate Spade fan? If so, you'll want to check out the Kate Spade Style Soiree hosted by Jenna and others last month. I joined their party and created a Kate Spade-inspired gold zig zag pitcher. Who doesn't need a little gold in their lives?


To celebrate my mom this month on Mother's Day, I took some photos with my brother, Instagrammed them, and created a photo strip style card for her. It was a fun project for me, and she loved it! Win win.


Another one of my favorite projects this month was this DIY iPhone speaker made out of...a toilet paper roll. Talk about doing a project "on the cheap" :). I use it all the time!


Last but not least, I shared a recipe for banana avocado bread. Head on over to the post to see why I used avocados, of all things, in this delicious quick bread.


That about wraps it up for May! Thanks, as always, for reading. I'm so grateful to each of you for stopping by my little corner of the blogging world.

And thanks to these wonderful blogs for featuring my posts this month:


Come on back tomorrow for a fun project I did over the weekend. Want to know what it is? Go back to this post from last week for a hint!

Pin It!

5.24.2013

Creative Bits | 20: Living Room from Sarah M. Dorsey Designs

Happy {almost} Memorial Day weekend! I don't know about you, but I'm pumped about having an extra day off this weekend. Before closing up shop for the next few days, I wanted to sneak in the next installment of Creative Bits. Today's comes from one of my favorite daily blog reads: Sarah M. Dorsey Designs. If you haven't checked out her blog before, you should! Sarah was kind enough to let me show off a photo of her lovely living room, point out a few favorite design elements and discuss how you could do something similar in your own home. Take a look:


I love her clean-lined, modern style, and her fearless use of color and pattern. I'm definitely taking notes on how she pulled together her white-framed gallery wall - especially all the typographical elements. This girl's got major design talent. Make sure you check out her blog for tons of awesome DIY projects and how-tos. She's got an Etsy shop too, so if you like the art you see around her home, check that out, because chances are she designed it herself and it's available for purchase!

I hope y'all have a great weekend. I'm taking Monday off off, so I'll be back to the blog on Tuesday!

photo source: Sarah M. Dorsey Designs

Pin It!

5.10.2013

Creative Bits | 19: Confetti Wall & Coral Dresser

Happy Friday y'all! I'm changing things up a little here with the Creative Bits series. The idea is the same - pick an inspiring photo and point out the creative ideas - but now I'm going to number my favorite parts and try to give you a few ideas on how you can "get the look." Today's installment comes from a new-to-me-blog called A Place For Us. Destiny was kind enough to let me show off a photo of part of her beautiful office space. Take a look:


Isn't that space just so pretty? I really do love how creative she was with the confetti wall, the bright coral paint on the dresser, and the handy, labeled drawer pulls - she'll always know where her office supplies are!

If you'd like to read more about this space, Destiny has her sources and how-tos over on her blog. Go here for the confetti wall and go here for the coral dresser.

Have a great weekend! And Happy Mother's Day to all moms out there. Make sure you give yours an extra squeeze this Sunday. If you're still looking for a last minute DIY gift - check out my post from last week!


---------

Creative Bits is a semi-regular series here on May Richer Fuller Be where I share little tips, tricks and simple do-it-yourself projects from other creative bloggers' minds. I figure if it makes me say, "wow," it's worth passing along to you! And remember, if you want to pin any images that don't belong to me, please click through and pin from the original source!

Click the "Creative Bits Series" tab at the top of the page to see more posts like this.

Pin It!

4.29.2013

Creative Bits | 18: File Cabinets Turned Storage Unit

It's time for another installment of Creative Bits! Today's bit has been circulating all over the blog world over the past week or so, but deservedly so (in my humble opinion). Take a look at these filing cabinets turned storage unit:


This chic industrial storage unit is a part of a house tour from Country Living. I can't help but love the happy yellow paint combined with the darkly stained wood top. This would be so easy for anyone to recreate - even those self-proclaimed non-DIYers. You'd just need to pick up three filing cabinets from your local thrift store, some happy-colored spray paint, and piece of plywood for the top (similar to the one I used for my DIY desk).

Just think about all the storage possibilities for this baby. You wouldn't have to use it for files. It'd make a great buffet in a dining room, a perfect sofa table, or even good storage for a mudroom. Any way you look at it, it's a super creative use of an otherwise boring office necessity.

If you do take on this project, just make sure that your thrifted file cabinets are the same height and have the same style drawer fronts (color doesn't matter, obviously, because you'll be painting them!). Also, before purchasing spray paint, check the label to be sure it's made for metal, otherwise it'll chip.

Hope y'all have a great week!

---------

Creative Bits is a semi-regular series here on May Richer Fuller Be where I share little tips, tricks and simple do-it-yourself projects from other creative bloggers' minds. I figure if it makes me say, "wow," it's worth passing along to you! And remember, if you want to pin any images that don't belong to me, please click through and pin from the original source!

Click the "Creative Bits Series" tab at the top of the page to see more posts like this.

Pin It!

4.12.2013

Creative Bits | 17: Paper Chandelier


When I spotted this paper chandelier in one of Centsational Girl's posts this week, I instantly fell in love with its modern, whimsy feel. The fixture lives in Sarah Richardson's living room in her Toronto home. I wish there was more detail about it, but HGTV seems more interested in talking about the color palette of the room on their site :). I think this would be an easy do-it-yourself light fixture, and would be very inexpensive to make something similar using a pendant light kit and a few common household materials. What do you think?

I'm in the process of putting together a DIY light fixture for our dining area in the apartment, and this is definitely inspiring me to make something similar. I think. I'm being terribly indecisive on this project. Hoping to share more about it in the next week or so. Stay tuned!

Have a great weekend!


---------

Creative Bits is a semi-regular series here on May Richer Fuller Be where I share little tips, tricks and simple do-it-yourself projects from other creative bloggers' minds. I figure if it makes me say, "wow," it's worth passing along to you! And remember, if you want to pin any images that don't belong to me, please click through and pin from the original source!

Click the "Creative Bits Series" tab at the top of the page to see more posts like this.

Pin It!

3.29.2013

Creative Bits | 16: Modern Easter Eggs

Happy Easter weekend everyone! I'll be spending much of this weekend at church - starting tonight with a Good Friday service. Tomorrow night we'll be going to an Easter Vigil and then on Sunday we get to celebrate Jesus rising from the dead - hooray! Easter is always such a joy-filled weekend, and I'm really looking forward to it.

I truly love Easter for the reasons mentioned above, but I also can't help but love some of the adorable decorations and crafts that pop up around this time of year. I'm particularly smitten by the pretty and modern designs I've come across lately on Easter eggs. If you're looking for some last minute ideas, or you're planning to get your egg-decorating on this weekend, here are a few of my favorites to get you going.


Have a lovely Easter, y'all!


---------

Creative Bits is a semi-regular series here on May Richer Fuller Be where I share little tips, tricks and simple do-it-yourself projects from other creative bloggers' minds. I figure if it makes me say, "wow," it's worth passing along to you! And remember, if you want to pin any images that don't belong to me, please click through and pin from the original source!

Click the "Creative Bits Series" tab at the top of the page to see more posts like this.

Pin It!

3.08.2013

Creative Bits | 15: Sour Patch Grapes

I've got a major sweet tooth problem. And it's difficult for me to control. Give me a bag of skittles (yes, skittles) and I'll eat the whole thing in a sitting. Let's just say I've got sugar-craving issues. I'm always on the lookout for alternatives (other than candy or a huge bowl of ice cream) in an attempt to be healthier and satisfy my sweet tooth.

This week, I think I may have struck gold. Thanks to Pinterest, I came across a recipe involving grapes (yay fruit!) and Jell-o gelatin powder from a blog called Pure Sugar. Carol came up with this creative recipe to jazz up some fruit for her son's Scout meeting and it was a huge success. I figure if kids loved it, I will too since I have the sugar cravings of a 10 year-old. 

She dubbed them Sour Patch Grapes, and seeing as I love sour patch kids, I'm really excited about these.


Head over to her blog for the full recipe and directions. You can probably guess how to do it based on the photo, but there are more details and tips there.

I bought my ingredients last night, and am definitely going to try making them this weekend. I got cherry and strawberry sugar-free Jell-o to put on the grapes, so we'll see how it goes!

Anyone else have some yummy "healthy" sweets they like to make or buy? I'd love to have a few in my arsenal for when those cravings come around. 

Happy Friday, y'all! 

---------

Creative Bits is a semi-regular series here on May Richer Fuller Be where I share little tips, tricks and simple do-it-yourself projects from other creative bloggers' minds. I figure if it makes me say, "wow," it's worth passing along to you! And remember, if you want to pin any images that don't belong to me, please click through and pin from the original source!

Click the "Creative Bits Series" tab at the top of the page to see more posts like this.

Pin It!

2.21.2013

Creative Bits | 14: Pretty Magnets

Raise your hand if you use magnets on your fridge (or anywhere else in your house).

Now raise your other hand if your magnets are less than attractive, utilitarian, or came as a freebie from that repair guy who knocked on the door and wants you to hire him do some work on your house.

Good, glad you're with me on this one. Now that you've got both hands in the air, feel free to raise the roof or fist pump or something because I've got a solution for your magnet problem.

I'm super excited to share this idea in my Creative Bits Series because this one comes from my sister-in-law, Mary! She's a wonderful photographer, and typically blogs about her photos, but this week she shared something a little different - a tutorial on how to prettify some regular ole magnets. I loved it, and want to try it myself since I have some of the same magnets she used, so I figured I'd pass the tutorial along to you lovely people in case you want to try it too!


You probably have all the materials you need hanging around your house already if you're like me and hoard have a few craft supplies. Go on over and take a look at the full tutorial for details. I promise you'll want to do this project immediately. :)


P.S. I'll be back later today to announce the winner of the Fan District Art Print giveaway. Thanks to everyone who entered!!

---------

Creative Bits is a semi-regular series here on May Richer Fuller Be where I share little tips, tricks and simple do-it-yourself projects from other creative bloggers' minds. I figure if it makes me say, "wow," it's worth passing along to you! And remember, if you want to pin any images that don't belong to me, please click through and pin from the original source!

Click the "Creative Bits Series" tab at the top of the page to see more posts like this.

Pin It!

2.08.2013

Creative Bits | 13: Upcycled Pantry Canisters

If you've been following for awhile, you heard me say before that I'm all about using what I've got on hand, re-purposing things, and generally spending as little as possible on projects around our house. Yay for tight budgets! Since this is kitchen organization month over here, and I've been dreaming about possibilities for our pantry as well as beginning to organize it, I've been on the lookout for inexpensive ways to update its storage.

Though I would love to go on a shopping spree at the Container Store to make this happen, I'm pretty sure my credit card would give me a dirty look and refuse to be swiped. Plus, when I see beautiful pantry makeovers filled with dollar store items, I have a hard time justifying spending a lot on pretty containers. And you know what's even better than buying dollar store containers? Using free containers! Yes, it's true! (she says, spoken with an enthusiastic infomercial voice.) How? Read on, friends, read on.

Lisa, from Lewisville Love made over her pantry using - wait for it - empty almond containers.


Would you have guessed that all those gorgeous, clear, silver-topped containers housed almonds in their previous lives? Neither would I!

Head on over to her blog to see how she did this, and how beautifully her entire pantry turned out.

I'm just so darn impressed with all the creativity and resourcefulness that's out there these days. It's so fun for me to feature some of these ideas on my little blog.

I'm off to be creative and resourceful myself in the pantry department this weekend. Fingers crossed I can get it finished and ready for a close up!

---------

Creative Bits is a semi-regular series here on May Richer Fuller Be where I share little tips, tricks and simple do-it-yourself projects from other creative bloggers' minds. I figure if it makes me say, "wow," it's worth passing along to you! And remember, if you want to pin any images that don't belong to me, please click through and pin from the original source!

Click the "Creative Bits Series" tab at the top of the page to see more posts like this.

Pin It!

1.30.2013

Creative Bits | 12: Silhouette Art

If you're new to my little ole blog today, welcome! After linking up a couple of my office organization posts over at IHeart Organizing, I had a lot of new visitors stop by yesterday. If you're one of them, I'm glad you're here. Introduce yourself in the comments if you'd like - I'd love to know you!

Creative bits is a regular series here at May Richer Fuller Be. I typically share something of the small/quick project variety (thus the "bits" part of the title) that most anyone could take on and replicate themselves. These are things that I would love to do myself, in our home, and I hope they'll spark some creativity for you as well! To see the whole series, mosey on over to this page.

Today's creative bit comes from a photo I spotted last week on a post from the Nester. I love watching her house evolve as she adds and subtracts different pieces, artwork, furniture and accessories. One of the things I see changing a lot is the gallery wall above her sofa. Every time she posts a new photo, I feel like something is different. I admire her willingness to take risks and just try something. I'm thinking I could learn a few things from her :).

This is the photo that grabbed my attention:


I was totally smitten by this simple little dog silhouette, and thought to myself, I'm sure I could replicate that. I'd love to incorporate a silhouette of Jackson into our gallery wall. I know I could use Photoshop to convert a regular photo to a silhouette, but I'm wondering if other software has that capability as well, since I know not everyone has or has access to Photoshop. Can anybody chime in on that?

Hope y'all have a great Wednesday! I'm hoping to spend a little bit of time outside today since we're having awesome unseasonably warm weather. We'll see if I can escape the confines of my office for a few minutes to soak it up before the cold weather returns tomorrow!

---------

Creative Bits is a semi-regular series here on May Richer Fuller Be where I share little tips, tricks and simple do-it-yourself projects from other creative bloggers' minds. I figure if it makes me say, "wow," it's worth passing along to you! And remember, if you want to pin any images that don't belong to me, please click through and pin from the original source!

Click the "Creative Bits Series" tab at the top of the page to see more posts like this.

Pin It!

1.22.2013

Creative Bits | 11: Simple Design Transfer Method

If you've been reading my little blog with any sort of consistency, you've probably figured out that I'm all about projects that are budget-friendly. When I get an idea and am planning how to make it happen, the first question is usually, "How can I do this by spending as little as possible, but still have the best outcome?" Then I'll think about what materials I have and what I need. If I do need to purchase something specific for a project, I'll try to think creatively about an inexpensive (or free!) option before buying. I'm excited about sharing today's creative bit with you today because it fits right in with that line of thinking when it comes to budget-friendly ideas. It's definitely a "use whatcha got" tip, and it's definitely going to come in handy for a little project I've got up my sleeve.

Ever come up with a design that you needed to transfer from a piece of paper to some other material (i.e. wood), but didn't want to freehand it for fear of messing it up, or not achieving the "exactness" you're looking for? Think typography or a design you've printed out from your computer. I have very few artistic skills, especially when it comes to drawing (I continue to maintain my belief that being "creative" is entirely different from being "artistic"), so this happens to me...a lot.

So when I was Googling something along the lines of "how to transfer a design" for this project I'm planning, I came across a post from a blog called Makely School for Girls, which claimed to have the "Easiest Design Transfer Method You'll Ever Find" (yep, that was the name of the post). Of course I clicked on it. And I think she may be right. Hit the nail right on the head. She used, wait for it, newspaper as transfer paper. Clever clever. And free, if you already get a paper delivered.


The idea is that you place your design on the newspaper, trace over it so it picks up some of the ink, move the design to the place you're transferring it, trace over it again, and you'll end up with a light version of your design you can paint or do whatever with! Like this:


This method takes you from needing to have the skills of real artist to the skills of color-by-number artist to be able to create intricate designs. Yessss. That's more like it. Of course, for full details on this technique, head on over to the original post using the source links above.

Now, you might be wondering what my little project is that needs this method, and I'm going to be a tease and not share details with you right now. What I will tell you is that it's a wooden sign with lettering and numbers on it - is that vague enough for you? Stay tuned; I hope to have more to share in the next week or so!

---------

Creative Bits is a semi-regular series here on May Richer Fuller Be where I share little tips, tricks and simple do-it-yourself projects from other creative bloggers' minds. I figure if it makes me say, "wow," it's worth passing along to you! And remember, if you want to pin any images that don't belong to me, please click through and pin from the original source!

Click the "Creative Bits Series" tab at the top of the page to see more posts like this.

Pin It!

1.16.2013

Creative Bits | 10: Washi Tape Labels

With office organization on my mind these days, I am constantly on the lookout for ideas, quick tips, and things to make the process a little more fun. This is especially true when it comes to the next task I've assigned myself - filing. Cue a collective sigh. I know, boring - but necessary. I'll stay away from the actual filing process today (phew!), but I did want to share a little tip I recently came across on IHeart Organizing that makes this less than glamorous task a tad more fun.

Washi tape file labels.


Allow me to explain in case I lost you at the word "washi." Washi tape is a type of paper tape (similar to masking tape, but of a lighter weight) that originally came from Japan. The reason it's so awesome is that it comes in a ton of delightful patterns and colors, and it's removable. No residue left over if you change your mind about its placement. There are about a million ways to use it - a quick search on Pinterest showed me that. Labeling files is just one of many ideas, but I was so smitten by this particular creative idea that I figured I'd pass it on to you in case you'd like to pump up the style factor in your filing system too.

Lucky for me, I got a bunch of lovely washi tape as a part of one of my Christmas presents this year (thanks in-laws!), so I'm already set up to try this little tip out myself. Now, if I can just find those file folders I bought ages ago and stuck in a closet somewhere...

Maybe my files will look a little more like these once I'm done!

{source: IHeart Organizing}


---------

Creative Bits is a semi-regular series here on May Richer Fuller Be where I share little tips, tricks and simple do-it-yourself projects from other creative bloggers' minds. I figure if it makes me say, "wow," it's worth passing along to you! And remember, if you want to pin any images that don't belong to me, please click through and pin from the original source!

Click the "Creative Bits Series" tab at the top of the page to see more posts like this.

Pin It!

1.09.2013

Creative Bits | 9: Gold Dots

It's been way too long since I last shared a creative bit with you! In fact, the last time was on November 30th. Bad blogger. Calling it a series and then stopping it abruptly with no explanation? Tsk tsk. (I'm choosing to blame the Christmas busyness.)

Anyway, the series is back. And today's bit comes on the heels of yesterday's post about organizing the problem areas in our apartment. Since I'm planning to tackle the "office" area first, I'm filing today's idea away for the future bathroom organization project. Or rather, the prettifying (can that be a word?) portion of the bathroom project. Function is, of course, very important in organization, but it's way more fun if it looks good too.

With that in mind, to prettify a bathroom cabinet, how 'bout adding some gold dots to the inside back of it? I think so. Courtney, at A Thoughful Place, did just that. Look!


I'm loving the results. Subtle, yet totally rockin' and unexpected. All it took was a piece of foam board, a stamp, and a gold ink pad. Check out the details on her blog to see how you can make one yourself. Go do it!

---------

Creative Bits is a semi-regular series here on May Richer Fuller Be where I share little tips, tricks and simple do-it-yourself projects from other creative bloggers' minds. I figure if it makes me say, "wow," it's worth passing along to you! And remember, if you want to pin any images that don't belong to me, please click through and pin from the original source!

Click the "Creative Bits Series" tab at the top of the page to see more posts like this.

Pin It!

11.30.2012

Creative Bits | 8: Handmade Paper Bows

This week's creative bit comes just in time for the gift-giving part of the Christmas season. If you're anything like me, you're a sucker for pretty gift packaging. i swoon over this stuff. Sometimes, creating the presentation is as much fun as giving the gift itself. So when I came across this tutorial on how to make a pretty paper bow, I instantly thought about how easy this would be to incorporate into my Christmas present-wrapping this year and how it would add that extra something to a gift. Take a look at the finished product...

{source}

Let's all ooo and ahhh together, ok? The full tutorial can be found here. I've already pinned it so I can go back to it later :).

The creator behind this bow is a new-to-me designer named Meghan Hopkins Sokorai who does custom letterpress and graphic design work for weddings, events and individuals. From what I've seen, she creates beautiful, fun and visually-entertaining pieces! Check out her portfolio. Oh, and in case you're wondering, the gift tag/coaster you see is of her creation as well! You can buy them in her shop if you're interested.

Happy creating!

---------

Creative Bits is a semi-regular series here on May Richer Fuller Be where I share little tips, tricks and simple do-it-yourself projects from other creative bloggers' minds. I figure if it makes me say, "wow," it's worth passing along to you! And remember, if you want to pin any images that don't belong to me, please click through and pin from the original source!

Click the "Creative Bits Series" tab at the top of the page to see more posts like this.

Pin It!

11.20.2012

Creative Bits | 7: Fancy Duct Tape!?

As I was reading through Young House Love's latest post today, I saw something on their "We're Digging" sidebar that stopped me in my tracks: duct tape. You probably think I've fallen off my rocker, but this is no ordinary duct tape. It's designer duct tape. And it looks a little something like this:

{source}

Ok, now do you think I'm a little less crazy for thinking this stuff is AWESOME? Just think of the many, many creative things you could do with this stuff. These Platypus people are. brilliant. High fives all around. I may have to get some and try it out.

Here are some other favorite patters:

{source}

{source}
{source}

What do you think? What would you do with patterned duct tape?


---------

Creative Bits is a semi-regular series here on May Richer Fuller Be where I share little tips, tricks and simple do-it-yourself projects from other creative bloggers' minds. I figure if it makes me say, "wow," it's worth passing along to you! And remember, if you want to pin any images that don't belong to me, please click through and pin from the original source!

Click the "Creative Bits Series" tab at the top of the page to see more posts like this.

Pin It!
Related Posts Plugin for WordPress, Blogger...
Blogging tips