You may remember when I shared the design plan for this modern farmhouse master bedroom in the Philadelphia suburbs a few months ago and I'm excited to show it to you today in its completion! This project was a blast to pull together, and I was thrilled that it was local so I could go snap some photos on a beautiful Sunday afternoon a couple of weeks ago.
My clients, Courtney and Kit, were going through some big transitions this summer including a move from a tiny one bedroom apartment in the city to a two bedroom in the suburbs and both starting new jobs, so the last thing they wanted to do was figure out how to furnish their bedroom. That's where Mix & Match stepped in to help - I created a design plan and then all they had to do was purchase the items and install them in their new home.
Here's what the final design board looked like:
And here's the finished room!
To see more photos and read more about the process, head on over to the Mix & Match blog. That's where I'll be sharing full e-design project reveals and more. You can also follow Mix & Match on Instagram in between posts for more design goodness!
If you or someone you know needs interior design help in their home - whether a big project or small - feel free to contact me. I'd love to help!
Hello friends! Long time no talk! Things have been ca-razytown over here recently and I've hardly had time to breathe, let alone post on the blog. Between my husband finishing up his semester and graduating with his MBA this weekend (I can't believe how quickly two years have gone!), a bunch of traveling, things ramping up with Mix & Match, and heck, just life, I've had to pick and choose where to spend my time and sadly, blogging didn't made the cut. I've still been pretty active on Instagram though, so if you want to catch me in between posts, you can follow me over there.
But! Some big news in my life is that as of the end of this week, I'll be full time with Mix & Match! Yep, I'm quitting my day job to pursue my e-design business and I couldn't be more excited. I'll have more on that in a separate post soon, but what that means for y'all is that you'll probably be seeing more interior design-focused posts - hope you're ready!
Big stuff, friends, big stuff.
Now, speaking of e-design, I've got a really fun project going on for a new client, and she was kind enough to give me permission to share the inspiration, plan and, fingers crossed, after photos once everything's installed. Since e-design is all done online and installed by the client, I don't always get to see the final product, so this is a real treat.
My client and her husband happen to also be great friends of mine and they're transitioning from a small one bedroom in the city to a larger two bedroom apartment in the suburbs. Since they're gaining a bedroom, they decided to put their current furniture in the guest bedroom and start with a clean slate in the master bedroom. I was thrilled when they asked me to put together a plan for that space!
The look they're going for is modern farmhouse with a touch of industrial. It definitely has Fixer Upper vibes and it's going to be beautiful!
Here are some of the photos she shared with me as inspiration:
{Sources: clockwise from top left: 1 | 2 | 3 | 4 | 5 | 6}
What I pulled from these photos was a primarily blue and white theme (with a little bit of green) mixed with warm wood tones. There's also a lot of great texture going on with both the textiles and furniture. It'll definitely be a cozy and inviting space.
Here's the design board I came up with based on these ideas:
What do y'all think? Is this look up your alley?
Another fun treat with this project is that I get to share many of the sources! You can shop the post for the items below:
(*affiliate link used - I earn a small commission for your purchase, but your price doesn't change. Thanks for supporting May Richer Fuller Be and Mix & Match in this way!)
I can't wait to share the progress on this project with you. They'll be up and running in their new place later this summer, so I should have photos to show you then!
I think the next project I'll be sharing is from the e-design giveaway I wrote about a couple of months ago. The winner was a dining room that was just begging for a makeover! That project is coming along too - more soon!
After one post on the progress we've made in our master bedroom and another on the guest bedroom, the topic of headboards sure has come up a lot recently. I think a headboard is a vital part to making a bedroom look put together and "finished," and it's driving me crazy not having the right one for our master and not one at all (gasp!) in the guest bedroom. I hope to remedy that situation soon and I've been going back and forth between DIYing another headboard and buying one.
I've DIY'd several headboards in the past and it can be a pretty quick and straightforward process if you keep the design simple. An added bonus is that you get to choose your fabric, making it a completely custom piece. Y'all seem to be into making your own headboards too, considering that the one I made that's currently in the master is one of my most popular posts ever!
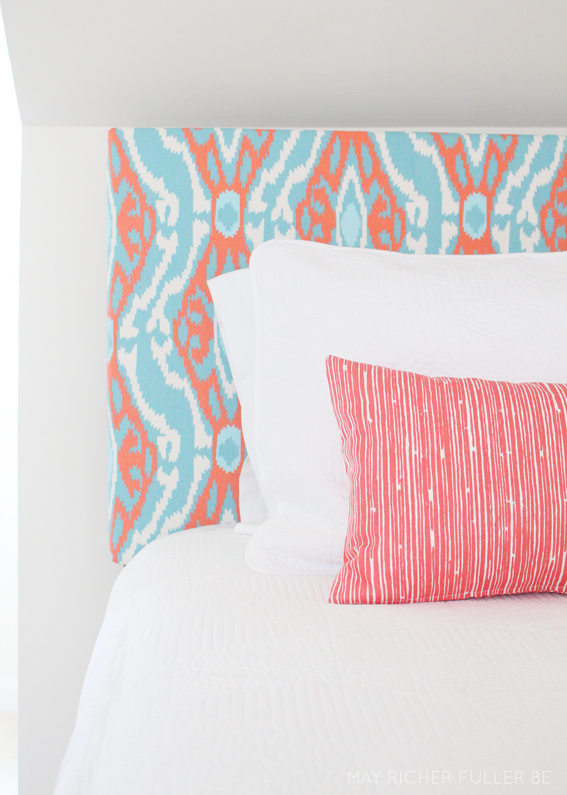
In other headboard-making adventures...last summer, rather than DIY from scratch, I cheated and bought two very inexpensive ones from Walmart and reupholstered them in an adorable patterned fabric for a room in my parents' river house (read all about that here and see the finished room here). Boy, was that project a breeze!
This time around, I'm toying with buying a new one for our master that's ready to go right out of the box, but the DIYer in me is protesting a little at that idea :). To appease my DIY side, I'm probably going to reupholster the one in the master and move it to the guest bedroom.
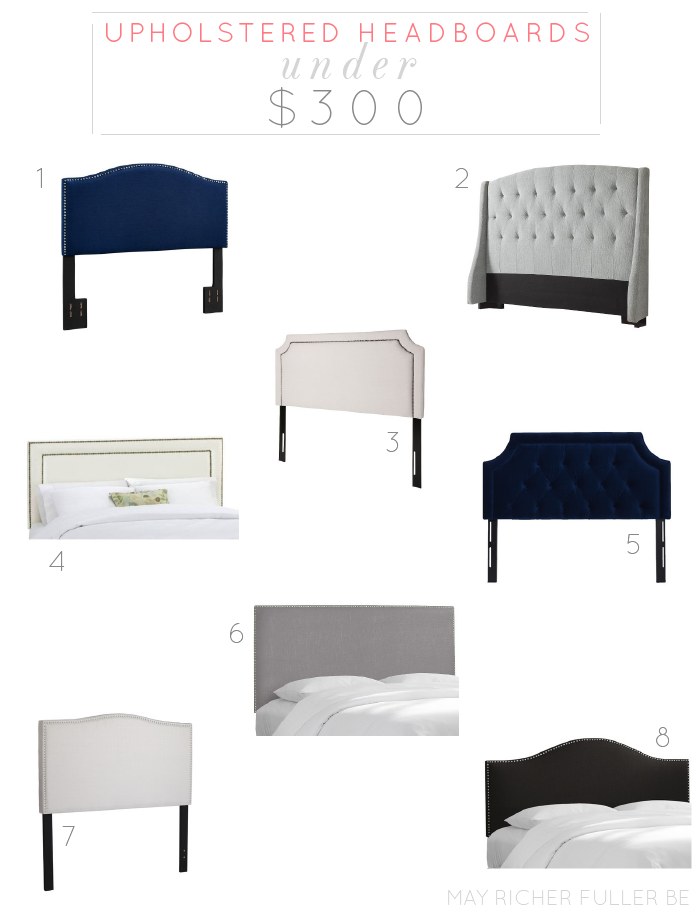
So! Where do we go from here? Find some upholstered headboard options, of course! As per usual, I'm always trying to keep things on a reasonable budget, so I started to take a look at what my options are for upholstered headboards under $300. There are a surprising number of good lookin' ones out there in that price range. Check these out:
I'm going to mull these options over for a bit and I'll be sure to keep you updated on the decision! Thanks for letting me brain dump here on headboards today. It's kind of fun to share my thought process on "house stuff" every once in awhile!
It's time to share more progress on our Philly Row House today, folks! I'll cover the rest of the upstairs, which includes the guest bedroom and my office. Upstairs there are three bedrooms and a bathroom, and I talked about the master bedroom last week. Check that out here.
We made the middle bedroom into the guest bedroom and it's a pretty little cozy space if I do say so myself!
The bed is in need of a headboard (I may snag the one that's in the master bedroom and make a new one for that room) and I'm debating what to use in here for bedside tables, but I'm happy with how it's coming along. It feels a bit more traditional than my style leans these days, but there's plenty of time to remedy that!
I love that old chest of drawers - it's a piece we inherited from my grandparents and it is a beast. They just don't make 'em like that anymore.
I can't wait to add some finishing touches to this room over the coming months!
Now, onto the office, which is where I spend the majority of my days :).
If you've been following the blog for awhile, you're probably having deja vu because I pretty much just transplanted it from our old house, but now I have more than double the square footage. You might remember how tiny my office was (which wasn't an issue - I'm just telling it like it is!) and now half of this room is empty. I don't know what to do with all that extra space, ha! We're thinking of making that spot into a mini sitting area, but we'll see...
Anyway, my desk is under the back window, and the only other piece of furniture is a bookcase.
It's a great space, and as I've said about every space in our house so far, I can't wait to continue making progress on it!
In the next Philly reno update, I'll show you how we're doing downstairs. It's come a long way too!
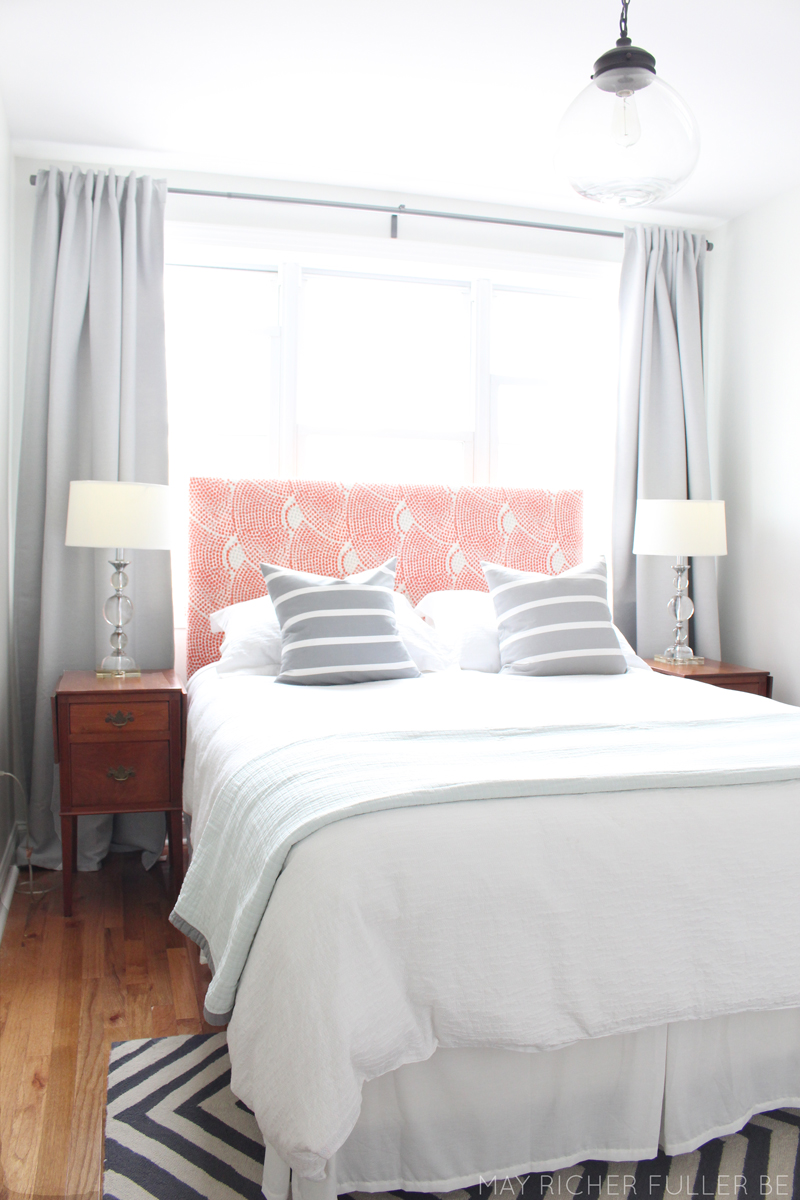
Let's debunk the design myth that beds should never go in front of windows. Yes! You can pull it off! I did it, and you can too!
I mentioned at the end of Monday's post that I would share some examples and I have some great ones to show you today, but let's talk about the "why" first. Furniture placement is so important to the flow, function, and look of a room, and sometimes doing something that might seem a little unconventional ends up working best.
Typically, beds are positioned against walls, right? Sure, but what if your bedroom is small (hello city living!), every wall has windows (not a bad problem!), or if it just feels right? Then it might be time to break that rule and push that bed up against the windows. To make it feel less awkward and purposeful, frame the bed with curtains or other window treatments, choose a headboard (or don't) that you love, flank the bed with pretty side tables, and hang mirrors if you can. Don't forget to hang those curtains high and wide, friends! When done well, all of a sudden, that bed under the windows becomes the beautiful focal point and you've got yourself a winner of a bedroom.
Let's take a look at some of the pretty examples I grabbed from around the web:
What do you think? Are you on board with putting your bed in front of the windows? If you've done it, I'd love to see!
If you need help making your house into a home you love, give me a shout! I offer affordable and approachable e-design services over at Mix & Match Design Company!
Happy New Year, y'all! I hope you've had a good start to 2016 so far. We spent the last 2.5 weeks traveling for Christmas and New Year's and I'm eager to get settled back in at home again and share some of the progress we've made on our row house in Philadelphia. So much has happened! I didn't mean for there to be such a long hiatus between progress posts (oops), but with the holidays being so busy I decided it was just fine to hold off.
How about we kick off the new year with the master bedroom progress? Since I left you with a teaser of it in my last post, that's probably a good place to start. Here's what it's looking like currently:
If you remember the before and real estate photos, you might recall that this room was, for lack of a better word, poop brown, and had the same wall-to-wall carpet as the rest of the house. We ripped that carpet out, installed beautiful new hardwood floors, painted the walls and trim, and moved on in.
This room has a lot of wall bump-outs (making it almost cross-shaped), and therefore furniture placement is a little tricky. After starting with putting the bed on the left wall, which is where the previous owners had theirs, we quickly realized that best place for the bed was actually under the windows.
Don't be scared to put the bed under the windows, friends! It's totally ok! I'll be showing you some great examples of that in my next post.
Having the bed under the windows made the room feel so much more open, and it helped with the "flow" of the room giving us easy access both sides of the bed, closet and dresser.
I absolutely love this light fixture we put up (it's from Lowe's - the full source list for this room is at the end of the post). It was the first fixture I picked out for the house and it's a great focal point for this room.
The dresser fits perfectly along the left wall (that's where we put the bed originally).
The closet is on the wall opposite the bed and - amazingly - fits all of our hanging clothes! I did a major closet clean-out before we moved and I think that helped :). I would love to put some sort of closet organization system in there at some point, but we're happy with the amount of space it gives us!
I'm thrilled with how well this room has come together so far. The only new items we purchased for this room are the long curtain rod and the light fixture. Everything else we had before. I have a running list of projects for this space in my head (and every other room in the house, ha!), but I'm trying to take things one day at a time and live in it for awhile before making any big decisions.
One project that I'll probably tackle sooner than later is a new headboard. Since the bed is in front of the windows, I want something that's a little shorter to let as much light in as possible and not block the windows as much. It'll probably be another upholstered headboard, but we'll see! The other one will likely move to the guest room.
That's about it for today! Let's take one last look at the master...
Hope you enjoyed seeing the progress on this room!
It's Monday! You know what that means, right? Time to launch the next set of in-stock design boards! This week, it's bedrooms, and I LOVE each of these.
In-stock design boards give you a custom look at an affordable price ($75). They come in several different styles and will provide all the basic pieces for a room. What you see is what you get! If you want direction on how to make a room into a place you love, but crave simplicity, purchasing an in-stock design board may be a great alternative to the full room design board package.
Once you purchase, you will receive a copy of the design board with a visual representation of the items and a source list so you can easily purchase the items and install them yourself on your own time frame. The approximate cost for the items on the board is listed at the top of the board. No custom sourcing is available for these boards.
You can also use a board and the source list as a jumping off point and add your own touches to the room!
I currently have three bedroom in-stock design boards available for purchase:
To purchase a board, go to this page and select the "In-Stock Design Board" option from the drop down menu. Follow the checkout process, and you will receive an email from us within 24 hours asking which board you would like to purchase and we will send you the source list.
Fine print: This source list is for personal use only and should not be distributed or shared. Some sites add additional state sales tax and shipping - this is not included in the quoted prices. Prices and sales/discounts are meant to be representative at the time the document was sent and are subject to change. Subject to availability.
In the epic battle between the master bedroom and office, it looks like the master bedroom won for being the most photo-ready this week. That means I have a house update I can share with you! Things are lookin' much better in there since the last time I showed it to you, so let's take a peek, shall we? I've made a few changes and there will be more to come, but here's where we are:
The main changes are that I hung three framed vintage egg prints and got our Ikea Ranarp clamp lamps up and running as bedside sconces (remember when I showed them to you here?). These small things have made such a difference.
Welcome to my spring home tour! This week I've teamed up with 13 other bloggers for a spring parade of homes and I could not be more excited to share ours with you today. We are packing up and moving out of our itty bitty city apartment in three weeks, so I was glad to have an excuse to snap a few photos of it before we move onto our next adventure (sniff! we'll miss this place!).
First off, let's take a peek at the living room:
I'm not much for seasonal decorating, but I do like to mix up accessories and restyle things throughout the year. This room is a mix of old and new, which I love. Several pieces were inherited from my grandparents (like the end tables, rocking chair and the larger wood piece by the TV), but the couch, chair and sofa are new.
Pillows are an easy way to freshen things up, and I sewed up the yellow ones you see here out of some remnant Marimekko fabric from Crate and Barrel (they're envelope style pillow covers) and bought the gray and white striped ones from H&M. (I rounded up a bunch of my favorite H&M pillows in this post not too long ago if you're in the market for some inexpensive ones!)
Yellow and gray are a recurring theme in the living room this season!
I restyled our built-in bookcase for the first time completely since we moved in nearly two years ago. Crazy! For someone who likes to change things around, I can't believe I didn't touch this until now ;).
Simple and clean was the name of the game on these shelves. I cleared out a lot of the books and added in some art, photos and accessories. See those book letters up there? I received the W as a gift and made the C myself, but let me tell you something - those books are HARD to cut! Maybe I used the wrong tool? (A jigsaw?)
Those ram head book ends belonged to my parents. My mom was going to sell them in a yard sale, but I gladly took them off her hands. Aren't they fun?
The tissue paper tassel garland was an easy DIY I shared last week. I might be addicted to tassel-making now. Watch out.
If you turn slightly to your right from the built-in bookcase, you'll see where I added a little more color on top of my grandparents old jelly cupboard. I talked about those blue bottles and showed you how I made a fun arrangement for tulips with them in Monday's post, so if you're in the mood for some pretty flowers, head over there next!
The pleated fabric wreath was a fall DIY, but I think it fits nicely with spring decor as well.
Now moving on to the other room in the apartment (literally, we only have two rooms and a kitchen!) - the bedroom! This room already feels light, bright and springy, so I didn't do much anything to it except add some flowers to the bedside table ;).
Hope y'all enjoyed this little spring tour of our home! Thanks for letting me share it one last time before we ship off to Philadelphia this summer.
Don't miss the tours from the other lovely bloggers this week, including Jenna from Rain on a Tin Roof today! All the links are listed below by day. One more day to go tomorrow!


