Showing posts with label interiors. Show all posts

9.19.2016

Philadelphia Suburbs Modern Farmhouse Bedroom Reveal


It's reveal time, y'all!

You may remember when I shared the design plan for this modern farmhouse master bedroom in the Philadelphia suburbs a few months ago and I'm excited to show it to you today in its completion! This project was a blast to pull together, and I was thrilled that it was local so I could go snap some photos on a beautiful Sunday afternoon a couple of weeks ago.

My clients, Courtney and Kit, were going through some big transitions this summer including a move  from a tiny one bedroom apartment in the city to a two bedroom in the suburbs and both starting new jobs, so the last thing they wanted to do was figure out how to furnish their bedroom. That's where Mix & Match stepped in to help - I created a design plan and then all they had to do was purchase the items and install them in their new home.

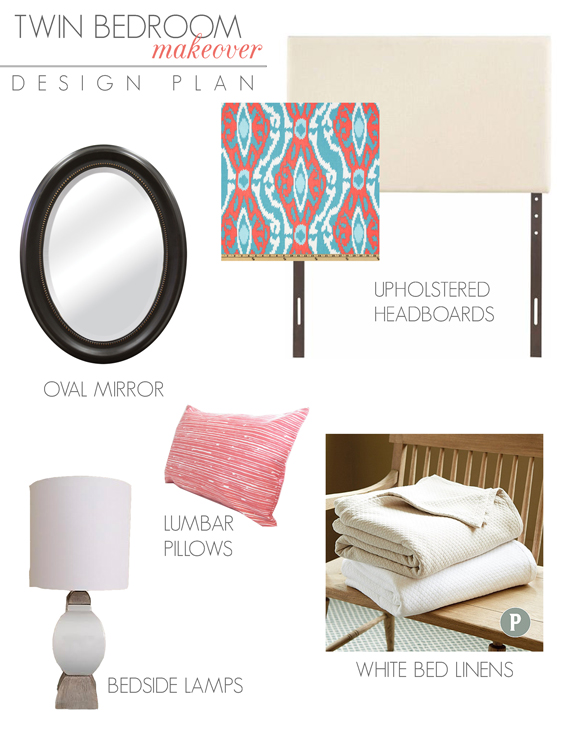
Here's what the final design board looked like:
And here's the finished room!


To see more photos and read more about the process, head on over to the Mix & Match blog. That's where I'll be sharing full e-design project reveals and more. You can also follow Mix & Match on Instagram in between posts for more design goodness!

If you or someone you know needs interior design help in their home - whether a big project or small - feel free to contact me. I'd love to help!


Enjoy what you read today?  Enter your email address below to subscribe to May Richer Fuller Be!  Delivered by FeedBurner

Pin It!

4.13.2016

Must-Have Decor: Round Brass Mirrors

{via Amber Interiors}
Round brass mirrors are definitely one of the most versatile decor items you can have in your home. Its clean lines and warm metal finish make it a classic that fits just about every style: mid-century modern, boho, traditional, hollywood glam and more. And, bonus, there's a place for one in most any room in your house. You can't say that for many pieces of decor, can you?!

To show you how pretty and versatile these mirrors are, I pulled the best examples I could find from around the web. I hope you enjoy browsing these, and if you make it to the end of the post, I've got a little surprise for you in the form of a very affordable option that I just purchased for our house!  

{via Becki Owens}
Mirrors have the ability to make a room look bigger and brighter, especially when there aren't any windows nearby. The living room above and entryway below are great examples of that.

{via Architectural Digest}
They also work well as a nice, polished touch of decor over beds. How fun are they in this twin bedroom below?

{via Birmingham Home and Garden}
{via West Elm}
Mantles are another piece of prime real estate for these mirrors. The roundness balances out and softens the sharp edges and angles of the mantle nicely.

{via Maggie Stephens Interiors}
{via A House in the Hills}
So what do you think? Are you sold on adding one of these to your home? Or do you already have one? Where?

Alright friends - hooray! You made it to the end of the post, and here's your promised surprise: Target recently came out with 28" round brass mirror for - wait for it - $49.99. If you're not on the hunt for mirrors regularly, just know that's a crazy good deal (especially for a good sized mirror). For comparison, the next cheapest option I've found is $249. Run, don't walk, to Target for this one! #targetdoesitagain

Check it out below:

{via Target*}

*Affiliate link: That means I get a small commission for your purchase, but it doesn't change your price. Thanks for supporting MRFB!

Enjoy what you read today?  Enter your email address below to subscribe to May Richer Fuller Be!  Delivered by FeedBurner

Pin It!

2.29.2016

Small Bathroom Makeover: Before & After with Modern Masters Paint


{Note: Modern Masters provided the lovely matte metallic brass paint for this project, but as always, opinions are 100% mine.}

Oh, how far we've come! 

When we purchased this house, its only bathroom was painted not one, but two shades of purple (yikes). It had good bones though, so I knew all it needed was a little paint to freshen it up. In December, I got rid of the purple, but was at a bit of a loss for what to do next. Here's where we stood once the walls and beadboard got a few coats of Benjamin Moore Winter White and Behr Ultra Pure White, respectively.


A little bland, but much better than purple!

Then, in January, I got an email from Regina at Modern Masters asking if I was interested in reviewing a couple of their paint products. Of course! I said immediately :). I had heard about Modern Masters several times through reading posts from other bloggers, so I was excited to try some of their paint myself. Though I had several projects in mind, I ended up zeroing in on the bathroom - this paint was just what I needed to start tackling this space!

I requested some of their Matte Metallic paint in Brass and boy, is this stuff awesome. I decided to paint the bathroom medicine cabinet mirror to make it the focal point of this small bathroom. I'm really loving mixed metal finishes in spaces like kitchens and bathrooms, so introducing a brass mirror to a bathroom with chrome fixtures was a great opportunity to add that idea to our home.

The mirror can't be detached from the medicine cabinet so I painted it in place. After a light sanding, I used a regular angled paint brush (this one from Purdy* is my favorite) to paint three coats onto the white mirror (I followed the directions on the container regarding drying time between coats).


Here it is after one coat...


Two coats...


And three coats...


This paint goes on like butter and after three coats, it looked like a solid brass mirror - no one would know it's actually dinky plastic under there (shh!). I was really amazed at the coverage and that there were no visible brushstrokes. Thin, even coats are the way to go. I'm also a huge fan of the matte finish. It's timeless and won't ever be mistaken for bad shiny lacquered brass from the '80s. ;)

Here's the finished product!


You might have noticed that I got a bit of paint on parts of the mirror as I went along, but not to worry - that was easily remedied after it dried. I just scraped it off with my fingernail or a flat piece of plastic like a credit card.

I am thoroughly impressed with this paint and can't wait to use it on some other projects! I want to #mattebrasseverything. We can make that hashtag a thing, right?

Here's a wider shot of the whole bathroom. It might be pretty tiny, but it's becoming quite mighty!


Once I finished painting the mirror, I was thrilled with how much that changed the whole look of the bathroom, but I knew I could take it up another notch. As you saw from the photo at the beginning of this post, the upper part of the wall didn't stay plain ole Winter White - I brought in some more paint and made one other small change to the sconces. These updates, plus the newly brassed-out mirror have absolutely transformed this bathroom, but I'll save the details of that for later this week. For now, I'll leave you with a teaser photo!


A couple more note notes on the Modern Masters paints before I sign off for today: the kind folks over there also sent me a container of Pale Gold from the Metallic Paint Collection that I didn't use with this project, but did in another that I can't wait to show you soon. Thank you, Modern Masters!

If you'd like to try some of the Brass Matte Metallics Paint (that I've now fallen in love with) or any of their other products, head over their website where you can look up retailers in your area or order online. You can also find them on social media to check out other projects folks have done using their paint. Here are the links to their FacebookPinterest and Instagram accounts for starters.

Have a great start to your week, y'all!


*affiliate link (That means I get a tiny cut of the price of the item if you buy the product using my link. I appreciate your support of this little blog!)


Enjoy what you read today?  Enter your email address below to subscribe to May Richer Fuller Be!  Delivered by FeedBurner

Pin It!

6.29.2015

Oriental/Kilim Rugs in the Bathroom - Yay or Nay?


{The Socialite Family}
One trend that's caught my eye lately has been the use of oriental or kilim rugs in bathrooms. These beautiful flat-woven rugs can add a lot of punch and style to an otherwise pretty neutral space. They're mighty fancy for a bathroom though, right? (But maybe that's the point!) They mix beautifully with a lot of different styles - modern, traditional, shabby chic, farmhouse...which makes them quite versatile. I'm not sure I'm totally sold on the look, but I did find some beautiful examples to share with y'all.

What do you think? Would you use a kilim or oriental rug in your bathroom?

{Tessa Neustadt}
{House Beautiful}

{Tessa Neustadt}
{Design Sponge}

{Houzz}

{Tessa Neustadt}
{Garden and Gun}
{The Shingled House}


Enjoy what you read today?  Enter your email address below to subscribe to May Richer Fuller Be!  Delivered by FeedBurner

Pin It!

5.28.2015

River House Twin Bedroom Makeover {Before + Design Plan}

Over the next couple of weeks, I'm going to be tackling a bedroom makeover at my parents' river house. One of the upstairs bedrooms is in need of some color and style, and my mom has given me the go ahead to take on the project. She's my partner in crime on this one and we've already had a ton of fun putting together ideas and getting our supplies together and making selections on beds, lamps, etc. I'm so excited to get started!

I thought it would be fun to share the makeover in "real time" starting with the before photos and design plan today, an update or two along the way, and then a final reveal when we finish. Ready to see the see the room?

The upstairs of this house has two bedrooms: one with a queen bed and one with two twins. The second floor has some tricky angles due to the roofline and dormers making space planning a challenge.


The only good place for the beds is where they are now under these dormers. The twin beds snuggle in nicely there though, so that's good!


It's a fairly large room, but with those tricky angles it's a little tough to "fill" the space well. One thing this room has going for it right now though is the incredible natural light it gets from a skylight and a window. During the day, you don't have to turn lights on up there, which is amazing, don't you think?


All in all, it's a very functional room, but it's time to infuse some color!


The plan is to try to use some of the existing pieces and shop the house to keep it budget-friendly, but we're adding several new pieces as well. Those honey-colored wood beds (they used to be my brother's bunk beds when he was a kid - that's the reason they're different heights) are being replaced with some awesome upholstered headboards I'm DIYing. There will be new bed linens and table lamps as well. I'll have more details on the specifics of what we chose for the room once we get a little farther along in the project, but for now, here's the design plan for the space:


We've already ordered nearly everything for the project and now the hardest part begins - waiting for it all to arrive. I've still got a few items to source, but I think we're in good shape so far. Stay tuned for updates over the next couple of weeks!


Want to see more of the river house and the projects I've done here? Try these posts!


Enjoy what you read today?  Enter your email address below to subscribe to May Richer Fuller Be!


Delivered by FeedBurner

Pin It!

9.10.2014

Simple and Budget-Friendly Fall Decorating Ideas


We've had a couple of cooler days here in Philly and with football season in full swing, I'm finally willing to turn a little bit of my attention to the season that's now upon us: fall. As I've said before around here, I heart summer like, big time, so it's hard for me to let go :). Once fall arrives, I do love it too - it's a big adjustment for me, haha. Anyway, I'm not a huge seasonal decorator, but I do like to add in some season-appropriate elements around the house when that change comes. Seasonal decorating doesn't have to be super involved, nor does it have to be expensive. A few budget-friendly elements here and there are all it takes.

When it comes to fall decorating specifically, your house doesn't have to look like you planted an orange pumpkin patch all over it (unless that's your thing, of course) and it doesn't have to scream halloween either. There are lots of little ways you can make things feel more like fall in your home and I've got a few for you to consider today. Feel free to add your ideas to this list in the comments section!

First up, cozy things up with texture and natural elements.

I love these birch bark-wrapped candles and woven pumpkins that Four Generations One Roof added to her dining room table.


It doesn't get any simpler than throwing some pinecones, tree branches and white pumpkins into a tall, clear vase and putting it on a side table, buffet or entryway console. No fancy styling tips needed!


Baskets are something you probably already have and fit in beautifully with fall decor. Texture like that just feels like fall, don'tcha think?

Take this photo for example. It doesn't scream fall, but can't you see it in a room with a fireplace and a warm cup of coffee? Cozy.


Here's another great example of incorporating a basket into your decor along with some other natural elements:


Make a fall wreath for your front door a la this corn husk wreath from At the Picket Fence.


Or how about this dyed coffee filter one?


Haul out those blankets from the deep, dark corners of your closet and put them on display. DIY yourself a blanket ladder for them, or find one at a flea market or thrift store like this one below. I've seen these ladders all over the place lately! Or you can keep it simple and just put them in one of those baskets like the photos above :).


Add in some new art around the house. You can make this chalkboard poster art for $4! Talk about cheap thrills.


Another easy idea? Sketch something fall-related on a piece of stained wood. It's simple, rustic, and probably takes about 30 minutes of work (unless you're indecisive like me and can't decide what sketch).


If you've got a mantle, decorate it! Play around with some different fall-related accessories like candles, tree branches, pumpkins, gourds and wreaths. Shop your house, and don't feel like you have to only use things you'd see in the fall section at Target (though, man, they've got some good stuff right now). I'll bet you could find plenty of things in your house and not spend a dime on "fall decor."

Here are 12 ideas to get you started:


Oh wait a sec...25 more...

...and I'd better stop with that. I could go on all day! What are you doing to decorate for fall?

Pin It!

3.27.2014

Decorate For Spring {Without Breaking the Bank}


{BHG}

Ah, spring. The time when nature starts to come alive again, people emerge out of hibernation mode, and a certain cheeriness starts to seep in. When winter finally (finally!) starts to let up and temperatures rise, I can't wait to first, get outside and enjoy it, and second, infuse a little springiness into our home.

Spring has me craving pops of color in almost any form - even with food labels in the kitchen (see the example above?). I wouldn't exactly classify myself as a seasonal decorator, but I do like to change things up around our home periodically. This year, winter had me loving a neutral, calm palette with lots of whites and subtle metallics. Now it's time to bring back the color! I'm sprucing up our house a bit so I can take some photos for a spring house tour that's coming up in a couple of weeks (details to come! It's going to be a whole lot of fun and a whole lot of eye candy...).

Here's my take on "spring decorating": there's no need to drastically change anything in your home to bring in that feeling of freshness that comes with this new season. To me, it's more about changing up the smaller things in your home like accessories, pillows, art, etc. You might not even need to make any purchases - dig through those drawers, raid your fabric stash, and check what you have in storage to make those little changes. I'm all about using what you have! This is how you can decorate seasonally without breaking the bank. Get creative!

I've got four ways to jump start your spring decorating if you're in the mood to make a few small changes around your own home:

Paint something!

Is there something in your home that is looking a little tired and could use a makeover? Instead of getting rid of it, try painting it! Small pieces of furniture can go big on color without overwhelming the room. They're also quick, do-it-in-one-afternoon projects. A great example is this chair in the photo below. Why not make it pink? It's a perfect pop of color for this entryway.

{BHG}


Bring the outside in!

Whether it's real or not-so-real (like paper flower branches), bringing plants, branches or flowers into your home is a natural (punny!) way to welcome spring. I even made a special trip to Trader Joe's last week to pick up some tulips, and I can't tell you how happy they made my home feel. It's the little things :).


{BHG}

P.S. Where do I find some of those awesome palm branch thingies?!

Pillows!

Pillows are one of the most affordable and fun ways to change a room. You can go as trendy as you want and step outside of your comfort zone since they're something you can easily change out once you get tired of them. Your wallet won't be too mad at you, promise :). I rounded up some of my favorite pillow finds at H&M a few weeks ago if you're in the market for some new ones - it's a super inexpensive source for fun pillows.


(Yep, I'm counting floor poufs as pillows ;) )


Change up the art!

Especially abstract art. This is another affordable way to add color to your home. Grab a canvas at a craft store (with a coupon of course), a few paints from your stash (I know you have one...) and go to town. You really can't go wrong here. My only piece of advice? Don't get overzealous with your paint mixing or your canvas will end up being a muddy brown mess.


Or, if you're feeling less than confident about your painting skills, frame up some new art. Change up what you have in existing frames with free printables, magazine tear outs, or inexpensive art from Etsy. The possibilities are endless! I love the gallery wall in the photo below.


That's all I've got for you! I hope you're feeling inspired and ready to change up your home a bit for the spring season. Now enough inspiration hunting...I've got to get down to decorating!

---------


Pin It!
Related Posts Plugin for WordPress, Blogger...
Blogging tips