Showing posts with label interior design. Show all posts

11.10.2016

Join Me at Mix & Match Design Company!


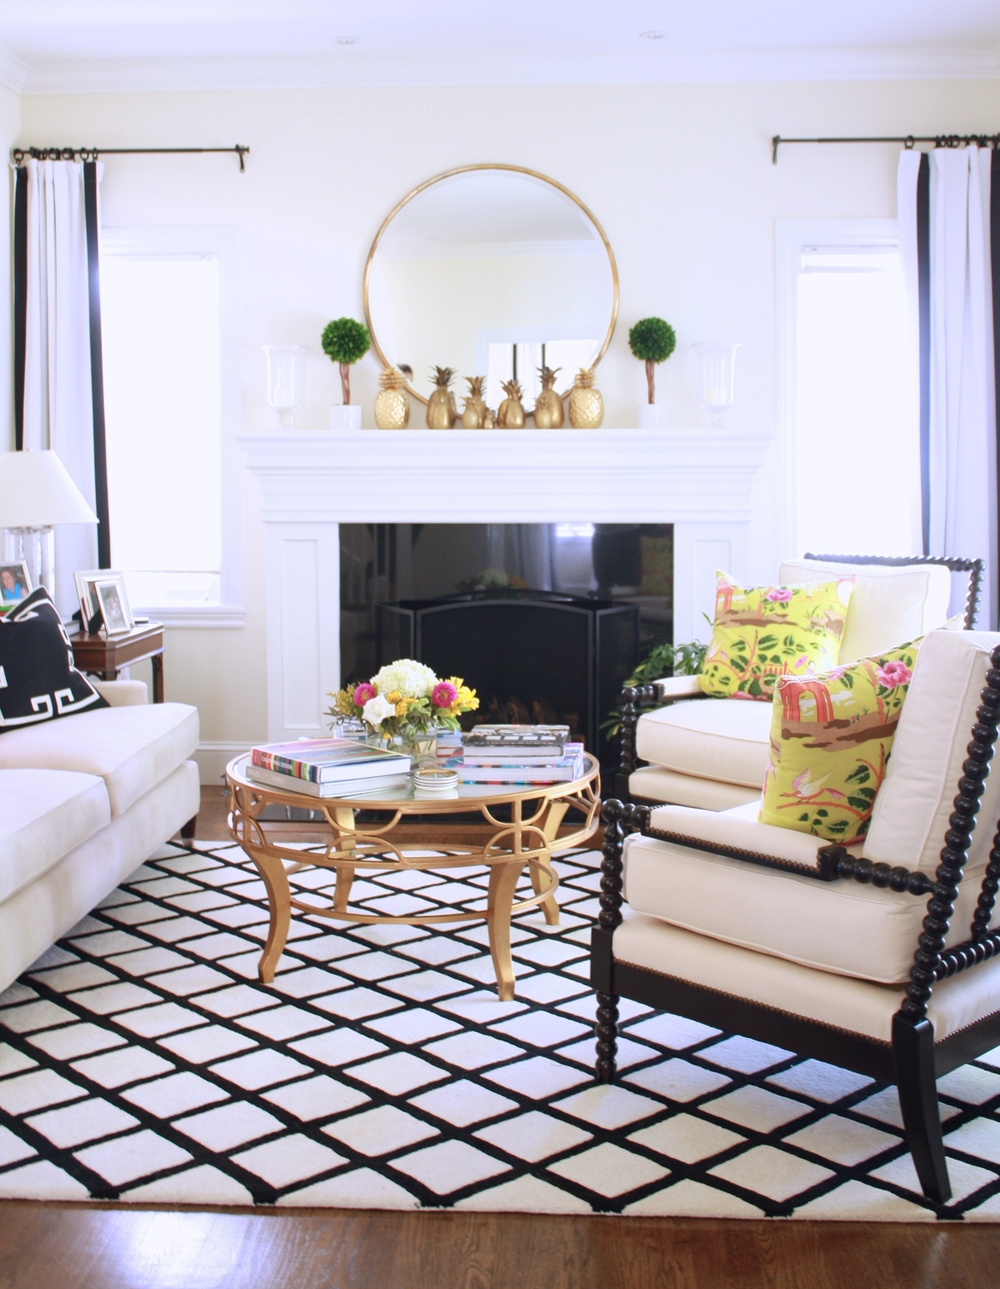
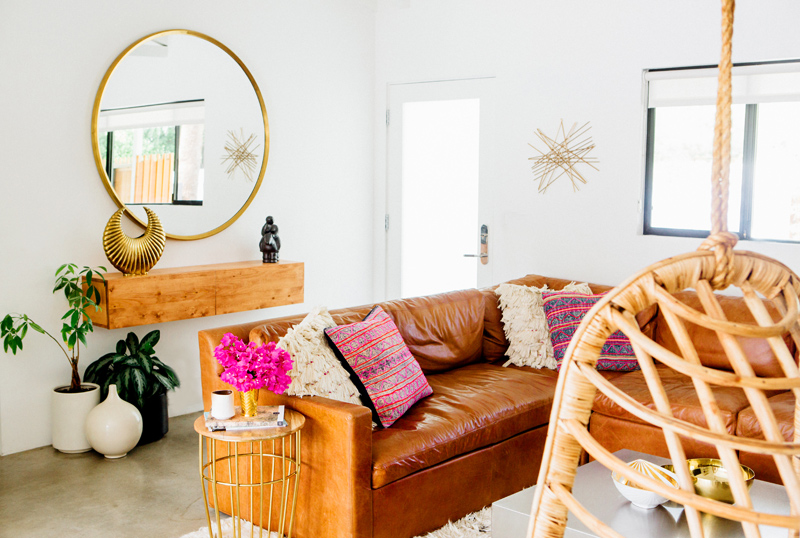
Hello, friends! Today will be the last post on May Richer Fuller Be, but don't worry, I'm not going away. :) Since going full time with my e-design business this summer, I've devoted all of my time and energy to growing it, and I would love it if you joined me over at Mix & Match Design Company! I blog about all things interior design and decorating, and it's where client project reveals are too. Yesterday, I posted a great gift guide for your Thanksgiving Host/Hostess - this year, show your appreciation to them for opening their home by bringing something a little more creative than a bottle of wine (though that's always welcome in my book!).

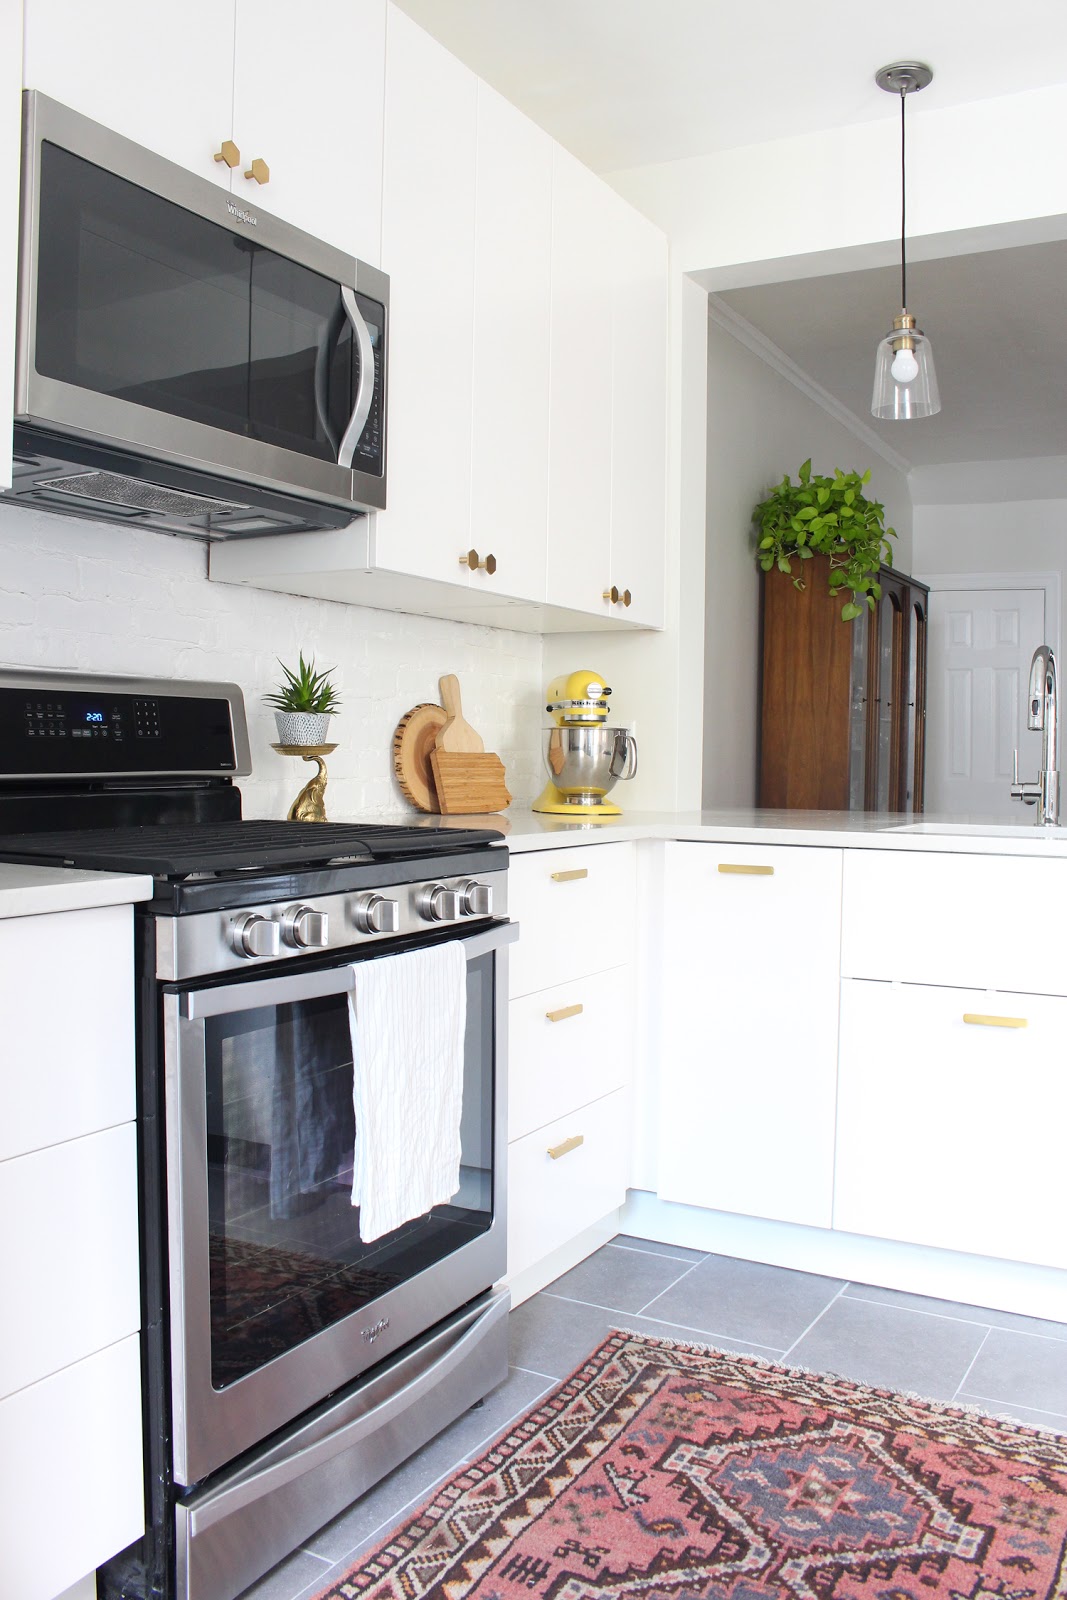
And if you've been waiting for the kitchen reveal, you're in luck, because it's over there in all its before and after glory! Our IKEA kitchen turned out even better than I could have imagined, and I'd love for you to pop over and see it.


These past four years(!) at May Richer Fuller Be have been incredibly formative, and have given me the chance to grow in more ways than I can count. Writing here gave me the confidence to start my business, and it's been such a joy to pursue something that I love so much. Thank you for your support here - it means the world to me, and I do hope you'll follow along with Mix & Match!

Here are three easy ways to do that:
  • Follow Mix & Match on Instagram
  • Subscribe to the blog: Enter your email address  (Delivered by FeedBurner)
  • Like Mix & Match on Facebook
Thanks again, friends, and I hope to see you around the new blog and social media soon. Don't be shy in saying hello and letting me know you're coming over from MRFB!


Enjoy what you read today?  Enter your email address below to subscribe to May Richer Fuller Be!  Delivered by FeedBurner

Pin It!

9.19.2016

Philadelphia Suburbs Modern Farmhouse Bedroom Reveal


It's reveal time, y'all!

You may remember when I shared the design plan for this modern farmhouse master bedroom in the Philadelphia suburbs a few months ago and I'm excited to show it to you today in its completion! This project was a blast to pull together, and I was thrilled that it was local so I could go snap some photos on a beautiful Sunday afternoon a couple of weeks ago.

My clients, Courtney and Kit, were going through some big transitions this summer including a move  from a tiny one bedroom apartment in the city to a two bedroom in the suburbs and both starting new jobs, so the last thing they wanted to do was figure out how to furnish their bedroom. That's where Mix & Match stepped in to help - I created a design plan and then all they had to do was purchase the items and install them in their new home.

Here's what the final design board looked like:
And here's the finished room!


To see more photos and read more about the process, head on over to the Mix & Match blog. That's where I'll be sharing full e-design project reveals and more. You can also follow Mix & Match on Instagram in between posts for more design goodness!

If you or someone you know needs interior design help in their home - whether a big project or small - feel free to contact me. I'd love to help!


Enjoy what you read today?  Enter your email address below to subscribe to May Richer Fuller Be!  Delivered by FeedBurner

Pin It!

7.28.2016

One Good Thing: Throw Pillow Combinations


A new series started this week over on the Mix & Match (my e-design biz) website's blog called "One Good Thing" where I share a favorite quick design tip or trick. I figured a lot of y'all over here might appreciate the post since this week's topic helps solve a common decorating conundrum: how to mix throw pillow patterns so they look cohesive. I put together five super combos to help show you how to mix patterns.

You'll have to head on over to Mix & Match to see the full post, but you can check out a preview of the combos below!


I've got lots of ideas up my sleeve for other posts in the "One Good Thing" series, but if you have any suggestions, I'm all ears! Feel free to leave a comment on the Mix & Match post or email me at chaney@mixandmatchdesign.com.


Enjoy what you read today?  Enter your email address below to subscribe to May Richer Fuller Be!  Delivered by FeedBurner

Pin It!

5.10.2016

E-Design Project: Philadelphia Suburbs Master Bedroom Plan


Hello friends! Long time no talk! Things have been ca-razytown over here recently and I've hardly had time to breathe, let alone post on the blog. Between my husband finishing up his semester and graduating with his MBA this weekend (I can't believe how quickly two years have gone!), a bunch of traveling, things ramping up with Mix & Match, and heck, just life, I've had to pick and choose where to spend my time and sadly, blogging didn't made the cut.  I've still been pretty active on Instagram though, so if you want to catch me in between posts, you can follow me over there.

But! Some big news in my life is that as of the end of this week, I'll be full time with Mix & Match! Yep, I'm quitting my day job to pursue my e-design business and I couldn't be more excited. I'll have more on that in a separate post soon, but what that means for y'all is that you'll probably be seeing more interior design-focused posts - hope you're ready!

Big stuff, friends, big stuff.

Now, speaking of e-design, I've got a really fun project going on for a new client, and she was kind enough to give me permission to share the inspiration, plan and, fingers crossed, after photos once everything's installed. Since e-design is all done online and installed by the client, I don't always get to see the final product, so this is a real treat.

My client and her husband happen to also be great friends of mine and they're transitioning from a small one bedroom in the city to a larger two bedroom apartment in the suburbs. Since they're gaining a bedroom, they decided to put their current furniture in the guest bedroom and start with a clean slate in the master bedroom. I was thrilled when they asked me to put together a plan for that space!

The look they're going for is modern farmhouse with a touch of industrial. It definitely has Fixer Upper vibes and it's going to be beautiful!

Here are some of the photos she shared with me as inspiration:

{Sources: clockwise from top left: 1 | 2 | 3 | 45 | 6}

What I pulled from these photos was a primarily blue and white theme (with a little bit of green) mixed with warm wood tones. There's also a lot of great texture going on with both the textiles and furniture. It'll definitely be a cozy and inviting space.

Here's the design board I came up with based on these ideas:

What do y'all think? Is this look up your alley?

Another fun treat with this project is that I get to share many of the sources! You can shop the post for the items below:

Upholstered Bed* | Nightstand* | Lamp* | Dresser* | Curtains | Mirror | Trunk* | Rug | White Sheets* | Navy Duvet | White Quilt* | Striped Euro Shams* | Green Leaf Lumbar Pillows

(*affiliate link used - I earn a small commission for your purchase, but your price doesn't change. Thanks for supporting May Richer Fuller Be and Mix & Match in this way!)


I can't wait to share the progress on this project with you. They'll be up and running in their new place later this summer, so I should have photos to show you then!

I think the next project I'll be sharing is from the e-design giveaway I wrote about a couple of months ago. The winner was a dining room that was just begging for a makeover! That project is coming along too - more soon!

*Psst! Need help with your home? Come on over to Mix & Match Design Company and let's chat!

Enjoy what you read today?  Enter your email address below to subscribe to May Richer Fuller Be!  Delivered by FeedBurner

Pin It!

4.13.2016

Must-Have Decor: Round Brass Mirrors

{via Amber Interiors}
Round brass mirrors are definitely one of the most versatile decor items you can have in your home. Its clean lines and warm metal finish make it a classic that fits just about every style: mid-century modern, boho, traditional, hollywood glam and more. And, bonus, there's a place for one in most any room in your house. You can't say that for many pieces of decor, can you?!

To show you how pretty and versatile these mirrors are, I pulled the best examples I could find from around the web. I hope you enjoy browsing these, and if you make it to the end of the post, I've got a little surprise for you in the form of a very affordable option that I just purchased for our house!  

{via Becki Owens}
Mirrors have the ability to make a room look bigger and brighter, especially when there aren't any windows nearby. The living room above and entryway below are great examples of that.

{via Architectural Digest}
They also work well as a nice, polished touch of decor over beds. How fun are they in this twin bedroom below?

{via Birmingham Home and Garden}
{via West Elm}
Mantles are another piece of prime real estate for these mirrors. The roundness balances out and softens the sharp edges and angles of the mantle nicely.

{via Maggie Stephens Interiors}
{via A House in the Hills}
So what do you think? Are you sold on adding one of these to your home? Or do you already have one? Where?

Alright friends - hooray! You made it to the end of the post, and here's your promised surprise: Target recently came out with 28" round brass mirror for - wait for it - $49.99. If you're not on the hunt for mirrors regularly, just know that's a crazy good deal (especially for a good sized mirror). For comparison, the next cheapest option I've found is $249. Run, don't walk, to Target for this one! #targetdoesitagain

Check it out below:

{via Target*}

*Affiliate link: That means I get a small commission for your purchase, but it doesn't change your price. Thanks for supporting MRFB!

Enjoy what you read today?  Enter your email address below to subscribe to May Richer Fuller Be!  Delivered by FeedBurner

Pin It!

4.11.2016

Featured Designer on Roomhints

Hey y'all! Happy Monday! I hope you all had great weekends. I wanted to pop in and let you know about a fun opportunity I have this week to be the featured designer for Roomhints.

{via Roomhints}

So what's Roomhints? Well, it's a free app you can use to get ideas for your home. You have the option to chat with a real live interior designer (that's me for this week!) who can help you solve your design dilemmas by giving you "hints" and sharing furniture and decor pieces you can often buy directly from the app. You can think of this as a more basic service than the e-design services I offer through Mix & Match Design Company. If you end up liking the hints you're getting from the app, but want some more comprehensive design help, stepping up to e-design may be a good option for you!

Here's how Roomhints works:
  • Download the app.
  • Upload a picture of your room. 
  • Use the Roomhints color-matching technology to find products that match with your furniture. 
  • Select what you are looking for - save the products you like or click "buy" to purchase the product on the vendors site.
  • Click the "designer chat" option and a real interior designer will take a look at your room, answer your questions and send you products ("hints") for your room.
Give it a try and let me know how I can help you with your home! :)

{via Roomhints}


*And don't forget, if you're local to Philadelphia or DC, you can enter the e-design giveaway that's open until the end of this week (April 15th). The submissions I've received so far are awesome - it's going to be really hard to choose just one!


Enjoy what you read today?  Enter your email address below to subscribe to May Richer Fuller Be!  Delivered by FeedBurner

Pin It!

2.29.2016

Small Bathroom Makeover: Before & After with Modern Masters Paint


{Note: Modern Masters provided the lovely matte metallic brass paint for this project, but as always, opinions are 100% mine.}

Oh, how far we've come! 

When we purchased this house, its only bathroom was painted not one, but two shades of purple (yikes). It had good bones though, so I knew all it needed was a little paint to freshen it up. In December, I got rid of the purple, but was at a bit of a loss for what to do next. Here's where we stood once the walls and beadboard got a few coats of Benjamin Moore Winter White and Behr Ultra Pure White, respectively.


A little bland, but much better than purple!

Then, in January, I got an email from Regina at Modern Masters asking if I was interested in reviewing a couple of their paint products. Of course! I said immediately :). I had heard about Modern Masters several times through reading posts from other bloggers, so I was excited to try some of their paint myself. Though I had several projects in mind, I ended up zeroing in on the bathroom - this paint was just what I needed to start tackling this space!

I requested some of their Matte Metallic paint in Brass and boy, is this stuff awesome. I decided to paint the bathroom medicine cabinet mirror to make it the focal point of this small bathroom. I'm really loving mixed metal finishes in spaces like kitchens and bathrooms, so introducing a brass mirror to a bathroom with chrome fixtures was a great opportunity to add that idea to our home.

The mirror can't be detached from the medicine cabinet so I painted it in place. After a light sanding, I used a regular angled paint brush (this one from Purdy* is my favorite) to paint three coats onto the white mirror (I followed the directions on the container regarding drying time between coats).


Here it is after one coat...


Two coats...


And three coats...


This paint goes on like butter and after three coats, it looked like a solid brass mirror - no one would know it's actually dinky plastic under there (shh!). I was really amazed at the coverage and that there were no visible brushstrokes. Thin, even coats are the way to go. I'm also a huge fan of the matte finish. It's timeless and won't ever be mistaken for bad shiny lacquered brass from the '80s. ;)

Here's the finished product!


You might have noticed that I got a bit of paint on parts of the mirror as I went along, but not to worry - that was easily remedied after it dried. I just scraped it off with my fingernail or a flat piece of plastic like a credit card.

I am thoroughly impressed with this paint and can't wait to use it on some other projects! I want to #mattebrasseverything. We can make that hashtag a thing, right?

Here's a wider shot of the whole bathroom. It might be pretty tiny, but it's becoming quite mighty!


Once I finished painting the mirror, I was thrilled with how much that changed the whole look of the bathroom, but I knew I could take it up another notch. As you saw from the photo at the beginning of this post, the upper part of the wall didn't stay plain ole Winter White - I brought in some more paint and made one other small change to the sconces. These updates, plus the newly brassed-out mirror have absolutely transformed this bathroom, but I'll save the details of that for later this week. For now, I'll leave you with a teaser photo!


A couple more note notes on the Modern Masters paints before I sign off for today: the kind folks over there also sent me a container of Pale Gold from the Metallic Paint Collection that I didn't use with this project, but did in another that I can't wait to show you soon. Thank you, Modern Masters!

If you'd like to try some of the Brass Matte Metallics Paint (that I've now fallen in love with) or any of their other products, head over their website where you can look up retailers in your area or order online. You can also find them on social media to check out other projects folks have done using their paint. Here are the links to their FacebookPinterest and Instagram accounts for starters.

Have a great start to your week, y'all!


*affiliate link (That means I get a tiny cut of the price of the item if you buy the product using my link. I appreciate your support of this little blog!)


Enjoy what you read today?  Enter your email address below to subscribe to May Richer Fuller Be!  Delivered by FeedBurner

Pin It!

2.26.2016

Thoughts on Slow Decorating and Enjoying the Process


Right now I've got a million ideas swirling around in my head for our home. There's a running list of projects I'd like to do, furniture I'd like to purchase, spaces I'd like to organize...it's really hard to resist wanting to have it all done and done right now. 

Does anyone else feel this way? I know I can't be alone in this.

Embracing patience while putting together our new home is slightly maddening to me, yet I also know it's the right thing for us. This idea of "slow decorating" might not lead to a magazine-worthy (or Pinterest-worthy) home overnight, but you know what it does do? It gives me time to live in a space, understand how it works (and doesn't work) for our family, be creative about pieces I add or subtract, and learn to enjoy the process itself. The reality is that we don't have the time or budget to transform our house into something magnificent overnight Ã  la HGTV, and I'm learning to be ok with that.

It's also important to remember how far we've come in the four months we've owned this place. Remember this real estate photo of the living room?


Here's where we are now (and actually, this room deserves an update post because things have even changed since this photo was taken!):


Or how about this photo of the previous owners' master bedroom?


It's seen a few happy changes since then as well:


People often ask how the reno/decorating process is going and if the house is done. My answer is usually something along the lines of, "Well, I'd say 'phase one' of the reno is done. We have new floors, paint and light fixtures, a wall came down, and we rearranged the kitchen...but we're planning a full kitchen reno, and I'm still on the hunt for a few key pieces of furniture like a dining room table. If you walked into our house now, you'd probably call it done, but really it's got a ways to go..." The reality is that sometimes I'm really happy with much we've accomplished and how the road ahead looks, and sometimes I'm frustrated at how much we still have to do.

For this home to truly become a place that we love - a place that's welcoming to others and reflects us - I want to be intentional and thoughtful about what we do. I want to be intentional about what I bring into it and how we decorate it. Embracing this idea does have the potential to devolve into plain old indecision, but I'm hoping to avoid that part :).

So what's your part in this? You, my friends, are along for that ride if you're regular readers here. I'll continue to brainstorm and obsess over ideas on the blog, post updates as they happen (if you've learned anything today, you'll know it'll happen slowly!), and hopefully inspire y'all to embrace some slow decorating principles into your own home.


*If you need help making your home into a place you love, take a look at my e-design services: Mix and Match Design Company. I'm passionate about helping folks make thoughtful, intentional decisions about choosing pieces for their spaces!


Enjoy what you read today?  Enter your email address below to subscribe to May Richer Fuller Be!  Delivered by FeedBurner

Pin It!

1.06.2016

Beds in Front of Windows {Yes You Can!}


{The Hunted Interior}
Let's debunk the design myth that beds should never go in front of windows.

Yes! You can pull it off! I did it, and you can too!

I mentioned at the end of Monday's post that I would share some examples and I have some great ones to show you today, but let's talk about the "why" first. Furniture placement is so important to the flow, function, and look of a room, and sometimes doing something that might seem a little unconventional ends up working best.

Typically, beds are positioned against walls, right? Sure, but what if your bedroom is small (hello city living!), every wall has windows (not a bad problem!), or if it just feels right? Then it might be time to break that rule and push that bed up against the windows. To make it feel less awkward and purposeful, frame the bed with curtains or other window treatments, choose a headboard (or don't) that you love, flank the bed with pretty side tables, and hang mirrors if you can. Don't forget to hang those curtains high and wide, friends! When done well, all of a sudden, that bed under the windows becomes the beautiful focal point and you've got yourself a winner of a bedroom.

Let's take a look at some of the pretty examples I grabbed from around the web:

{Homepolish}
{BHG}

{Helen Davidson Design}
{Dayka Robinson}
{StyleRoom}
{BHG}
What do you think? Are you on board with putting your bed in front of the windows? If you've done it, I'd love to see!

If you need help making your house into a home you love, give me a shout! I offer affordable and approachable e-design services over at Mix & Match Design Company!

Enjoy what you read today?  Enter your email address below to subscribe to May Richer Fuller Be!  Delivered by FeedBurner

Pin It!

1.04.2016

Master Bedroom Update {Philly Row House Reno}


Happy New Year, y'all! I hope you've had a good start to 2016 so far. We spent the last 2.5 weeks traveling for Christmas and New Year's and I'm eager to get settled back in at home again and share some of the progress we've made on our row house in Philadelphia. So much has happened! I didn't mean for there to be such a long hiatus between progress posts (oops), but with the holidays being so busy I decided it was just fine to hold off.

How about we kick off the new year with the master bedroom progress? Since I left you with a teaser of it in my last post, that's probably a good place to start. Here's what it's looking like currently:


If you remember the before and real estate photos, you might recall that this room was, for lack of a better word, poop brown, and had the same wall-to-wall carpet as the rest of the house. We ripped that carpet out, installed beautiful new hardwood floors, painted the walls and trim, and moved on in.


This room has a lot of wall bump-outs (making it almost cross-shaped), and therefore furniture placement is a little tricky. After starting with putting the bed on the left wall, which is where the previous owners had theirs, we quickly realized that best place for the bed was actually under the windows. 

Don't be scared to put the bed under the windows, friends! It's totally ok! I'll be showing you some great examples of that in my next post.


Having the bed under the windows made the room feel so much more open, and it helped with the "flow" of the room giving us easy access both sides of the bed, closet and dresser. 


I absolutely love this light fixture we put up (it's from Lowe's - the full source list for this room is at the end of the post). It was the first fixture I picked out for the house and it's a great focal point for this room.


The dresser fits perfectly along the left wall (that's where we put the bed originally).


The closet is on the wall opposite the bed and - amazingly - fits all of our hanging clothes! I did a major closet clean-out before we moved and I think that helped :). I would love to put some sort of closet organization system in there at some point, but we're happy with the amount of space it gives us!

I'm thrilled with how well this room has come together so far. The only new items we purchased for this room are the long curtain rod and the light fixture. Everything else we had before. I have a running list of projects for this space in my head (and every other room in the house, ha!), but I'm trying to take things one day at a time and live in it for awhile before making any big decisions. 

One project that I'll probably tackle sooner than later is a new headboard. Since the bed is in front of the windows, I want something that's a little shorter to let as much light in as possible and not block the windows as much. It'll probably be another upholstered headboard, but we'll see! The other one will likely move to the guest room.

That's about it for today! Let's take one last look at the master...


Hope you enjoyed seeing the progress on this room!


Source List:

  • Headboard: DIY project. Instructions are here.
  • Duvet and shams: TJMaxx
  • Gray and white striped pillows: H&M (no longer available)
  • Pendant light fixture: Lowe's
  • Blue blanket: West Elm (no longer available)
  • Curtains: IKEA Vilborg  (these are SUCH great quality and a steal for lined curtains!)
  • Rug: RugsUSA Homespun Chevron
  • Nightstands: family pieces
  • Dresser: family piece


Enjoy what you read today?  Enter your email address below to subscribe to May Richer Fuller Be!  Delivered by FeedBurner

Pin It!
Related Posts Plugin for WordPress, Blogger...
Blogging tips