Showing posts with label New House. Show all posts

11.19.2015

New House Renovation Progress {First Floor}

*Psst! If you're new here, we're renovating our first home - a 1930s row house - in the city of Philadelphia! To hear the story from the beginning, start here, then check out the real estate listing photos here. After we closed, we started a month-long renovation blitz to shape it up and I'm sharing the progress here piece by piece! I started with the upstairs last week. Catch up on that in this post.

If you read last week's post, you know that we spent this past weekend moving into our new house!  It's crazy town up in here with boxes scattered in nearly every corner, but the move went just about as smoothly as it could have thanks to some fantastic help from friends, family and a couple of very strong movers. This is the first time we've ever moved "in town" and it was far easier than moving to a new city, but also far less efficient. It'll take us awhile to get settled, but in the meantime...

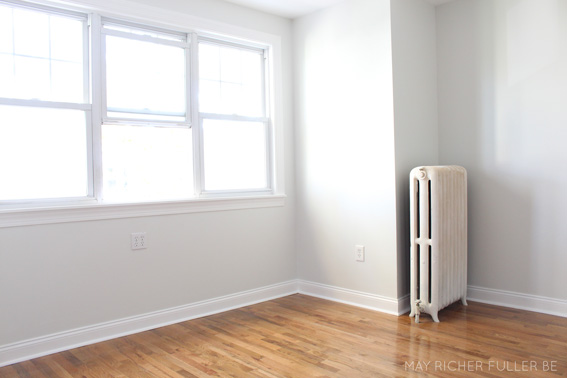
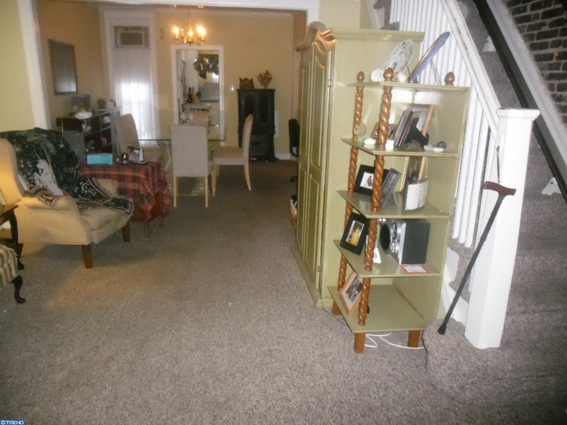
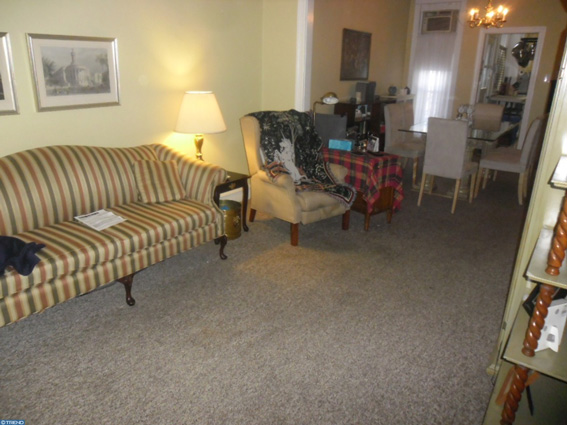
It's time for another reno update! I think the first floor has seen the most dramatic changes so far, though you won't quite get the full effect for a little while. Remember this shot from the day we closed on the house?


That's the view from the front door. I'm standing in the living room and the next room you see is the dining room. The doorway with the bright light shining through it leads to the kitchen.

We ripped up the yucky carpet throughout (including the stairs - oy) and my sweet mama spent practically an entire day on her bottom pulling out tacks, staples and nails to prep it for the new hardwood flooring. What you see below is the subfloor post-carpet-ripout.


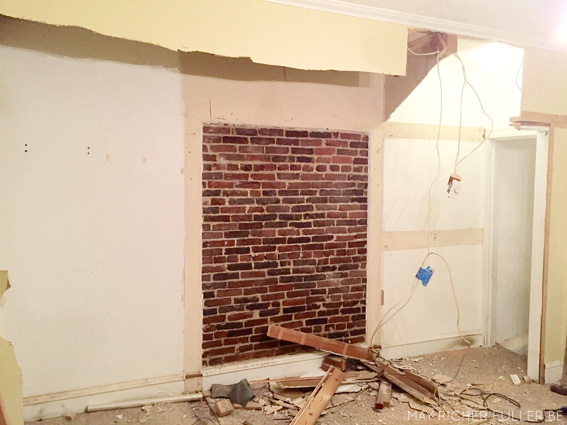
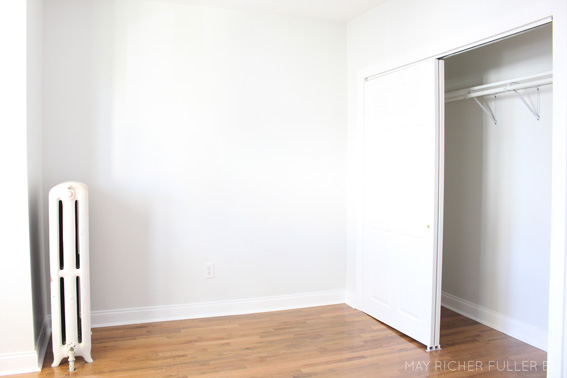
Next is a view of the dining room from the day we closed. We ripped those closets out (as I mentioned in this post), pulled the carpet and patched the brick wall with drywall.


 It feels so much more spacious in here now! Can you believe the next photo is even the same view as above?


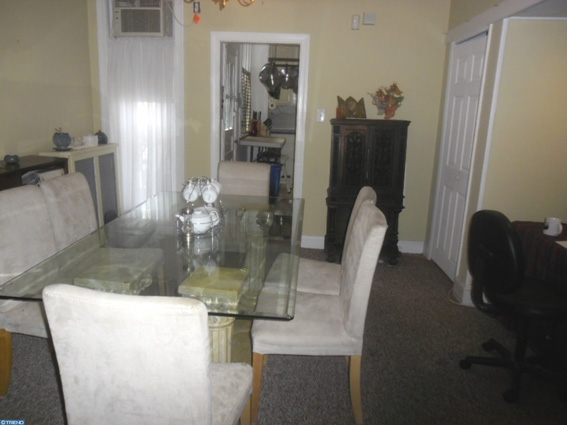
Here we are standing in the dining room and looking back toward the front door.

Before:


Progress:


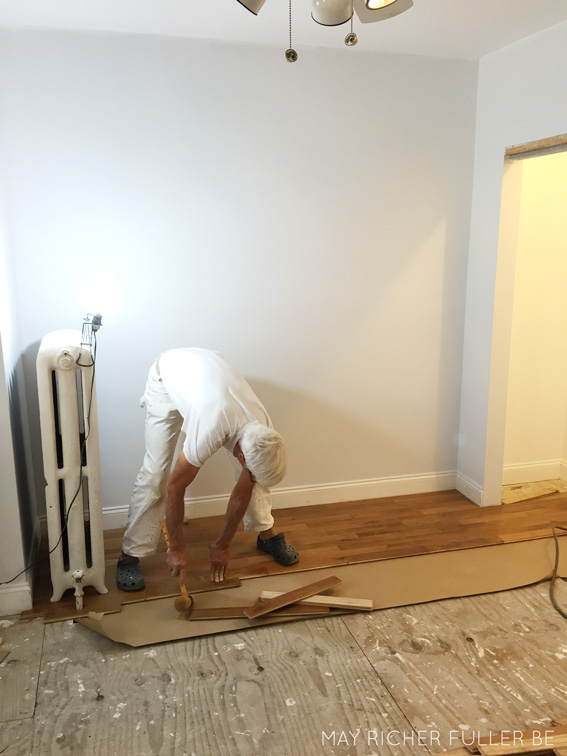
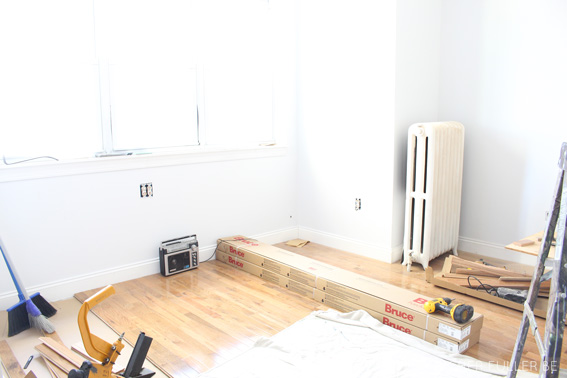
As soon as the floor was prepped and my father-in-law took care of some of the tricky hardwood flooring areas, C and I got to work on installing much of the rest of it. We knocked out almost all of the downstairs flooring on Halloween and as a funny aside, when the neighborhood kids came by to trick or treat, I greeted them at the door wearing my ear protection and wielding that flooring nail gun you see in the next shot below. I'm not sure if they thought I was wearing some sort of costume or that I was just a crazy neighbor lady!

Anyway, in case you were ever curious about how you lay hardwood flooring, the photos provide a mini-demonstration.

We found that it's fastest and easiest  with two people (relatively speaking that is - hardwood flooring is not really fast or easy no matter how you do it!): the first person lays out the strips and bangs them into place with a hammer. The pieces fit together with a tongue and groove, but you have to use some muscle to get them flush. The second person comes through with heavy duty flooring gun and secures the pieces to the subfloor with it. There's more to it, of course, but that's the quick and dirty version of the process.


Installing hardwoods is pretty backbreaking and time-consuming, but totally, totally worth it.

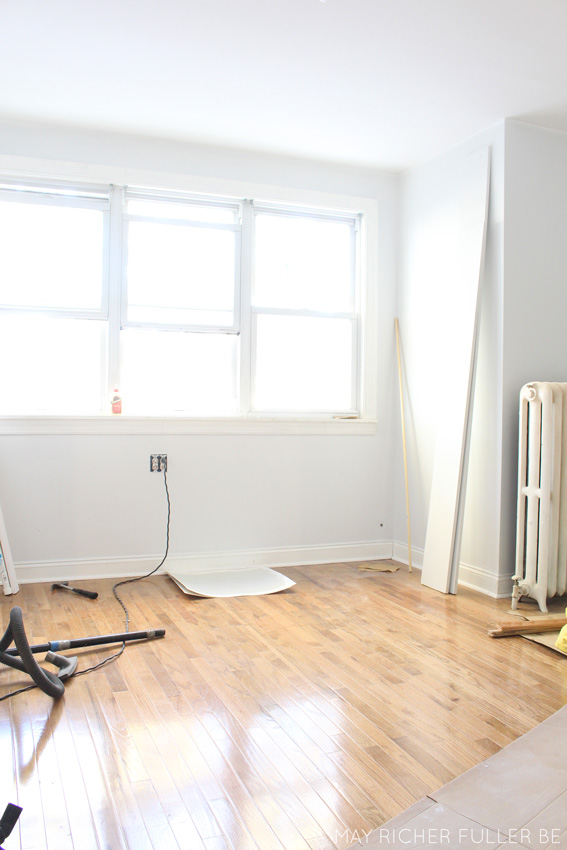
Here's a shot of the progress on the first floor:


Pretty nice, huh?

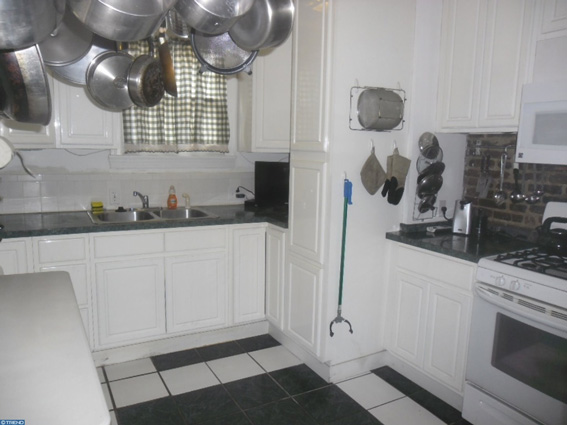
I'm going to leave you with a total teaser shot today of the wall between the dining room and kitchen. Can you guess what's going to happen with it?

Spoiler alert - it's down!

But I'll save that progress shot for next time :).


I'm off to unpack some more boxes. It's time to get settled in here!

Enjoy what you read today?  Enter your email address below to subscribe to May Richer Fuller Be!  Delivered by FeedBurner

Pin It!

11.11.2015

New House Renovation Progress

Happy Wednesday, friends! Thanks for all your kind words about our new home last week! In case you missed it, catch up here with the empty house "before" tour and real estate photos (there are some gems in there...). We have been hard at work over the past several weeks getting the place into shape so we can move in THIS weekend. Yep, this weekend! It's crunch time. We'll see how much we can finish between now and then - I can't wait to see it all come together. SO much work has been done (I've been calling it our month-long renovation blitz), but there is still plenty to do and we've already got plans for future projects.

Let's walk through some progress photos today, shall we? Also, please forgive the crazy lighting and slight graininess of some of these photos - construction work doesn't always wait for perfect light and camera setups so I had to snap some quick shots with my iPhone along the way!

If you follow me on Instagram (@mayricherfullerbe), you already saw a sneak peek of the very first project we did when my father-in-law (FIL) arrived: rip out the two closets in the dining room (below).


Goodbye, closets! The reasons we removed them were two-fold: one, they made the dining room feel really small, and two, they had to go to make way for our plans to open up the dining room to the kitchen. We have plenty of storage elsewhere in the house, so we weren't worried about losing that space.


Soon after that we turned our attention to the second floor. Room by room, we ripped out nasty carpet, prepped the floors (oh how I dislike you, carpet tacks, staples and old flooring nails) and started laying the new, beautiful hardwood floors. The next few photos are from the installation in our master bedroom.


In case any of you are in the market for new flooring, we went with 2.25-in wide prefinished oak hardwood from Lowe's (Bruce Addison Oak Hardwood in Spice to be exact). I'll probably dedicate a separate post to our hardwood floors, but so far we are happy with them. They're perfect for the more traditional style of our home, and many of the other homes in our neighborhood have similar hardwood floors, so trading the carpet for them is one way we're bringing this house back up to snuff :). And yes, we did install them ourselves with the help of my FIL. Installing 1000 square feet of hardwood is not for the faint of heart!


In the photos above, we had also primed and painted the walls (Behr Premium Plus color matched to Benjamin Moore Winter White). Shall we compare this to the before of this bedroom for a sec?


So fresh and so clean!

One fun surprise we found when we pulled the carpet in the hallway and other bedrooms was the original hardwoods. They had the coolest band of dark wood inlay along the edges. They just don't make 'em like that anymore, do they? It would've been cool if we had been able to refinish them, but this house had a major fire 10 years ago and many of the floor were ripped up due to fire and water damage. The ones that remained were badly warped and stained.


Off we go with the installation down the hallway!


See the original hardwoods to the left of the new ones? This is the back bedroom (and also my office). Someone had a field day splattering and/or tracking paint on them at some point!


Here's my office from the other side with the floors finished.


It's amazing what a huge different new floors and fresh paint can make.

I think I'll save the first floor progress for the next reno post since this one is getting super long! The house is coming along, that's for sure, and I can't wait to get in there. We've got lots of little things left to do, but ready or not, we're moving this weekend!

More to come!


Enjoy what you read today?  Enter your email address below to subscribe to May Richer Fuller Be!  Delivered by FeedBurner

Pin It!

11.05.2015

Our New House {The Real Estate Photos}

*In case you missed Monday's post...we bought a house! Catch up on the details over here.*

I don't know about y'all, but I LOVE stalking looking at real estate listings. There's something so fun to me about virtually touring other people's homes. Interior design and home blogs provide the same sort of thrill, but they're typically edited to showcase only the pretty stuff. Real estate photos, on the other hand, can be amazing, but they can also be downright awful. You'd think that the seller would want to have great photos to show the house off in the best way possible so the it sells quickly for asking price, right? There's a reason home staging and real estate photography are whole industries in and of themselves!

And yet...sometimes you find yourself looking at photos like the ones that were on our house's listing that leave something to be desired.   Let's just say that it didn't show very well :). The house sat on the market for awhile and I'm thinking these photos might have had something to do with it. 

Want to see the house as we saw it for the first time? 

Let's start at the front, shall we? Hello weeds! Our house is the one in the middle you can barely see with the front porch and very brightly lit second level.


In through the front door, you enter the living room. With all that furniture lining the walls and the lack of light, it looks cramped and sort of dungeon-like. The people who lived here before us sadly never opened their blinds - there's actually a good bit of natural light on this floor!


Heading into the dining room...

Nothing like crooked photos to make it look like the house might be falling over, right? I promise it's not. I can't wait to show y'all photos of this space soon. It's changed SO much in the past couple of weeks!


The kitchen is a great size, but unfortunately, the folding table and hanging pots make it look cramped and small.


Now we're off to the second level. This is the back bedroom with the unusual furniture placement. I think they used it as an office and tv watching room of sorts.


This is the middle bedroom. I'll be honest, those pig cut outs and animal masks totally freaked me out the first time I saw them. Creepy, aren't they? Yikes.


The infamous purple bathroom. Enough said.


And lastly, the master bedroom. This room has changed a ton as well. It's amazing what new flooring, paint and a new light fixture will do!


So that's the real estate photo house tour! Now tell me, if these were the photos you saw of the house, would you have gone to see it in person? Would you have bought it?

When I walked into the house for the first time, I knew it had great bones and incredible potential, but knew it was going to take some work to get there. It's already come a long way! More updates to come soon!

Enjoy what you read today?  Enter your email address below to subscribe to May Richer Fuller Be!  Delivered by FeedBurner

Pin It!

11.02.2015

We Bought A House!

On our new front porch on closing day

Yes we did! We bought a house!

I've been keeping this tiny (ok, huge) piece of news under wraps for awhile, but now that everything has been finalized, papers have been signed and the keys are in our hands, I can share our biggest project YET here on the blog. We bought a row house in Philadelphia, and are well on our way to fixing this place up and making it our own. I've been dreaming of a project like this for so long and can't wait to share the play-by-play with y'all. 

So, do you want to know more? 

Here are a few facts about the house: 
  • It's a two-story, three bedroom, one bathroom row house (plus an unfinished basement).
  • The previous owners lived in the house for nearly 50 years and raised three kids in it.
  • It's around 85 years old.
  • It needs some serious love (we've given ourselves a timeline of one month to make it livable - pressure's on!).
But let's be real - what you really want to see are some photos, am I right? I snapped a bunch the day we closed while it was completely empty before renovations began.

Let's start on the first floor. I'll share some of our plans along the way - every surface needs to be touched/worked on before the big move. The renovations have been underway for about two weeks and we've made a lot of progress, but still have a ways to go!

From the front door, you walk straight into the living room opens up to the dining room. The kitchen is in the very back through the doorway you see below.


There's exposed brick along the whole right side of the stairs and down the upstairs hallway - isn't it cool? The woman who lived here before us chipped off all the original plaster by hand to expose it. Goodness, I can't imagine how long that took!


Heading into the dining room, there are two closets (one of which leads to the basement) - or should I say were two closets. We ripped them out on day one of renovations because they really make that space feel more closed in than it is. In a row house, the more open you can make it, the better in my book, so adios closets! There is plenty of storage elsewhere, so we don't think we'll miss them.


The kitchen is at the back of the house and is a nice size. It's not in very good shape, but it's fully functional. 


That wraps up the first floor!

So what work will happen on this floor? 


  • Rip up the old carpet (it's in way worse condition in person than in you can see in photos) and replacing the flooring throughout with hardwood. 
  • Paint every surface.
  • Replace light fixtures.
  • Add a dishwasher.
  • Open the kitchen up to the dining room to make the whole floor open concept.
  • Renovate the kitchen - that's probably a "phase two" project (again, it's in way worse condition in person than in photos and the layout is not ideal).
Let's head to the second floor!


Heading down the hallway all to the back, you reach the back bedroom. This will be my office. It gets tons of natural light since it has windows on two sides, which helps make it a place you want to be all day! It also has kind of a weird layout making it tricky to know where to put a bed.


Two of the walls are painted a dark red - not necessarily my favorite color :).


Heading back out and down the hallway, the next door down leads to the middle bedroom, which will be our guest room.


It's pretty much a white rectangle - a blank slate, if you will. Not much to talk about here!


Going out into the hallway again, the last two doors lead to the bathroom and the master bedroom (front bedroom).


Hello purple bathroom! It's special. But, to its credit, it does have a linen closet, which we've never had in any other place we've lived. Yay!


Lastly, we have the master bedroom. It's a great size and gets lots of light from that bank of three windows.


The paint color leaves a little to be desired - I've dubbed it "poop brown." Nice mental image, huh?


So what work is happening on this floor? 


  • Rip up old carpet and replace the flooring throughout with hardwood. 
  • Paint every surface.
  • Replace light fixtures.
There are a ton of little projects too - the list is a mile long!

I'll wrap up this long post with one other important thing you should know about this month-long sprint to get this house move-in ready: we couldn't have taken this project on without the help of my father-in-law. He's a general contractor and we're doing all the work with his help. He has generously given us a month of his time to do some major projects for us. Seriously, we could not have done this renovation without him! I'm up there helping out pretty much every day after work and on the weekends, but he's doing the majority of the work. We're so grateful to have him!

I'll be back later this week to show you another set of photos of the house - the real estate photos! It's one thing to see "before" of an empty house, but the real estate photos will give you a sense of what we saw when we went to see the house with our real estate agent (James Price of Coldwell Banker - I couldn't recommend him enough if you're in Philly!). This house sat on the market for awhile, and after you see the photos, you might be able to guess why...

Suspense!


Enjoy what you read today?  Enter your email address below to subscribe to May Richer Fuller Be!  Delivered by FeedBurner

Pin It!
Related Posts Plugin for WordPress, Blogger...
Blogging tips