Showing posts with label operation organization. Show all posts

1.21.2014

Pantry Organization {Take Two}

Last week I mentioned how I had failed needed to revisit some of the areas I organized in our home last year. One of those lovely areas was our pantry - or should I say, half a cabinet in our kitchen. It was tough to keep everything we needed in such a small area, and if we ever acquired anything larger than a box of Triscuits from the grocery store, we were in trouble.

Here's what it looked like for a few months after I organized it the first time:


Clearly there wasn't a lot of wiggle room in there, and it was soon apparent that the "system" I put in place wasn't working.

The cabinet (and surrounding countertop area) looked like this before I got to working on it over the weekend:


Not terrible, but as you can see, we were storing bags of chips and other snacks on the counter since we had no other room - not ideal. It was time for a change. I somehow needed to increase the size of our pantry without really changing much else in the kitchen.

So I did what I always do when I first start an organization project...EMPTIED EVERYTHING. Then I did some brainstorming and space planning.


{By the way, I cannot tell you how much it bothers me that the cabinets in our rental are yellowy-white while the trim is pure white and the white in the granite is also pure white...could they not have painted the cabinets the same color as the trim? The photo above shows how nicely it clashes, so I thought I'd take a moment to point that out :). }

The wine glasses I kept in the top right of the double cabinet got relocated since we hardly ever use them (we typically use our stemless glasses that live in the secretary-turned-bar). They were taking up prime real estate that I knew would be better utilized as food or other storage for oft-used items. That little change made a huge difference in my organization strategy.

In order to make more room I did some other creative rearranging as well including cleaning out the little double cabinet above the fridge (no photos of that, sorry! It was boring anyway...) and this cabinet to the right...


Out came the mixing bowls, strainers, and other random bowls and containers. Once I was done emptying out, I was left with these gloriously empty cabinets ready to be filled up again.


Meanwhile, all the stuff from those cabinets ended up here:


...and here. Ack.


{Oh hello $6 rug. I heart you.}

After a little strategy session with myself, a little purging and a little consolidating, everything went back onto the shelves. I adjusted the heights of said shelves to better utilize the available space and commandeered one additional shelf for food items in the double cabinet. Also, the mixing bowls, measuring cups and strainers moved from the cabinet to the right to this double cabinet. And look! There's nothing on the counter anymore! Victory.


The pantry shelves have some room to spare now. I can bring groceries home and have somewhere for them to go!


Drinking glasses (along with a couple of other items) did a switcheroo to the cabinet to the right. They're still just as easy to access and are less crowded on these shelves than they were before. 


There's way more breathing room now, and there's even room to grow a little bit. It may not look like Martha Stewart, but hey, function is the key here, right? Here's to hoping this new system works out better than the previous one!

So that's the story of my failure-turned-turned victory in the pantry department.

I hope this is encouraging to y'all and shows you that just because you organize something in your home once, that doesn't mean that it will work perfectly. In fact, sometimes it just doesn't and you have to start over again. I'm ok with that. Organization, just like most things in life, has its ups and downs. You just have to be willing to admit that something isn't working and try again!

Pin It!

1.14.2014

Operation {Re}Organization: What's Working and What's Not


If you've been following the blog for awhile, you may remember that last year, one of my major goals was to get a few "problem" areas in our apartment organized. I took on a new area of the house almost monthly, and the hard work really paid off! As I've been thinking about new ways to get organized this year (isn't just about everyone thinking about that right now? ha!), and what I want to work on, I've also been reflecting a bit about what I did last year that worked, and what might need some tweaking.

Before we get going, I want to say one thing: once a space is organized, that doesn't necessarily mean it's done forever and that the system will always work perfectly. For example, perhaps you purged and organized your pantry. You put a system in place, gave everything a home, gave yourself a big pat on the back for a job well done, and then came to realize a short while later that, oh shoot, this isn't working. You know what? That's ok. Seriously ok. I consider myself to be a pretty organized person, and my systems fail too. I still have clutter, even when I spent what feels like a year going through most every space in our apartment.

But guess what, my friends, all that work is not, I repeat, IS NOT worthless. Organization is a continual process. It takes time and effort, and I hope that some of my projects have inspired/will inspire you to get (back) on that organization horse. Writing these words is going to help keep me accountable as well. I've got some project ideas up my sleeve, but before I start again, let's take a look back at three of last year's major problem areas that I detailed in this post...

Problem area #1: Front Hall Closet


Overall Grade: A-

This closet has come a long way, baby! It serves all of it's (many) purposes well, including storing coats, athletic gear, tools, paint, utility-related items, wrapping paper, vacuum and dog supplies. It pretty much looks just like this photo does now after living with it for nearly eight months.

My only complaint is that the wrapping paper can be a little tricky to get to with all the coats in place. Thankfully, I don't have to get it out very often, but when I do, it's a little annoying to shove the coats to the side and pull a roll down.

To read more about this space, take a look at the inspiration, the before, and the after.

---------


Overall Grade: C-

Alas, the "pantry" area (we have a small cabinet in the kitchen and one small piece of free-standing furniture we use as pantry storage) has really gone downhill. It's not a total fail, but not everything fits anymore, and the use of space doesn't totally make sense anymore in the kitchen cabinet area. I think I'm going to clean out and start over there. I'm brainstorming some alternatives, so I'll let you know what I come up with soon.

On the bright side, the storage system in the free-standing piece of furniture has worked really well. It holds all the extra/overstocked and baking-related items still looks very much like this photo below:


To read more about the pantry organization, check out these posts: before (and a little progress), after, and DIY pantry labels. 

---------

Problem area #3: Bathroom


Overall Grade: B+

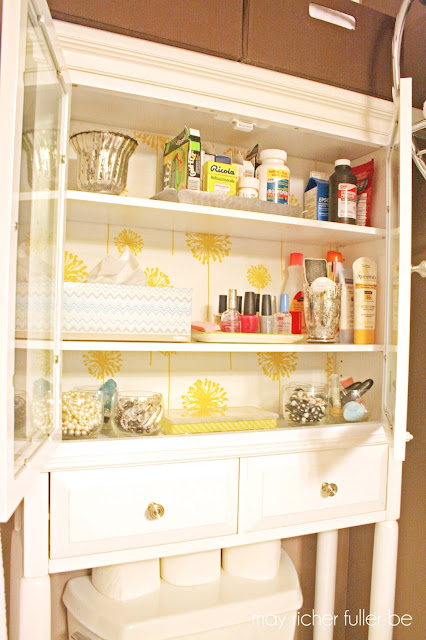
The bathroom is certainly a success story. I'm proud to say that the over-the-toilet storage has worked really well as it looks above, and that I've only made a few very minor changes since tackling that project back in March. 

The place that could use a little bit of work is the storage under the sink. It's nothing major, but I think it's time to clean out the clear storage bins and baskets, take inventory, and figure out what we need to stock up on. I hate it when we suddenly run out of shampoo or some other item, and I have to buy it full price! I'd much rather shop the sales, use coupons, and store the items in the bins for later, but in order to fully utilize that kind of system, I need to know what I have! Plans are in the works to make that a reality...

To read more about the bathroom organization project, check out these posts: introduction, before, and after.


So that's where I am today on some of the major organizing projects from the past year. I need a little kick in the pants to get going, so I figured sharing a little bit on the current state of these projects would help! A little bit at a time...

What are you hoping to organize this year? Any help or tips I can give to kickstart the process?

Pin It!

10.28.2013

Organizing Dog Walking Supplies {31 Days: Day 29}


We sure do love our little dog, Jackson (meet him here and here), but he comes with a lot of stuff! I've got most of his supplies under control in his designated bin in the front closet, but one thing I've never attempted to corral are his supplies for walks. It wasn't until I saw this post that I realized how much it bothered me that they didn't have a true home in our entryway. Sometimes, spending a few minutes organizing the little things makes all the difference, so that's what I did.

The furniture piece in our entryway (the same one that I styled the shelves of last week) often becomes a dumping ground for random paper, mail, keys and Jackson's leashes.


I decided that one thing I could easily clear off of it would be his leashes and the towel we use to wipe his paws. I had those two small metal buckets (from the Target dollar section a few years ago) and a couple of extra command hooks on hand, so I used those two things to make a little holding station.

In order to keep them accessible at the front door, I placed the two command hooks on the side of the furniture piece that faces the living room. That way, you wouldn't see them from the front door, but they're right where I need them to be.


I gave the adhesive on the hooks time to "cure" before hanging the buckets (they recommend an hour in the instructions) and I do find that that helps make sure they're secure. On an occasion or two in the past, I've been a little too eager to hang things on them before that hour is up and it's never worked out well!

I hung the buckets and placed Jackson's two leashes (one retractable and one short one) and his harness in one bucket, and the towel in the other. They're the perfect size for those items and nothing more! No chance to clutter up those buckets!


I'm so thrilled with how this worked out. Nothing like a little creativity and using supplies you have on hand to come up with a simple organizing solution. And the great part about using command hooks here is that we can always remove them later with no damage to that piece of furniture. Here's to hoping we keep this mini-system up!


Read the series from the beginning...


Pin It!

9.30.2013

September Project Round-Up


***Psst! Have you had a chance to fill out my reader survey yet? It'll take you 5 minutes! I'd love your feedback - I want to make this little blog the best it can be!***

Another month coming to a close? My how the time flies...I'm wrapping up September a little bit early this month because tomorrow is the start of my very first 31 Days series! That's right, I'm joining The Nester and about oh, a couple thousand other bloggers on a quest to write on the same topic for 31 Days straight. Come back tonight for my introduction post and to see what my topic is going to be. I think you'll like it! Any of y'all participating in this this year?

Now before we can get to that, it's time to take a look back at the past 30ish days at some of my favorite projects. Monthly round-up time!

First, my purse got a major organization overhaul this month thanks to this nifty little bag in a bag. I'm over a month into using it and I'm happy to report that it's still like, the most awesome thing ever.


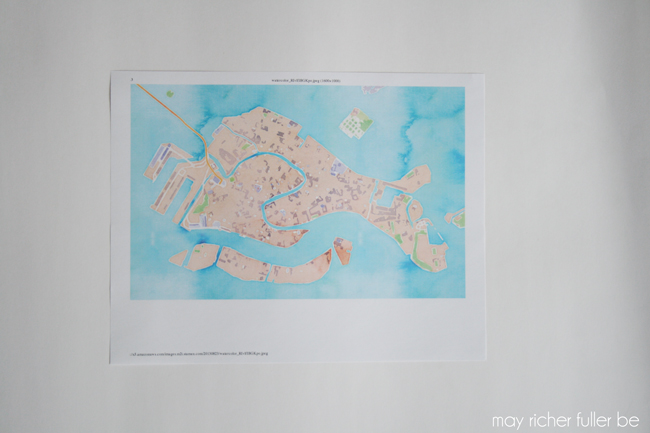
I had fun messing around with a free website that makes watercolor maps of any place in the world, and framed up an image of Venice for the living room gallery wall.


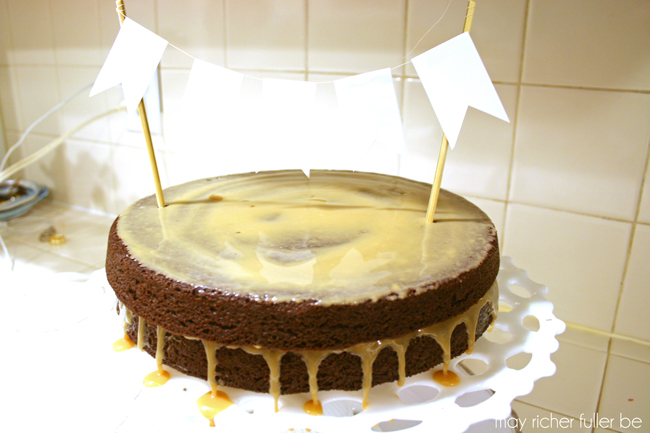
If you love brownies as much as I do, you might want to try making this easy brownie cake sometime. Just sayin'.


I finally organized the last bottom cabinet in our kitchen - the under-sink corner cabinet. It felt so good to be able to access everything again once I cleaned it out!


Three of my posts focused on chalkboard-related items this month. The first was this typographic chalkboard art I made for my friends at CHAT (head to the post to read more about them).


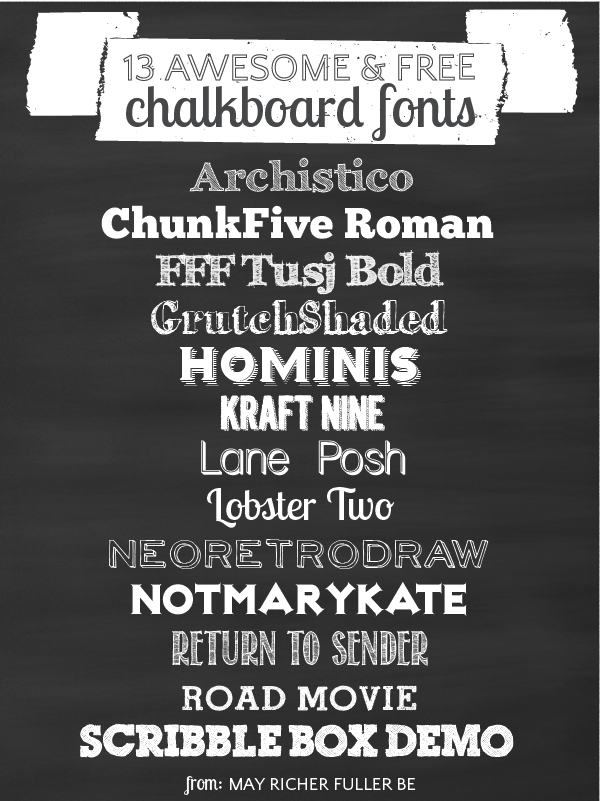
Second was a round up of favorite chalkboard-appropriate fonts:


And third was a freebie for you - three iPhone lock screen wallpapers! The day after I posted these, Apple released iOS7, and I'm glad to report that these still look fab on the updated system.


I finished up the "Defining My Style" series with some snazzy dining rooms...


And to finish off September's round-up, I showed y'all my fall "makeshift" mantle, which I think is my favorite one I've ever done. :)


Adios September. You've been great. Can't wait to get started on my #31Days series though! See you tonight!

Pin It!

9.11.2013

Operation {Re}Organization: The Under Sink Cabinet

I finally got my hands on another organization project in our kitchen last night: the under sink cabinet. It had been taunting me since I finished organizing the other lower cabinets and drawers in our kitchen back in July. (If you missed those posts, they're here, here and here.) Now, dear friends, this isn't going to be one of those amazing before and after makeovers. This one was about making that awkward space functional. I like to call it "real life organizing." Make it functional and move on. Pinterest can get over it ;).

Alrighty, let's do this thang.

This cabinet isn't an ordinary under sink cabinet. It's a corner cabinet (my least favorite!). We have the lovely privilege of having a corner sink, which means we have a really giant corner cabinet with no shelving underneath to accommodate for the plumbing. (Note to self: never install a corner sink. I hate leaning into a corner or standing at an awkward angle to use it.)

Here's what it looks like with the doors shut. You can see the sink faucet peeking out at the top.


And here's how the interior contents were looking yesterday before I went at:


Yikes. As you can see, we keep a variety of items in here including a couple of larger kitchen appliances that don't fit anywhere else (the only advantage of having such a giant cabinet with no shelving), maintenance items and cleaning supplies. I keep cleaning supplies in that (currently overflowing) orange, polka dotted tote.

For your viewing pleasure, here's another view of the right side of the cabinet. Hello randomly piled up trash bags, dishwasher detergent and extra paper bags. Are you enjoying your balancing acts?


This clearly wasn't working well, so I came up with a few goals for how I'd like it to look and function:

  • Divide the cabinet into two zones: appliances and cleaning/maintenance/extra supplies
  • Keep daily use items accessible in the front right side of the cabinet
  • Reorganize and simplify my cleaning tote
  • Relocate dish towels from an upper cabinet shelf to this cabinet

The tricky part about organizing this cabinet is that all the plumbing associated with the sink and neighboring dishwasher is smack in the middle of it. This made it a little challenging to utilize the space well, but I just pretended it was a divider for my new "zones" and went with it.


After pulling all the items out, I went ahead and put all the appliances on the left side ("zone 1"). That included our food processor, extra large pot, Kitchen Aid mixer and griddle.


My next task was reorganizing the cleaning tote.


I cleaned it out, threw away some unnecessary packaging and kept only the necessities in it. That included small towels, microfiber cloths, all purpose cleaning spray, Bar Keeper's friend (love that stuff), a bristly scrub brush and an old toothbrush. A few items, such as toilet bowl cleaner, were relocated. I like to keep all my bathroom cleaning supplies in the bathroom so I'll be more likely to clean more :). I also grabbed a couple of tupperware containers to corral items such as dishwasher detergent packets, Swiffer dusting cloths and extra sponges.

Oh, and I discovered that I have enough microfiber cloths to start a small cleaning business. I certainly won't need to go buy any more of those anytime soon.

Once these mini-organizing tasks were done, I placed them in their new homes in the right side of the cabinet ("zone 2"). The end result looked like this:


Now the very back (the least accessible area) holds extra cleaning supplies and sponges. The middle area holds the cleaning tote. The front has a variety of items that I use every day and want to be super accessible: extra dish towels (stored in that old enamel bucket), dish soap, dishwasher detergent packets and trash bags.

Like I said at the beginning, I wasn't going for a magazine-worthy makeover, I was going for functional. And functional it is. I am SO happy with it now. In the future, I think I'd like to add some kind of removable shelving on the right side so I can use some of that vertical space more efficiently, but this is great for now.

Let's look at it before and after:


Ah, so much cleaner and simplified. All it took was about a half-hour of my time and a little bit of thinking. No money spent here! That's the best - am-I-right?

Have you done and "real life" organizing recently? Please share!

---------

This post is a part of the series "Operation {Re}Organization." To see other posts in the series, click the tab at the top of the page.


Pin It!

9.09.2013

Operation {Re}Organization: Conquering the Purse


"Organize your purse the easy way!"

Boy, does that sound like an infomercial or what? Sorry for that. It's just that I've got a seriously easy organizing solution for the gal who is constantly frustrated by not being able to find anything in her purse. I don't carry a huge purse but regardless of the size, I always find myself digging for my keys, phone, chapstick...and it drives me nuts. I felt like I could never grab anything easily, or that things got squished or buried deep in the bottom of my bag. Does anyone else have this problem? Please tell me I'm not the only one.

Enter a brilliant solution: the Bag-in-Bag. It's changed my purse's life, y'all. I'm so pumped.


I ran across this little contraption made by a Korean company called invite.L a month or so ago and decided to ask for one for my birthday (i.e. they're not paying me to write this review, nor do they even know I exist!). They've got various sizes, styles and colors, but the one I chose was the Dual Bag-in-Bag in coral. It fits perfectly in my everyday Longchamp purse.

It only took me about 10 minutes to clean out the chaos in my purse and reorganize it using the Bag-in-Bag. Talk about a quick organizing project (my favorite!). The longest part was waiting for that awesome little thing to arrive from Korea. They estimated shipping would take 15-25 business days, but it ended up only being 10 calendar days. Nice surprise!

So to show you the awesomeness of this baby, I thought I'd walk you through my quick organization process and give you a tour of all the nice features.

Let's start with the befores. Goodbye messy purse...


First I emptied my purse of all its contents and cleaned it - literally cleaned it because as you can see, it was gross. With all my stuff jumbled in there, I couldn't ever see the yuckiness of the bottom of my purse. Embarrassing? Yes. But that's real life, dear friends :).

Then I grabbed my purse's new best friend and placed all my necessities in its various pockets and zippered pouches.


The thing I love about it is that it has LOTS of pockets and pouches of various sizes. This ensures that everything from large items down to tiny ones has a designated home. No more jumbled chaos and I still have empty pockets to fill! Anything I add that's new has to have a home or it doesn't get to stay in my purse.

Allow me to demonstrate.

On one side, I have phone accessories (charger and headphones) in the small mesh pockets, and a pen. The pockets just above that are pretty empty except for a pack of gum right now.


On the other side, I keep my chapsticks and lipstick in a mesh pocket and my phone in the pocket above. The other pockets are empty.


Looking at the bag from above, you'll see that there is a large space in the center that's open, as well as zippered pocket on each side. I keep my wallet and my coupon organizer in the middle space (my keys also go in that small empty space when I head out of our apartment). One of the zippered pockets holds "personal" items such as Advil a nail file and (ahem) feminine products, and the other side holds my blog planning notebook.


Here's a view from the side. If you have less stuff than me, you have the option to snap the sides together to make the bag slimmer...


And another view from the top.


It slides easily into and out of my purse, making it easy to switch the contents to a different purse or tote bag when needed.

Isn't this thing nifty? Since everything has a home, it's really easy to keep my purse organized. I've been using it for a week or so now, and I can honestly say I love it. Not once have I had to fish around for my phone when it's ringing or fish in the deep dark recesses for my keys.

So tell me, do you use something like this in your purse? Or have any brilliant organization solutions for keeping the chaos at bay?
---------

This post is a part of the series "Operation {Re}Organization." To see other posts in the series, click the tab at the top of the page.

---------


Pin It!
Related Posts Plugin for WordPress, Blogger...
Blogging tips