Showing posts sorted by relevance for query cleaning. Sort by date Show all posts

9.11.2013

Operation {Re}Organization: The Under Sink Cabinet

I finally got my hands on another organization project in our kitchen last night: the under sink cabinet. It had been taunting me since I finished organizing the other lower cabinets and drawers in our kitchen back in July. (If you missed those posts, they're here, here and here.) Now, dear friends, this isn't going to be one of those amazing before and after makeovers. This one was about making that awkward space functional. I like to call it "real life organizing." Make it functional and move on. Pinterest can get over it ;).

Alrighty, let's do this thang.

This cabinet isn't an ordinary under sink cabinet. It's a corner cabinet (my least favorite!). We have the lovely privilege of having a corner sink, which means we have a really giant corner cabinet with no shelving underneath to accommodate for the plumbing. (Note to self: never install a corner sink. I hate leaning into a corner or standing at an awkward angle to use it.)

Here's what it looks like with the doors shut. You can see the sink faucet peeking out at the top.


And here's how the interior contents were looking yesterday before I went at:


Yikes. As you can see, we keep a variety of items in here including a couple of larger kitchen appliances that don't fit anywhere else (the only advantage of having such a giant cabinet with no shelving), maintenance items and cleaning supplies. I keep cleaning supplies in that (currently overflowing) orange, polka dotted tote.

For your viewing pleasure, here's another view of the right side of the cabinet. Hello randomly piled up trash bags, dishwasher detergent and extra paper bags. Are you enjoying your balancing acts?


This clearly wasn't working well, so I came up with a few goals for how I'd like it to look and function:

  • Divide the cabinet into two zones: appliances and cleaning/maintenance/extra supplies
  • Keep daily use items accessible in the front right side of the cabinet
  • Reorganize and simplify my cleaning tote
  • Relocate dish towels from an upper cabinet shelf to this cabinet

The tricky part about organizing this cabinet is that all the plumbing associated with the sink and neighboring dishwasher is smack in the middle of it. This made it a little challenging to utilize the space well, but I just pretended it was a divider for my new "zones" and went with it.


After pulling all the items out, I went ahead and put all the appliances on the left side ("zone 1"). That included our food processor, extra large pot, Kitchen Aid mixer and griddle.


My next task was reorganizing the cleaning tote.


I cleaned it out, threw away some unnecessary packaging and kept only the necessities in it. That included small towels, microfiber cloths, all purpose cleaning spray, Bar Keeper's friend (love that stuff), a bristly scrub brush and an old toothbrush. A few items, such as toilet bowl cleaner, were relocated. I like to keep all my bathroom cleaning supplies in the bathroom so I'll be more likely to clean more :). I also grabbed a couple of tupperware containers to corral items such as dishwasher detergent packets, Swiffer dusting cloths and extra sponges.

Oh, and I discovered that I have enough microfiber cloths to start a small cleaning business. I certainly won't need to go buy any more of those anytime soon.

Once these mini-organizing tasks were done, I placed them in their new homes in the right side of the cabinet ("zone 2"). The end result looked like this:


Now the very back (the least accessible area) holds extra cleaning supplies and sponges. The middle area holds the cleaning tote. The front has a variety of items that I use every day and want to be super accessible: extra dish towels (stored in that old enamel bucket), dish soap, dishwasher detergent packets and trash bags.

Like I said at the beginning, I wasn't going for a magazine-worthy makeover, I was going for functional. And functional it is. I am SO happy with it now. In the future, I think I'd like to add some kind of removable shelving on the right side so I can use some of that vertical space more efficiently, but this is great for now.

Let's look at it before and after:


Ah, so much cleaner and simplified. All it took was about a half-hour of my time and a little bit of thinking. No money spent here! That's the best - am-I-right?

Have you done and "real life" organizing recently? Please share!

---------

This post is a part of the series "Operation {Re}Organization." To see other posts in the series, click the tab at the top of the page.


Pin It!

5.28.2013

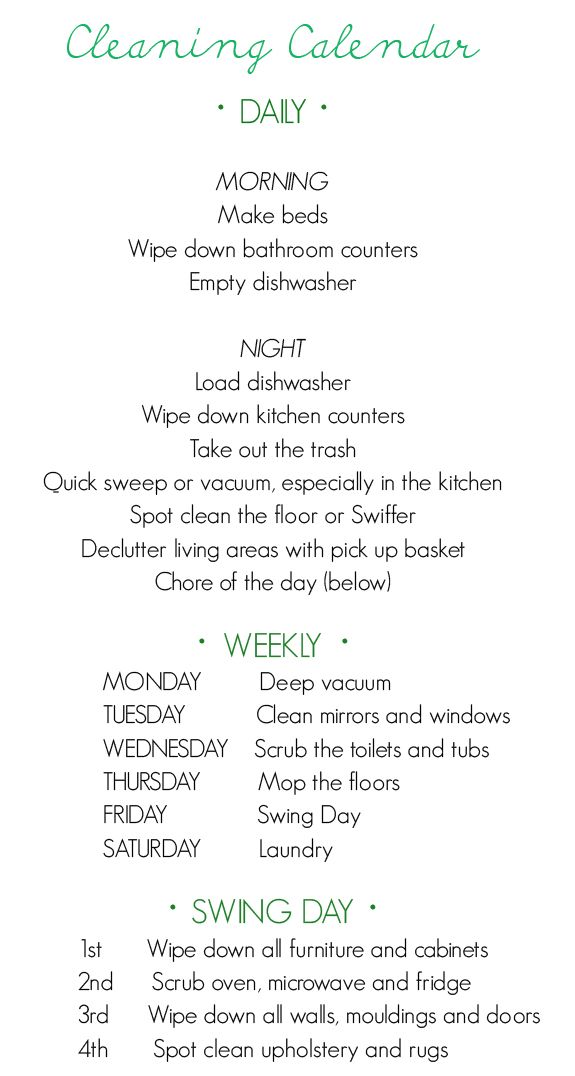
Operation {Re}Organization: Let's Get Clean!


Confession: I'm lousy at cleaning. There, I said it :). Our house is far from clean 98% of the time. I have no routine, no set schedule, and a really hard time prioritizing scrubbing toilets over things I actually enjoy like spending time with family and friends and this blog. My current "routine" for cleaning includes frantic last-minute vacuuming and sink-wiping before we have guests over. Please tell me I'm not alone on this one.

But here's the thing - I really like having a clean house. The type A part of me has a mini internal freak out when I come home to visible dust bunnies and soap scum in the tub, so I think I've had enough of my current "routine." It's really been driving me nuts lately. 

For the past few weeks, I've been thinking about making some changes to the way I approach cleaning. I've discovered that I need a way to hold myself accountable without making things too cumbersome. This involves following a schedule. So I looked to Pinterest, Google and some other bloggers for some help. I found some good ideas and even came across this weekly cleaning schedule quiz from Modern Parents Messy Kids, that, as silly as it is, really helped me figure out what kind of schedule I wanted to have.

I'm a checklist kind of gal, so I wanted something that gave me the satisfaction of crossing an item off a list and getting things done a little at a time, but didn't want to be too strict about it (i.e. Monday is always vacuuming day). For instance, I know myself well enough to know a list like this one wasn't going to be a great fit for me:


More power to you if stick to a schedule like this - I wanted a little more flexibility. It's all about finding what works best for you. 

I ended up dividing up tasks into four categories: daily, weekly, monthly and as needed. No specific days assigned (except for the daily tasks, of course :) ).

Daily tasks:
  • Loading/unloading the dishwasher (no dirty dishes left in the sink!)
  • Make the bed
  • Wipe down the kitchen counters
  • Take out the trash and recycling
Weekly tasks:
  • Sweep the floors and vacuum the carpets
  • Scrub counter tops
  • Scrub the bathroom (toilets, sinks and tub)
  • Clean mirrors and windows
  • Dust surfaces
  • Change sheets (this will probably be a bi-weekly task)
  • Declutter living room and return items to their designated spots
  • Go through the inbox (i.e. incoming mail, coupons, bills, etc.)
Monthly tasks:
  • Spot clean oven and microwave
  • Clean out fridge and freezer (throw away expired items)
  • Clean/dust baseboards and hard to reach corners
As needed tasks:
  • Wash couch slipcovers
  • Self clean oven
  • Wash dog bed

Once I made the list, I decided looking at a plain ole set of bullets isn't much fun, so I made up a pretty-looking checklist to help me stay motivated and organized. If I've gotta do it, why not make it a little fun?
Since I didn't assign a task to a specific day, I made a grid to the right of the task's name so I can write in the date I completed it. That way, I can make sure I get to each task within its designated window of time. This checklist takes me through two months of cleaning.

This plan goes into effect today, so I'll have to update y'all on how it goes in another month or so. Ask me about it, ok? I need y'all to help me out. There's nothing like blurting out your plan to the blogosphere to keep yourself accountable, huh?

What's your cleaning style? Are you a checklister, a strict schedule-follower, or a fly-by-the-seat-of-your-pants cleaner? Any tips or tricks on getting it all done?


--------


Pin It!

6.26.2013

Operation {Re}Organization: The Freezer


Ever since I put together my cleaning schedule a few weeks ago, I've had cleaning up and cleaning out on my brain - especially since I put that schedule up right smack on the front of the fridge. No out of sight, out of mind for this girl. Plus, it's pretty to look at and fits in nicely next to my magnetic fridge organizer.


One of the items I put on the monthly part of the list was cleaning out the fridge and freezer. The fridge got a nice clean-out a couple of weeks ago (Um, it's amazing how well those old/expired items can hide in the back corners. Those sneaky things...), but the freezer needed a little more TLC than just a nice clean-out. Let's just say it had some organizational issues - as in it had no organization at all.


Ahh! Crazy mess alert!

Before we get into the solution to this little organizational nightmare, can I just whine for a minute? Make a plea to all the freezer designers out there? Why oh why is there only one measly wire shelf? Do you really think this is a functional design? Please, please do something to make this precious space a little more functional.

Whoa. Ok. Reeling it in...I just had to get that out.

I decided that in order to utilize that one little wire shelf well, I would need some bins. Preferably ones that cost very little money. Enter the dollar store. The one near me always has a great selection of small plastic bins, buckets, boxes, etc. that are perfect for this kind of job. We'll get to those in a minute...

The first thing I did was clean out the freezer - quickly, before any significant melting could happen - by pulling everything out, throwing old items away, and getting rid of anything we knew we wouldn't eat. I love having a clean slate to work with before doing any organizing.


Much better.

(P.S. You can just ignore the junk on the top of the fridge and the items in the freezer door. Just keepin' it real here - I haven't gotten my organizing hands on that stuff yet.)

I moved the shelf up a notch so that four plastic bins would fit, and did a quick wipe down with some all-purpose cleaner before loading everything back up again.

Here's how it looks now with the new bins!


I loosely grouped the items in the bins by category knowing that we generally keep the same types of items in our freezer. I'm keeping it flexible for awhile though, just to make sure I'm really sold on this bin system. If I decide I like it, I'll probably label the bins by category.

For now, starting from the top left and moving clockwise: the first bin holds bread and snacks, the second bin holds ice cream (yep, that needs its own bin), the third hold meat, and the fourth holds vegetables. We keep a bag of ice in there too because the ice from our automatic ice maker tastes yucky :(.

So for a total of $4 (bins were $1 a piece) that's how I cleaned out and organized our freezer. Do you have any tips or systems that have worked well for yours? I'm always open to suggestions!

Pin It!

3.11.2013

The Bathroom: "Befores" and Starting the Organization Process


I'm kicking this week off with some real live photos of our bathroom. Woohoo! But, as I anticipated, taking photos of a tiny room with no natural light ain't easy. I ended up having to wedge myself next to the toilet (not exactly an ideal position, if you ask me...), stand flat up against the wall in the tub, and shoot with a wimpy overhead light as my light "source."

All that to say, I'm asking your forgiveness ahead of time for the somewhat poor quality of the photos in this post. I'm thinking my next major investment may need to be a tripod and a camera remote for circumstances like these. Sigh.

Ok, enough whining. Let's move onto the good stuff - the very early beginnings of my bathroom organization overhaul.

Last time we met regarding this little bathroom makeover, I showed you some beautiful inspiration photos of wonderfully organized bathroom spaces. I mentioned we have pretty good storage, but that we're not utilizing it as well as we can, nor is it particularly pretty.

Today you get the privilege of seeing the three major storage areas in our bathroom I plan to organize. Not-so-lovely befores make for the best afters, right? Here they are...

1. Over-the-toilet etagere:


Its main function is to store items we need to access on a fairly regular basis. Medicines, hair products, travel-related items (our toiletry bags and under 3-ounce containers we take on flights), etc. fall into that category. It also serves as a landing area for our towels, as you can see stacked up on top :).

2. Towel rack/hanging shelf thingy (that's the formal name for it, I assure you):


This isn't so bad, actually. It's doing its job quite well holding extra hand towels and washcloths. This area may not change much. We'll see.

3. Under-the-sink space:


This area is the most disastrous, I think. When we moved in, the storage baskets/bins worked out quite nicely, but over the past nine months, they've lost their way a bit. I've got lint rollers mixing in with dog shampoo, sunscreen and hair curlers in that woven basket. Not good.

The two plastic bins on the right house extra toiletries that I've bought on the cheap thanks to sales and coupons. Cleaning products are hiding behind the mouthwash on the left. Extra toilet paper lives in the very back.

As always, whenever I begin any organizational project, the first thing I do is empty everything out. Starting with a clean slate is so important because it forces you to evaluate everything are keeping in those spaces. It also gives you a chance to do a thorough cleaning of drawers and shelves (because we all know how often that happens once you have all your stuff situated).

Here are my cleaned out spaces:


Ahh, so nice.

I realize that the space under the sink still looks a little dingy, but since we're renting, I'm not planning to do anything drastic to it. (If we owned, I'd repaint the inside of that cabinet in a heartbeat!)

Once cabinets were cleaned out, I started the purging/sorting/organizing process.

I designated our bedroom floor for that area:


I'm knee-deep in sorting and purging right now, so this is the most you'll see in terms of "progress" for today. I'll leave you with a few tips for the next steps of the process (helpful reminders to myself more than anything!). I won't go into detail about the major points, since I covered general steps and principles in this post. They are pretty much the same for any organizing project, but here are a few additional helpful bathroom-specific details...

1. Go through all medications. Toss any expired, unused ones (don't flush them unless the label tells you to do so!). If you're not sure how to dispose of a medication, check out the FDA's website here. Group the remaining medications together so you can easily find the one you need.

2. Clean hair/makeup brushes. This is an easy one to overlook, and it only takes a few minutes. Who wants to use a dirty brush on clean hair? (I'm definitely guilty of not doing this as often as I should!)

3. Throw away any items you no longer use or that have expired. This includes old makeup, that shampoo you never liked, empty containers that have stuck around...

4. Donate gently used items or unopened toiletries. Emphasis on gently used. For example, if you have an extra toiletry kit you don't use, consider giving it to someone in need. If you have more toothpaste than you'll ever use, maybe give your surplus to a homeless shelter or a non-profit that collects toiletries to hand out to those who can't afford them.

5. Sort and group like with like. Pretty self-explanatory. 

6. Brainstorm the kind of containers you need to keep your items organized. Do you need open-topped containers for cleaning products? Boxes with lids for extra toiletries? Cups to hold toothbrushes or small items like Q-tips? My bathroom organization Pinterest board has lots of ideas if you're looking to get creative, or you just need a little inspiration!

7. Think about how you use your space. This will be different for everyone, so make sure what you do works for you and your family! 

Phew! I think that's enough for today. Hope y'all have a great Monday!

--------

This post is a part of the series "Operation {Re}Organization." To see other posts in the series, click the tab at the top of the page.


Pin It!

1.23.2013

Operation {Re}Organization: Behind the Scenes


Remember this mess I showed you last week during the "gather and purge" stages of my office reorganization?


I thought it would be fun (and possibly a little embarrassing) to share some behind-the-scenes info about the process. Alternate titles for this post could be: "The {Un}Glamorous Side of Organizing" or "Chaney: Pen Hoarder Extraordinaire." This post ain't pretty, but in the spirit of keeping it real, I figured it would be worthwhile to share. As we all know, organization isn't all that glamorous - until you get the part where you get to use things like washi tape(!) to label things.

As I was cleaning out, purging and grouping my office supplies, I started making a list of all the things I found - mostly for my own amusement, but it did make me realize a few things about myself. For one, I hoard office supplies. I admit it. (That's the first step, right?) Especially pens, tape and paper. And I can't bear to throw away things of monetary value or that are tied to a memory. To demonstrate some of these hoarding tendencies, I took a few of the photos from last week's office post and labeled them with my finds.


Four. Separate. Pen. Collections. Really? That apothecary jar is full of sharpies and markers, which aren't really pens, but for the sake of calling myself out on my hoarding tendencies, they fall into the "pen" category. What can I say? I love writing implements. I did realize I needed to consolidate though. No one needs access to that many pens on a daily basis. So I tested every pen to see if it worked (yep, every one), and put my ten favorites in a pen cup. The rest of the working pens were relegated to my box of extra office supplies.

Also pictured is my extensive tape collection. Double-sided and regular scotch. I probably don't need to say anything else about this except that I don't need to buy any more tape. Probably for like, five years. Seriously. 

Onto the next photo!


First of all, 42-cent stamps? Stamps now cost 46 cents. They cost 42 cents waaaay back in 2009. I looked it up. In order to use that stamp, I would have to add 4 one-cent stamps to the envelope (yes! I can do math!). It would cost me more in gas to get to the post office and buy those one-cent stamps than that 42 cents that stamp is worth. My solution? Hold onto the stamp - maybe I'll need it for extra postage on a larger envelope. Is that ridiculous?

Notepads. I have a size to fit any note-taking need. Need one for a grocery list? Got it. To-do list? Check. Note to the dog walker? Not a problem. Again, probably won't need to buy another notepad for about five years. Maybe ten.

Notecards. Three sizes. Straight to storage since no one is in school or studying right now.

Onto the last photo!


I discovered a small collection of postcards from a trip to Barbados I took in middle school with my family. How in the world these traveled with me all these years I have no idea. Some of them are even duplicates! Though I have good memories of this trip, I have no emotional attachment to these cards, so they took a trip to the trash. And yes, all the rest of the stationery you see there stayed. I have a vast collection. Slightly embarrassing. I'll try not to buy any more of that for awhile. Try.

Whew! That was fun. Hope you enjoyed this behind-the-scenes look. On a positive note, in the midst of this little organizational exercise I did find $21. Yessss. I love finding cash in unexpected places!

Anyone else have some fun discoveries recently while cleaning out closets/baskets/drawers?  

--------

This post is a part of the series "Operation {Re}Organization." To see other posts in the series, click the tab at the top of the page.

Pin It!

10.17.2013

Organizing the Car {31 Days: Day 17}

I've been learning recently that a major part of using and loving what you have is taking good care of your stuff. And I must admit that I've been really, really bad at that with something I use every single day - my car. I have a love/hate relationship with my nearly 10 year old Jeep. It has served me really well for the most part, but I'm not a fan of the terrible gas mileage or the expensive repairs I've had to have recently. I've done a pretty good job with things like schedule maintenance, oil changes, etc., but when it comes to keeping my car clean and organized, I've been failing miserably. It's kind of sad. I used to take such pride in keeping my car clean and tidy, and then for some reason over the past few years, it's become a total disaster zone.

So, when I started this series, one of the first things I put on my list of topics was cleaning and organizing my car. I finally took a stab at beginning to clean and organize it this week, and I figured I'd share some of my progress with you today! 

I started with the trunk. Here's a really terrible photo of the before. Brace yourself:

That's one messy car - and one grainy photo!

And here's where I am today:


Big difference, huh? Sure, there's still a giant circular stain from an old tire, but what a difference!

What I did was very straightforward. I started by taking out all the junk and trash and sorted through it. I kept what was supposed to be in the car there (and organized it - getting to blue bin you can see in a sec), threw away trash, and took anything that belonged in the house inside. 

The next day, I took my car to the carwash and spent a well-worth-it $20 to have it vacuumed out and washed. I can't remember the last time I did that.  

Besides that squeaky clean awesomeness, my other favorite part is my new "car essentials" kit I put together. Now this is by no means a comprehensive collection of items, so if you're looking for what to keep in an emergency kit or something, this isn't the place! There are a few things I like to have on hand though in case I need to fix or clean something in a pinch. If it's anything major, I'm calling AAA. Just sayin' :). I don't pay for that service for nothin'!

I already had this large Scout Junque Trunk in our apartment - where it was doing a great job accumulating clutter - so I cleaned it out, found homes for its former contents, and designated it as my car essentials tote.


I placed jumper cables, paper towels, windshield wiper fluid, a flashlight, a flare, duct tape, wrench, screwdriver, ice scraper and a towel in here. The size is WONDERFUL for corralling these necessary, but clunky items, and I know it won't tip over - kind of an important quality in a car tote. :)


So that's as far as I've gotten with my organization. It's nothing fancy, but at least the bin is pretty snazzy-looking. Next I'd like to hit up the front areas like the center console and glove compartment, but that'll have to wait for another day. I'm hoping that giving this big ole piece of machinery a good clean out, pampering and a little organization will help keep me motivated to take care of it better. Going through this process also reminded me that it's a huge privilege to even have a car, let alone one that works just fine, and gets me where I need to go.

Do you have any car cleaning or organizing tips? I'd love to hear 'em!


Read the series from the beginning...

Pin It!

6.27.2013

Operation {Re}Organization: The Dishwasher


While I'm on my cleaning kick (in case you missed the other posts, they're here and here), I thought I'd throw out a helpful hint about speeding up your dishwasher routine. Forgive me if this hint I'm about to give seems a little OCD, but it really works for us, and has made the unloading process less cumbersome. Warning, this hint may be the most obvious one in the entire world, but I just figured it out recently, so just play along with me, k?

Sometime in the past six months or so, I decided I was tired of having to sort the clean silverware and cooking tools as I was putting them away. It might seem ridiculous that I didn't have any patience for this task that takes approximately two whole minutes, but for some reason it really bugged me - that is, until it hit me one day that I should sort them as I load up the dirty dishes instead of after they're clean.

Duh.

So, armed with this new strategy, I assigned a specific item to each section of the dishwasher basket - i.e. all the knives go in the first one, small spoons in the second...etc. as demonstrated here.


In other words, group "like with like." That way, once the dishes are clean, I just put the basket on the counter and grab each type of utensil all at the same time (that's the time saver!) and put them right in their homes in the silverware drawer. This is instead of having them all randomly dispersed and having to sift through each section of the silverware basket to make sure I got all the spoons out and put away, and then all the knifes... 


I taught my husband "the system" too. It only works if everyone's on board, right? 

Now, I will say that I'm not quite OCD enough to be particular about which utensil goes in which section. (For example, knives don't always have to go in the first slot.) It's all about just making sure that "like" items are grouped together in the same place.


On a scale of 1-100 on major world problems, I'd say this ranks close to a zero, but it is one little thing that smooths out my cleaning routine and keeps me a little more sane. One day, when there are more than two people in our house, I'm sure this tiny time saver will come in handy more so than it does today, but it's never too early to get into good habits!

So what do you say...am I a crazy person for sorting my utensils? Or am I late in getting on board with this strategy? Do any of you have any other brilliant tips on speeding up your dish washing routine that I need to know?

---------


Pin It!

12.05.2012

Christmas House Tour

I've spent parts of the last week or so getting our little apartment ready for Christmas, and finally have some pictures to share with you! Since I've had to do most of my decorating at night after work, it's been hard to take good photos without natural light (except for a couple on the weekends). Bear with me on photo quality, but I was so ready to share that I just went ahead and did the best I could!

Join me on a little 2012 Christmas tour...

First stop is our tree. As I mentioned in my Thanksgiving Rewind post, we stopped at Crazy Joe's Christmas Tree Farm on our way home from C's family's house and cut it down. So it's actually been up since November 25th! I hope it survives until Christmas. I'm a little worried about it drying out by then, but it looks pretty now. I love coming home to the smell of a real Christmas tree every day.

Here's the tree during the day...


And at night with the lights on...


This year's tree keeps with the color scheme I mentioned in my inspiration post: green, white and silver. My ornaments are a simple collection of silver, clear glass, and mercury glass. The silver ones are especially special, because each one was a gift from my parents. They have given me one every year at Christmas for as long as I can remember. Pretty crosses, like the one below, along with stars and snowflakes, are a big part of the collection. Of course, as a kid, these were my least exciting gifts, because the didn't do anything. Boy, do I appreciate and love getting them now. Thanks mom and dad. I'm really glad you had the foresight to give me something that I would be able to use every year for the rest of my life!


The sheep in the background of this next photo is another special one. It was on my grandparents' tree every year. Our family spent many of my childhood Christmases with them in Montgomery, and every year when we arrived, the tree was already up and decorated. I would go find my favorite ornaments and I remember this sheep well. Years later, I found it when we were cleaning out their house after my grandmother passed away. This little sheep came home with me and reminds me of my grandparents every time I see it. It's the only white ornament on the tree.


New additions to the tree this year are these mercury glass birds I picked up at a barn sale a few weekends ago...


...And these glass balls with a pretty swirl around the outside. I bought them on sale after Christmas last year from Crate&Barrel outlet. They don't seem to have them anymore, but they do have a lot of pretty ornaments if you're looking for some! 


The next stop on our tour is a handmade Advent calendar. This was a fun, though somewhat tedious, project I did last weekend. I've got a simple tutorial coming tomorrow (I know, I know, we're already 5 days into December...but better late than never!) in case you want to make your own. So consider these photos a preview!


I hung it in our living room over the TV. I wish we had a mantel or something I could hang it over, but we're working with limited space here. Gotta work with whatcha got. :)


Onward!

The closest thing we have to a "mantel" in our apartment is the tabletop on our jelly cupboard (and no, we don't actually keep jelly in there in case you were wondering). Since it's one of the first things you see when you walk into our apartment, I've been changing what's on top of it seasonally. For Christmas, I put these glass trees and angels on the tabletop. They were also from my grandparents' and were out on display every year at Christmas. The tray they're sitting in was a wedding gift. I believe it's made by Mariposa.


The last stop on our tour is our side tables in the living room. The trees that are sitting here were a makeover project from last weekend. This is the "after" of one of the trees. There's one on each side table.


A full post on that makeover is coming Friday, so come back then to see what they looked like before, and how I changed them up to fit more with the look I was going for this year.

That brings us to the end of the tour for today! I'm constantly tweaking and adding things, so I may have some other updates for you to come. I'd like to add some real greenery as it gets closer to Christmas, but am still planning to keep things clean and simple. 


How have you decorated for Christmas this year? Any especially meaningful ornaments or decorations? I'd love to see/hear about them!

-------


Pin It!
Related Posts Plugin for WordPress, Blogger...
Blogging tips