1.27.2016

February 2016 Desktop & iPhone Wallpapers


Welcome to the first installment of my 2016 iPhone and desktop wallpapers! Yep, I missed January (oops). It was fun to get back in the swing of graphic designing with these guys. I didn't realize how much I had missed it!

This month, I've got three renditions of the design - they've got the same background, but there's a calendar option, a quote option and a blank option. So many options!

For these wallpapers, my inspiration came from a little escape I went on with my husband to a tiny island in the Bahamas for a few days. Our last night there, we witnessed the most beautiful sunset as we sat out on a pier sipping our final fruity cocktails for the week. I couldn't get over the "golden hour" light that spread out all over the calm waters. I wanted to freeze time and have it stay like that forever. Of course, I couldn't do that, so I snapped a photo instead.


Peaceful, isn't it?

For the wallpapers, I snagged a little corner of that photo and turned it into the wallpapers you'll see below.

The calendar and blank ones are pretty self-explanatory, but the one with the quote from C.S. Lewis might be my favorite of the bunch.
"There are far, far better things ahead than any we leave behind." - C.S. Lewis
To download the one (or ones) you'd like for your phone or desktop, click the link below the image. It will take you to a Dropbox file where you can download it directly. As always, these are free - no strings attached. Enjoy!


Enjoy what you read today?  Enter your email address below to subscribe to May Richer Fuller Be!  Delivered by FeedBurner

Pin It!

1.25.2016

China Hutch for the Dining Room

*Missed last week's #phillyreno update on the downstairs? Check it out here! And follow me on Instagram for all in-betweens and sneak peeks.

I hope you all had awesome weekends! We had a big blizzard sweep through our area this weekend that dumped 20 inches of snow in our hood and it. was. awesome. I'm always gunning for one giant snow storm every winter (that's my inner child coming out) and boy did we get one this year. We're still digging out! Once it's gone though, I'm ready for spring. Bring on the warmer weather!

Anyway, onto today's post!

Since we moved into this house, I've been itching to find a great piece of storage furniture for the dining room, and after I got a little money for Christmas from my parents I was ready to begin the search.

I was looking for a piece to fit the space on the wall to the left of the dining room table:


That big ole wall was just begging for something to fill it!

Knowing I wanted to make those Christmas dollars stretch as far as possible, I started by taking a peek at my favorite second-hand furniture store and wouldn't you know it, I found the perfect piece! When does that ever happen when you're thrifting?! I was totally prepared to have to hunt for awhile, but lucked out this time and - bonus - I got it for a steal since they were having a sale. (For you local Philadelphians, the store is called Uhuru. It's all furniture and home decor, and their prices are fantastic.)

So what did I find? Let's take a peek!


The minute I spotted that china cabinet, I knew it was the perfect size and style for the room. It's going to give us so much storage for our barware, china and serving dishes. I like that it's tall and on the narrower size (good for our petite home), and I love that cool detailing on the lower doors.

And now that this piece is in, I can't wait to flank either side of it with some sort of large, framed art to finish off this wall in the dining room.


It has mid-century vibes, which I love, but I can't quite peg it as a true mid-century piece. What would you guys call this style?


Here's a wider shot of how it looks in the dining room as a whole:


In that photo, you can also catch a glimpse of the new ceiling fixture that recently went up in the living room. It's the Traditional Urban Drum semi flush ceiling light from Shades of Light. I actually got it at the outlet in Richmond when we were traveling over Christmas, but even at full price, it's a good deal. Richmond friends, run, don't walk to their outlet! It's amazing.

But back to the china hutch. The one thing I wasn't crazy about was how dark it was inside the glass door section. Our glassware just kind of got lost in there.


I came up with a solution to make things pop that turned out to be a very simple fix (hint: it didn't involve a paint brush), but you're going to have to wait to see it until I have a chance to put everything back on the shelves! That'll probably be next week. Since this is a showpiece in our dining room, I want to have some fun with the styling. If anyone has any tips on that, I'm all ears! There's a lot of surface area in there.

So that's my latest thrifty find! Have you had any thrifty scores recently?

Want to catch up on other #phillyreno updates? Find all the posts under the label "renovation."

Enjoy what you read today?  Enter your email address below to subscribe to May Richer Fuller Be!  Delivered by FeedBurner


Pin It!

1.19.2016

Living and Dining Room Progress {Philly Reno House Reno}


We're quickly wrapping up the house progress tour over here! You can catch up on what has happened so far in the kitchenmaster bedroomguest bedroom & office and bathroom if you missed any of the previous renovation progress posts, but today we're focusing in on the living and dining room.

Since our first floor is completely open concept, it make sense to group the living and dining room progress photos together. Let's start with the living room!


We tried out a couple of different furniture arrangements in here and settled on this one. You come right into the living room from the front door making it a high traffic area. It's also long and narrow, so it is important to maximize both seating and traffic flow in there. Putting the couch against the wall with the chair at the end of the coffee table seems to work best with the furniture we have now.


Right now, you can see below that we have that large antique jelly cupboard by the front door and it acts as a sort of entry table, but it's probably not going to stay there. I'd like to define more of an entryway space with coat storage on the opposite wall by the staircase. By doing that, it would free up a little bit of space to add another chair to the living area (something that's on my wish list).


If you turn around from that photo above, you'll find yourself in the dining room. This room has been in a bit of a holding pattern while we decide what kind of table we want. Our current one looks so tiny in here now! (Hello giant dining room!) 

Clearly we need a new chandelier here too. ;)


Looking into the kitchen for a sec, you can see we've made a bit more progress in here too: we have pendants over the peninsula and stools! I wasn't sure we wanted/needed the stools in here, but now I'm so glad we have them. It's awesome to be able to sit at the bar while someone is cooking.


Here's the view from the kitchen back toward the front door to help orient you a bit. (Also, can you tell I took these photos during Christmas? I spy a tree!)


Since I took these photos a few weeks ago, we've already made some more progress that I'm SUPER excited about. My awesome father-in-law came up and gave nearly all of the trim in the living and dining room a fresh coat of bright white paint (Behr Ultra Bright White), painted the living room radiator white, and put up a new light fixture in the living room. Last week I found a china cabinet for our dining room for a steal at a local second-hand furniture store that I can't wait to style up, and I bought two roman shades from West Elm that are on their way for the front windows. Can't wait to show you soon!

So what's on the to-do/wish list for downstairs now?

  • Find a new dining room table and chairs
  • Find a new light fixture for the dining room
  • Figure out what to store in the china cabinet and how to organize it
  • Define the entryway
  • Finish painting trim and touch up other areas
  • Paint the dining room radiator white
  • Install the roman shades in the front windows
  • Find a second chair for the living room
Making a list like that feels so daunting, but I'm trying not to put too much pressure on myself to define a timeline. It'll happen when it happens and I'm so proud of what we've accomplished so far! :)


Source List:


Enjoy what you read today?  Enter your email address below to subscribe to May Richer Fuller Be!  Delivered by FeedBurner

Pin It!

1.13.2016

Upholstered Headboards - DIY or Buy?

After one post on the progress we've made in our master bedroom and another on the guest bedroom, the topic of headboards sure has come up a lot recently. I think a headboard is a vital part to making a bedroom look put together and "finished," and it's driving me crazy not having the right one for our master and not one at all (gasp!) in the guest bedroom. I hope to remedy that situation soon and I've been going back and forth between DIYing another headboard and buying one.

I've DIY'd several headboards in the past and it can be a pretty quick and straightforward process if you keep the design simple. An added bonus is that you get to choose your fabric, making it a completely custom piece. Y'all seem to be into making your own headboards too, considering that the one I made that's currently in the master is one of my most popular posts ever!


In other headboard-making adventures...last summer, rather than DIY from scratch, I cheated and bought two very inexpensive ones from Walmart and reupholstered them in an adorable patterned fabric for a room in my parents' river house (read all about that here and see the finished room here). Boy, was that project a breeze!


This time around, I'm toying with buying a new one for our master that's ready to go right out of the box, but the DIYer in me is protesting a little at that idea :). To appease my DIY side, I'm probably going to reupholster the one in the master and move it to the guest bedroom.

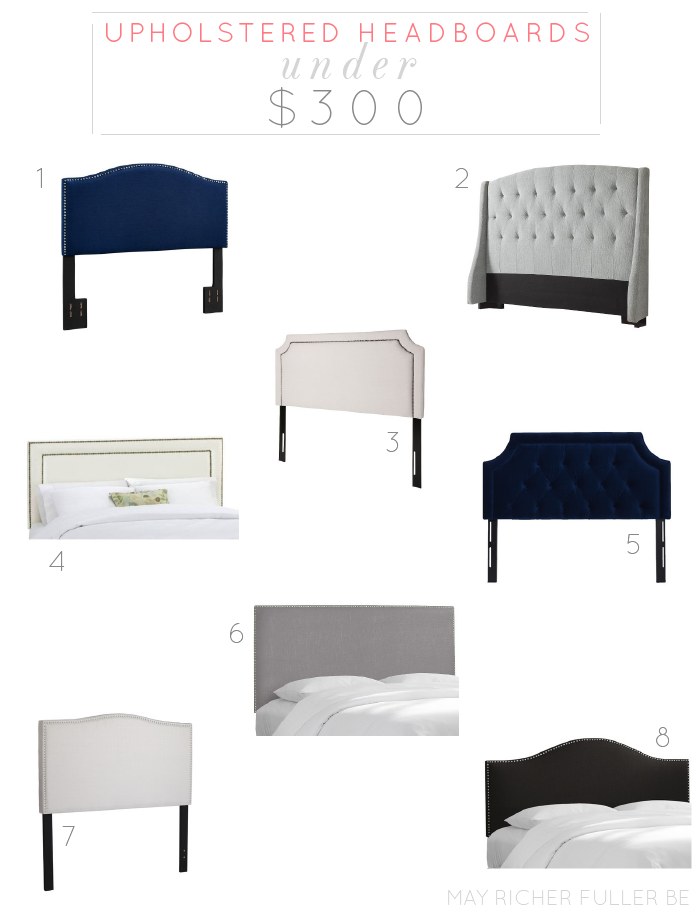
So! Where do we go from here? Find some upholstered headboard options, of course! As per usual, I'm always trying to keep things on a reasonable budget, so I started to take a look at what my options are for upholstered headboards under $300. There are a surprising number of good lookin' ones out there in that price range. Check these out:


I'm going to mull these options over for a bit and I'll be sure to keep you updated on the decision! Thanks for letting me brain dump here on headboards today. It's kind of fun to share my thought process on "house stuff" every once in awhile!

Enjoy what you read today?  Enter your email address below to subscribe to May Richer Fuller Be!  Delivered by FeedBurner

Pin It!

1.11.2016

Guest Bedroom + Office Update {Philly Row House Reno}


It's time to share more progress on our Philly Row House today, folks! I'll cover the rest of the upstairs, which includes the guest bedroom and my office. Upstairs there are three bedrooms and a bathroom, and I talked about the master bedroom last week. Check that out here.

We made the middle bedroom into the guest bedroom and it's a pretty little cozy space if I do say so myself!


The bed is in need of a headboard (I may snag the one that's in the master bedroom and make a new one for that room) and I'm debating what to use in here for bedside tables, but I'm happy with how it's coming along. It feels a bit more traditional than my style leans these days, but there's plenty of time to remedy that!


I love that old chest of drawers - it's a piece we inherited from my grandparents and it is a beast. They just don't make 'em like that anymore.


I can't wait to add some finishing touches to this room over the coming months!

Now, onto the office, which is where I spend the majority of my days :).

If you've been following the blog for awhile, you're probably having deja vu because I pretty much just transplanted it from our old house, but now I have more than double the square footage. You might remember how tiny my office was (which wasn't an issue - I'm just telling it like it is!) and now half of this room is empty. I don't know what to do with all that extra space, ha! We're thinking of making that spot into a mini sitting area, but we'll see...

Anyway, my desk is under the back window, and the only other piece of furniture is a bookcase.


It's a great space, and as I've said about every space in our house so far, I can't wait to continue making progress on it!

In the next Philly reno update, I'll show you how we're doing downstairs. It's come a long way too!

Enjoy what you read today?  Enter your email address below to subscribe to May Richer Fuller Be!  Delivered by FeedBurner

Pin It!

1.06.2016

Beds in Front of Windows {Yes You Can!}


{The Hunted Interior}
Let's debunk the design myth that beds should never go in front of windows.

Yes! You can pull it off! I did it, and you can too!

I mentioned at the end of Monday's post that I would share some examples and I have some great ones to show you today, but let's talk about the "why" first. Furniture placement is so important to the flow, function, and look of a room, and sometimes doing something that might seem a little unconventional ends up working best.

Typically, beds are positioned against walls, right? Sure, but what if your bedroom is small (hello city living!), every wall has windows (not a bad problem!), or if it just feels right? Then it might be time to break that rule and push that bed up against the windows. To make it feel less awkward and purposeful, frame the bed with curtains or other window treatments, choose a headboard (or don't) that you love, flank the bed with pretty side tables, and hang mirrors if you can. Don't forget to hang those curtains high and wide, friends! When done well, all of a sudden, that bed under the windows becomes the beautiful focal point and you've got yourself a winner of a bedroom.

Let's take a look at some of the pretty examples I grabbed from around the web:

{Homepolish}
{BHG}

{Helen Davidson Design}
{Dayka Robinson}
{StyleRoom}
{BHG}
What do you think? Are you on board with putting your bed in front of the windows? If you've done it, I'd love to see!

If you need help making your house into a home you love, give me a shout! I offer affordable and approachable e-design services over at Mix & Match Design Company!

Enjoy what you read today?  Enter your email address below to subscribe to May Richer Fuller Be!  Delivered by FeedBurner

Pin It!

1.04.2016

Master Bedroom Update {Philly Row House Reno}


Happy New Year, y'all! I hope you've had a good start to 2016 so far. We spent the last 2.5 weeks traveling for Christmas and New Year's and I'm eager to get settled back in at home again and share some of the progress we've made on our row house in Philadelphia. So much has happened! I didn't mean for there to be such a long hiatus between progress posts (oops), but with the holidays being so busy I decided it was just fine to hold off.

How about we kick off the new year with the master bedroom progress? Since I left you with a teaser of it in my last post, that's probably a good place to start. Here's what it's looking like currently:


If you remember the before and real estate photos, you might recall that this room was, for lack of a better word, poop brown, and had the same wall-to-wall carpet as the rest of the house. We ripped that carpet out, installed beautiful new hardwood floors, painted the walls and trim, and moved on in.


This room has a lot of wall bump-outs (making it almost cross-shaped), and therefore furniture placement is a little tricky. After starting with putting the bed on the left wall, which is where the previous owners had theirs, we quickly realized that best place for the bed was actually under the windows. 

Don't be scared to put the bed under the windows, friends! It's totally ok! I'll be showing you some great examples of that in my next post.


Having the bed under the windows made the room feel so much more open, and it helped with the "flow" of the room giving us easy access both sides of the bed, closet and dresser. 


I absolutely love this light fixture we put up (it's from Lowe's - the full source list for this room is at the end of the post). It was the first fixture I picked out for the house and it's a great focal point for this room.


The dresser fits perfectly along the left wall (that's where we put the bed originally).


The closet is on the wall opposite the bed and - amazingly - fits all of our hanging clothes! I did a major closet clean-out before we moved and I think that helped :). I would love to put some sort of closet organization system in there at some point, but we're happy with the amount of space it gives us!

I'm thrilled with how well this room has come together so far. The only new items we purchased for this room are the long curtain rod and the light fixture. Everything else we had before. I have a running list of projects for this space in my head (and every other room in the house, ha!), but I'm trying to take things one day at a time and live in it for awhile before making any big decisions. 

One project that I'll probably tackle sooner than later is a new headboard. Since the bed is in front of the windows, I want something that's a little shorter to let as much light in as possible and not block the windows as much. It'll probably be another upholstered headboard, but we'll see! The other one will likely move to the guest room.

That's about it for today! Let's take one last look at the master...


Hope you enjoyed seeing the progress on this room!


Source List:

  • Headboard: DIY project. Instructions are here.
  • Duvet and shams: TJMaxx
  • Gray and white striped pillows: H&M (no longer available)
  • Pendant light fixture: Lowe's
  • Blue blanket: West Elm (no longer available)
  • Curtains: IKEA Vilborg  (these are SUCH great quality and a steal for lined curtains!)
  • Rug: RugsUSA Homespun Chevron
  • Nightstands: family pieces
  • Dresser: family piece


Enjoy what you read today?  Enter your email address below to subscribe to May Richer Fuller Be!  Delivered by FeedBurner

Pin It!
Related Posts Plugin for WordPress, Blogger...
Blogging tips