

For my birthday this year, I asked for a drill. Yep, looks like I'm solidly in the DIY blog camp now that I own my very own power tool. (Picture me smiling BIG over here.) For my first project using this new toy, I decided that I couldn't just use it to screw something together, I had to do something creative. That "something" became a pretty super project that I'm excited to show you today: a votive holder made from scrap wood.
I certainly can't claim to have invented this idea - I've seen versions of these guys in lots of places! - but I was excited to try my hand at one since I had a few leftover pieces of 2x4 from my upholstered headboard that were in the "use it or lose it" category of things I've saved from other projects. It was either use them for something ASAP or they were going in the trash. I'm definitely on a "toss it" kick right now when it comes to clutter so nothing is safe :).

This project is super simple if you have the materials and equipment on hand and about ten spare minutes.
Supplies needed:
- Piece of wood
- Power drill
- Spade bits (Spade bits are handy little things to have around for drilling holes or circles into wood. I'm pretty sure their original purpose wasn't to make votive holders, but that's what I'm using them for today!)
- Votives/tea lights
- Paint or stain (optional)
The first thing you need to do is measure out the diameter of your votive candles and make sure you have a spade bit that's a tiny bit wider than that. Turns out I didn't - oops! 1 1/4 was just a tad too small.

I have a lovely solution for that little problem that I'll get to in a second that doesn't involve going out to Home Depot and buying another spade bit. FYI, the spade bit set I have is similar to this one . (*affiliate link)
I have a lovely solution for that little problem that I'll get to in a second that doesn't involve going out to Home Depot and buying another spade bit. FYI, the spade bit set I have is similar to this one
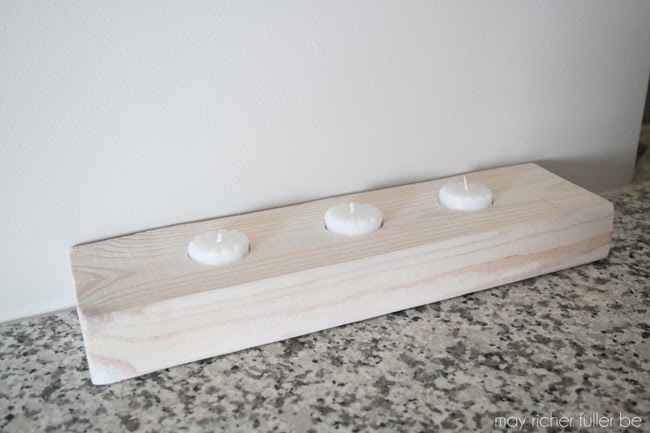
Once you've made sure you have the right spade bit (*ahem*), measure out where you want your circles to go. I had a pretty short piece of wood, so I decided on three evenly spaced circles (hint: odd numbered groupings are visually appealing). I found the middle of the 2x4 piece first, marked it with a pencil, then measured out three inches in both directions and marked those spots as well.

Then it was time for drilling. I decided to make my circle holes on the shallow side so you'd be able to see the tops of the candles. You could also make them deeper if you like that look.

Once you're through drilling, all you have to do is stick your votive candles in and you're done! So easy, right? But wait, remember how I said that my spade bit wasn't wide enough for the diameter of my votive candles? So how in the world did I manage to make them fit in the holes?
Enter the vegetable peeler.

I used it to shave off some of the candle wax to shrink its diameter. It was so, so easy to do, and even though the candle may not be perfectly round anymore, it saved me a trip and some dollars on supplies I didn't have to have for this project. I made do with what I had and I'm totally happy with the result!

I also added an optional step at the end to make that 2x4 look less like a 2x4 - I whitewashed it. I mixed up a little white paint and water and brushed that baby quickly with a small art paint brush. I wiped off the excess paint with a paper towel and voila, whitewashed wood.


It's a subtle, but well worth it, optional step. I like the beachy, bleached look. Once the paint was dry, I plopped the newly sized-down votive candles into the holes and called this project done.

This little votive holder would make an awesome addition to a table centerpiece or a mantel. It's simple, clean-lined and a little rustic, but pretty cute too if you ask me!
Now, before you go off any make one of these I need to throw in an obligatory warning since these are candles and they're in close proximity to wood. DO NOT, I repeat, DO NOT leave burning candles unattended. If I were to light these babies, I would put a piece of tin foil around them before placing them in their holders to make sure the flame doesn't come anywhere near the wood. I had to take them out of their original tin cups to make them fit, so I'd need to replace those with some other form of fire protection.
Ok, all done :). Now go make yourself a cute little votive holder from some scrap wood!
Then it was time for drilling. I decided to make my circle holes on the shallow side so you'd be able to see the tops of the candles. You could also make them deeper if you like that look.

Once you're through drilling, all you have to do is stick your votive candles in and you're done! So easy, right? But wait, remember how I said that my spade bit wasn't wide enough for the diameter of my votive candles? So how in the world did I manage to make them fit in the holes?
Enter the vegetable peeler.
I used it to shave off some of the candle wax to shrink its diameter. It was so, so easy to do, and even though the candle may not be perfectly round anymore, it saved me a trip and some dollars on supplies I didn't have to have for this project. I made do with what I had and I'm totally happy with the result!
I also added an optional step at the end to make that 2x4 look less like a 2x4 - I whitewashed it. I mixed up a little white paint and water and brushed that baby quickly with a small art paint brush. I wiped off the excess paint with a paper towel and voila, whitewashed wood.
It's a subtle, but well worth it, optional step. I like the beachy, bleached look. Once the paint was dry, I plopped the newly sized-down votive candles into the holes and called this project done.
This little votive holder would make an awesome addition to a table centerpiece or a mantel. It's simple, clean-lined and a little rustic, but pretty cute too if you ask me!
Now, before you go off any make one of these I need to throw in an obligatory warning since these are candles and they're in close proximity to wood. DO NOT, I repeat, DO NOT leave burning candles unattended. If I were to light these babies, I would put a piece of tin foil around them before placing them in their holders to make sure the flame doesn't come anywhere near the wood. I had to take them out of their original tin cups to make them fit, so I'd need to replace those with some other form of fire protection.
Ok, all done :). Now go make yourself a cute little votive holder from some scrap wood!
Read the series from the beginning...


linking up to: DIY Showoff, Rain on a Tin Roof, Home Stories A to Z, Uncommon Designs, If It's Not Baroque, Liz Marie Blog, Blissfully Ever After,Design, Dining and Diapers, Crafty Scrappy Happy, Craftberry Bush, The Shabby Creek Cottage, Tatertots and Jello, Serenity Now, It’s Overflowing, House of Rose, Love of Family and Home, Dear Creatives, Madigan Made, First Home...Love Life, Simply Dream and Create,Whipperberry, Sparkles and A Stove, Making Home Base, Naptime Creations, Southern Hospitality, Remodelaholic, Living Well Spending Less

ReplyDeleteغسيل خزانات بمكة غسيل خزانات بمكة
غسيل خزانات بجدة غسيل خزانات بجدة
غسيل خزانات بالدمام غسيل خزانات بالدمام
Just desire tto say your article is as surprising.
ReplyDeleteThe clarity in your post is simply excellent and i could
assume you’re an expert on this subject.
Well with your permission allow me to grab your RSS feed to keep updated with forthcoming
post. Thanks a million and please carry on the enjoyable work.휴게텔
Every order is customized and written to order from scratch essay writer. Guaranteed original! We are ready to provide you with professional essay help when you need it.
ReplyDeleteFor many reasons, I have been using the fact that you can buyessay for a long time, there is a writing service, an assistant who will write any written work for me, inexpensively and with high quality
ReplyDeleteI am always interested in learning something when I arrive in a new city where I have to study for a while, and many people use advice when learning. I take advantage of the fact that there is an essay writer, an assistant who does any written work.
ReplyDeleteCustomers who order from us get their essays completed by highly qualified individuals thesis writer. Every writer you hire from our assignment service has undergone a background check to confirm their credentials.
ReplyDeleteIf you wonder where to buy motivation letter written by a qualified writer then I will make you happy a little bit. On the website where I order my essays, you will get exactly what you need.
ReplyDelete