7.26.2016

Tracking Budgets + Keeping Projects Organized


As y'all know, we're about to embark on a serious kitchen renovation over here! Last week I filled you in on plans, materials and finishes, and today I'm going to talk a little bit about how I'm keeping this project organized and making sure we're staying on budget.

Since so much goes into a kitchen renovation (or any big house project for that matter), I knew there was no way I could keep everything straight in my head - let alone stick to a budget - without a little bit of help from technology. I found that a combination of two tools, Pinterest and itsums, worked beautifully for me.

The first tool I used, and probably the most obvious one, was Pinterest.


Pinterest is an awesome resource for finding inspiration and keeping track of favorite images you find on the web, but did you know that you can create secret boards that no one else can see? These are perfect for project planning because you can corral not only the pretty images, but the practical things too, like floor tile samples, that you like. You can also invite others to pin to these secret boards (or regular boards if you want to go that route), so if you have a partner in the project, it's a nice way to be able to collaborate together.

I started a secret board (I guess it's not so secret anymore since there's a screenshot of it above!) for our kitchen remodel almost a year ago, way before we knew it was going to happen for real. It was fun to dream about it and allow my plan to develop over time as I honed in on how I wanted things to look and what kind of budget we'd have.

Speaking of budgets, one thing Pinterest can't do is track those. That's where my second tool, itsums, comes into play. This one's a game changer, y'all - for real.


I started using itsums for my kitchen remodel, but now I'm using it for client projects too because it's just that helpful!

It has some similarities to Pinterest in that you can create different "boards," (called sum boards) "pin" from websites, and add bits of information to each image, but where it differs from Pinterest is that it's primarily a budgeting tool. It's much less focused on pretty images and more focused on the practical part of a project - knowing where the money is going.

For example, for our kitchen project, I created a sum board called "Kitchen Remodel" and put in our budget. Then, every time I picked out an item for the kitchen, I added it to the board using the handy little itsums bookmarklet, which, when you click it, pops up in a window like this:


There you add the item's price, how many you need, which board you want to add it to, the category (if you want - this isn't always necessary) and any notes about the item. Once you hit save, you can choose to view the sum board, which looks like this:


On the left, you can scroll through and see all the items you've added, and on the right you can see the sum of the items, your overall budget, etc. Once a project is going and you start buying items, you can hover over them and click "purchased." The "purchased" section on the right will automatically update and show you what you've spent in real time. Pretty cool huh? There's also an option to "hide" the item from your budget if you're not sure you're planning on purchasing it. I've used that option when I've found multiple options for an item (like tile) and I'm not sure which one I'm going to buy yet, but I want to keep track of them all for the time being. I can toggle the hide/show to see how different ones will affect my budget.

And if you're super organized, you can add categories to the project and keep track of how much you spend on each one. I created a bunch for our kitchen remodel like appliances, flooring and cabinets. It can be handy to be able to go right to the board and find out the total cost of a group of items.

Now, could I do this kind of budgeting in Excel or something similar? Well sure, but it's a heck of a lot more cumbersome to do it that way! With itsums, all the information is right there - no math to do, no copying and pasting of links, and no trying to remember what something looks like.

Have I sold you on itsums yet? :)

It really is so so helpful and I've found it to be a lifesaver for staying on track with this project. A kitchen remodel is no small undertaking and this tool has helped keep me sane during all the planning and purchasing!

What projects are y'all working on these days? Have you ever used itsums to help you manage them? Or do you have other tools you like to use?

---

(P.S. I feel like I should make the disclaimer that Pinterest and itsums did not ask me to write about them - they don't even know I exist! I just love to share about awesome tools and tricks that I find all over the web with you, my lovely readers!)

Enjoy what you read today?  Enter your email address below to subscribe to May Richer Fuller Be!  Delivered by FeedBurner
SaveSaveSaveSave
SaveSave

Pin It!

7.19.2016

Kitchen Design Board + Floor Plans

The countdown is on! In about two weeks, we'll be starting our kitchen renovation and I cannot wait. Demo is set to begin in about two weeks - in other words, things will be getting real real fast. (Any advice on living without a kitchen for awhile?)

I basically started planning this kitchen reno the moment we first laid eyes on our house last year and if you've been around the blog for awhile, you might remember that in our "30 day blitz" after closing we took down a wall and did some quick reconfiguring to make it work for us before we could move forward with a true remodeling project.

It went from this (real estate photo):


To this (wall came down, installed a dishwasher and moved the sink to where the fridge used to be):


Since this photo was taken back in the winter, the only thing we've done is install pendant lighting (shown in the design board below) over the peninsula. Though it's been in a state of limbo - for example, our only ceiling light in there right now is a hanging bulb from a ceiling fan we took down, ha! - it's been great to live with the kitchen in this form for awhile to really be able to know what we wanted our new one to be like.

A few months ago, before I took time off from blogging in June and July, I shared my kitchen inspiration, and I'm happy to report I've stayed pretty true to that vision! Light, bright and modern are the key words.

So without further adieu, here's the design board for our new kitchen!

(Please note that some of the following are affiliate links, which means that if you purchase through the link, I may earn a small commission at no cost to you. Thanks for supporting the blog in this way!)

1. IKEA cabinets (VEDDINGE) || 2. quartz countertop (Caesarstone London Grey) || 3. butcher block countertop || 4. refrigerator || 5. range || 6. dishwasher || 7. brass hex knob || 8. brass pull || 9. pendant lights || 10. faucet || 11. sink || 12. floor tile

We decided to go with IKEA for our cabinets, doors and quartz/butcherblock countertops. Their system is amazing (soft close doors, anyone?!) and the prices are hard to beat. Though there's a lot of assembly involved, I'm not too concerned since I'm an avid do-it-yourselfer and I have a contractor father-in-law spearheading the project. :)

I went back and forth for a good while on whether to go with flat panel doors or shaker style and ultimately decided to go with the more modern, flat panel doors. I'm pairing the simple door style with some really fun brushed brass pulls and knobs that take the kitchen to the next level. (By the way, the hardware I chose is super affordable - especially those Target pulls. I went into the store the other day to see them in person and they're a great weight and color, which I wasn't necessarily expecting for a Target find! #targetdoesitagain)

For the countertops, I wanted something that looked like marble, but was more durable, and these London Grey quartz countertops fit the bill. I loved the veining and the grey tone. They'll be everywhere in the kitchen except for a small section that will have butcher block. Those cabinets will imitate a credenza - more on that in the floor plans below.

I haven't nailed down the exact tile for the flooring, but I know it will be a dark gray/charcoal and likely be in a 12"x24" size. We're also pretty sure we're going to install electric radiant heat under the tile since our kitchen is freezing underfoot in the winter. Does anyone have any brands they recommend for that? I'm still researching...

Our sink and faucet were ordered this week. I can't tell you how excited I am to be replacing our cheap double basin, stainless steel sink with a deep, single basin one, and our leaky, low faucet for a sleek, pull down one!

Lastly, appliances. I've been thrilled with our Whirlpool dishwasher (it's silent and cleans really well) and we'll be going with them for our refrigerator, range and microwave/hood as well. I'm not sure exactly which models yet, but the three I linked above are strong contenders.

Now let's take a look at the rough floor plan! If any of you have ever tried out the IKEA kitchen planner, you know it's a bit maddening to use, but it gets the job done for the most part.

Here's the overall view:


The main part of the kitchen will maintain the existing L-shape, but the countertop on the peninsula (where the sink and dishwasher are) will extend out into the dining area so we can have a real bar with stools under it for seating. The new items are the "credenza" (represented as brown in the above floor plan) and the floor-to-ceiling pantries (labeled 10 and 11 above).

(To see our kitchen as it stands now, check out this post.)

Below you can see the pantries on the left side. The cabinetry surrounding the range has basically the same layout as the existing cabinetry. A microwave/hood will go above the range.

And P.S., I have no idea why the knobs aren't parallel with each other - a quirk of the software I guess!


Here's a better look at the "credenza" on the opposite side of the space. It will have exposed legs since a small radiator will be sitting under those cabinets. I'm excited to gain a bit of counter space here too!


Our sink, dishwasher and pull out trash can(!) will be in the peninsula and the bar area will extend out the back.


I think that's it. Phew! That was a long post, but I hope it gives you a better idea of where we're headed. Hopefully the next update will be a real life one where we'll be saying adios! to the old kitchen!


*Psst! Need help with your home? Come on over to Mix & Match Design Company and let's chat!


Enjoy what you read today?  Enter your email address below to subscribe to May Richer Fuller Be!  Delivered by FeedBurner

Pin It!

7.14.2016

And I'm Back!

Did you miss me? I feel like I have a lot to catch y'all up on, so I'll divide this post up into three sections: where I've been, what's happening now, and what's coming up.

Where I've been:

The reason I took a little break (ok, maybe 6 weeks isn't exactly short...) from blogging was because my husband and I had a once-in-a-lifetime opportunity to help run a series of summer programs on Martha's Vineyard! Never in my life did I think that we would have the chance to leave our normal lives behind for awhile to work together on a property that hosts week-long programs for middle and high school students on an island in Massachusetts. Crazy, right? "Real adults" don't do this sort of thing, do they?

Well, we did!

With my husband finishing graduate school in May and me deciding to leave my career in healthcare to pursue Mix & Match Design Company full time, we created a gap of time this summer that freed us up to do this crazy thing. Our primary responsibility was to work behind-the-scenes to ensure that the programs ran smoothly from week to week. I nicknamed the two of us "the great communicators" because a lot of what we did involved collecting and disseminating info between the summer-long staff (kitchen, office and facilities folks) and the week-long staff/volunteers so that everything would go according to plan from day to day and week to week. We were also in charge of developing community among the college-aged summer-long staff and running weekly Bible studies for them. We had such a great group and I already miss them!

While we were on the Vineyard, we also managed to have a lot of fun in our off time. I feel like I should put together some kind of guide for all the fun things you can do there - we had a blast exploring beaches and cute little towns, hiking, catching sunsets, fishing, eating lobster, etc. I put together a little collage of some of the photos I snapped with my iPhone, which doesn't do our adventures justice, but it gives you a flavor!


What's happening now?

As of this past Monday, I'm a full-time entrepreneur! I've turned my attention to running and growing Mix & Match Design Company.


I'm excited slash a little bit terrified. Running your own business is no joke! Transitioning from a job where pretty much every minute was planned out for me to a job where I'm the boss and it's up to me to run this thing is quite an adjustment. I'm definitely up for the challenge though, and I'm pumped to finally be able to put all my energy toward my passion of offering folks affordable and approachable interior design services! With that being said, if you or anyone you know is in need of help in their homes, send them my way! You can find out more info through the website (linked above) or contact me via chaney@mixandmatchdesign.com.

What's coming up?

So many things! I've got two Mix & Match projects in the works right now that I hope to share photos of soon. I shared the plan for one of them before I went on sabbatical - the Philadelphia suburbs master bedroom. In case you missed it, here it is:

We tweaked a few of the items along the way, but this is the general gist! It's going to be beautiful and I can't wait to see it in person soon.

The second project is an industrial farmhouse style dining room. I'm still working with that client to finalize a few things and I hope to share more about it in the coming weeks!

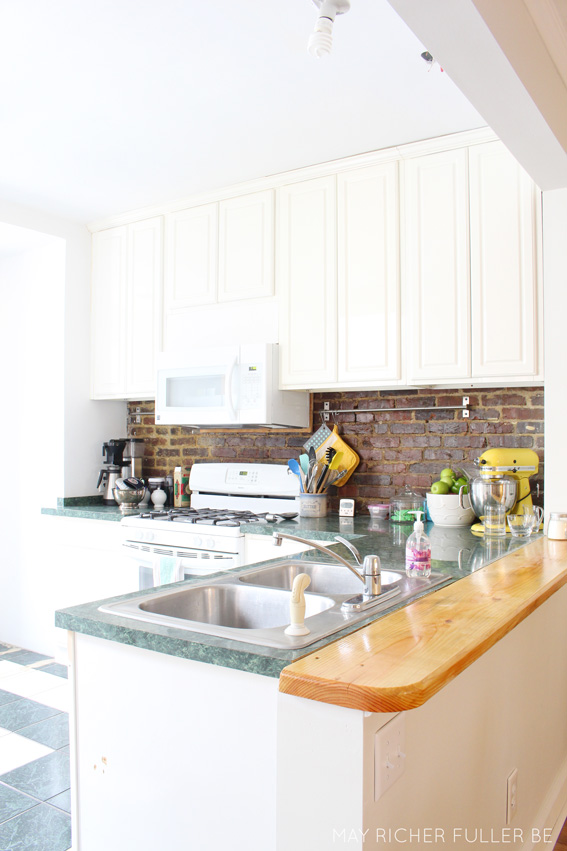
The last big thing that's coming up is that in a couple of weeks we start our big kitchen renovation. Yippee! We're ripping everything out and starting from scratch. It's time to say goodbye to cracked, mismatched floor tiles, the makeshift "bar," old appliances, a leaky faucet and oh so much more... This may be one of the last times you see it like this, so get a good look now!


I shared my kitchen ideas and inspiration awhile back and now plans are firming up, which is exciting. My father-in-law and I will be taking this project on in August and y'all will get the full scoop as we get going. The #phillyrowhousereno is back for round two!

I think I'll wrap things up for today, but it's good to be back in action here on the ole blog. More to come!


Enjoy what you read today?  Enter your email address below to subscribe to May Richer Fuller Be!  Delivered by FeedBurner

Pin It!

5.30.2016

MRFB on Sabbatical


Hey friends! Happy Memorial Day! Just a quick programming note to say that May Richer Fuller Be is taking a little break between now and mid-July. My husband and I have headed off on a little adventure helping out with a summer program in Massachusetts and the blog will be on sabbatical during that time. I'll probably be popping in on Instagram (follow MRFB here and Mix & Match Design Company here) every now and then, but otherwise things will be pretty quiet!

When I get back, there are a few projects I can't wait to share with you including photos of the finished Philadelphia suburbs master bedroom design I shared recently, a dining room e-design from the giveaway from Mix & Match and eventually, our very own kitchen reno! It's going to be a fun second half of the summer - stay tuned!

Thanks for following along, and as always, if you need help with your home, head on over to Mix & Match to check out my e-design services!


Enjoy what you read today?  Enter your email address below to subscribe to May Richer Fuller Be!  Delivered by FeedBurner

Pin It!

5.10.2016

E-Design Project: Philadelphia Suburbs Master Bedroom Plan


Hello friends! Long time no talk! Things have been ca-razytown over here recently and I've hardly had time to breathe, let alone post on the blog. Between my husband finishing up his semester and graduating with his MBA this weekend (I can't believe how quickly two years have gone!), a bunch of traveling, things ramping up with Mix & Match, and heck, just life, I've had to pick and choose where to spend my time and sadly, blogging didn't made the cut.  I've still been pretty active on Instagram though, so if you want to catch me in between posts, you can follow me over there.

But! Some big news in my life is that as of the end of this week, I'll be full time with Mix & Match! Yep, I'm quitting my day job to pursue my e-design business and I couldn't be more excited. I'll have more on that in a separate post soon, but what that means for y'all is that you'll probably be seeing more interior design-focused posts - hope you're ready!

Big stuff, friends, big stuff.

Now, speaking of e-design, I've got a really fun project going on for a new client, and she was kind enough to give me permission to share the inspiration, plan and, fingers crossed, after photos once everything's installed. Since e-design is all done online and installed by the client, I don't always get to see the final product, so this is a real treat.

My client and her husband happen to also be great friends of mine and they're transitioning from a small one bedroom in the city to a larger two bedroom apartment in the suburbs. Since they're gaining a bedroom, they decided to put their current furniture in the guest bedroom and start with a clean slate in the master bedroom. I was thrilled when they asked me to put together a plan for that space!

The look they're going for is modern farmhouse with a touch of industrial. It definitely has Fixer Upper vibes and it's going to be beautiful!

Here are some of the photos she shared with me as inspiration:

{Sources: clockwise from top left: 1 | 2 | 3 | 45 | 6}

What I pulled from these photos was a primarily blue and white theme (with a little bit of green) mixed with warm wood tones. There's also a lot of great texture going on with both the textiles and furniture. It'll definitely be a cozy and inviting space.

Here's the design board I came up with based on these ideas:

What do y'all think? Is this look up your alley?

Another fun treat with this project is that I get to share many of the sources! You can shop the post for the items below:

Upholstered Bed* | Nightstand* | Lamp* | Dresser* | Curtains | Mirror | Trunk* | Rug | White Sheets* | Navy Duvet | White Quilt* | Striped Euro Shams* | Green Leaf Lumbar Pillows

(*affiliate link used - I earn a small commission for your purchase, but your price doesn't change. Thanks for supporting May Richer Fuller Be and Mix & Match in this way!)


I can't wait to share the progress on this project with you. They'll be up and running in their new place later this summer, so I should have photos to show you then!

I think the next project I'll be sharing is from the e-design giveaway I wrote about a couple of months ago. The winner was a dining room that was just begging for a makeover! That project is coming along too - more soon!

*Psst! Need help with your home? Come on over to Mix & Match Design Company and let's chat!

Enjoy what you read today?  Enter your email address below to subscribe to May Richer Fuller Be!  Delivered by FeedBurner

Pin It!
Related Posts Plugin for WordPress, Blogger...
Blogging tips