1.31.2013

Operation {Re}Organization: Washi Tape Filing Labels


Sometimes it's the little things in life that bring the most happiness. In this case, it was a bit of washi tape that did the trick. I'll get to that in a minute.

I spent a good chunk of last Saturday morning pawing through our important papers in an effort to get things sorted and organized into a usable file system. Over the past couple of years, our filing system has essentially been non-existent. As in, the only "system" in place was a brown envelope labeled "Important Life Documents" - how's that for vague?! Although it did the trick in terms of keeping things like our birth and marriage certificates in one place, I was constantly afraid that one little envelope would somehow get lost in the proverbial shuffle. I knew this needed to change, but I was lacking some serious motivation to get it done. Finally, inspiration came in the form of a challenge proposed by Jen over at IHeart Organizing. And I love a good challenge. Competitive much? She challenged her readers to get their home offices organized during the month of January, so that's been my focus for the last 30 days-ish. The last project for this month was getting our important papers filed away, and here I am to share that with you today!

Lucky for you, I will not be going over the actual filing process in detail. The basics of what I did go a little something like this: retrieve all pertinent documents from their disheveled hiding places, throw out unnecessary or outdated papers, sort pertinent documents into piles of similar content, place each pile of similar content into a hanging file folder, and hang file folder in pretty filing box. See? Easy as 1, 2, 3...4, 5. Now that everything was neatly filed, the fun part began - labeling!

I wanted to make the labels fun, since filing itself is totally lame. Inspiration for this came, again, from Jen at IHeart Organizing (dang, Jen, you're so good at this stuff!). She used washi tape to label her files, and I wrote about that here. I added my own spin on it since I used hanging files instead of regular folders. Here's how I did it:

Supplies needed:

  • Hanging file folders
  • Clear tabs and paper labels that come with hanging files (do those actually have a name?)
  • Roll of washi tape
  • Scissors
  • Sharpie
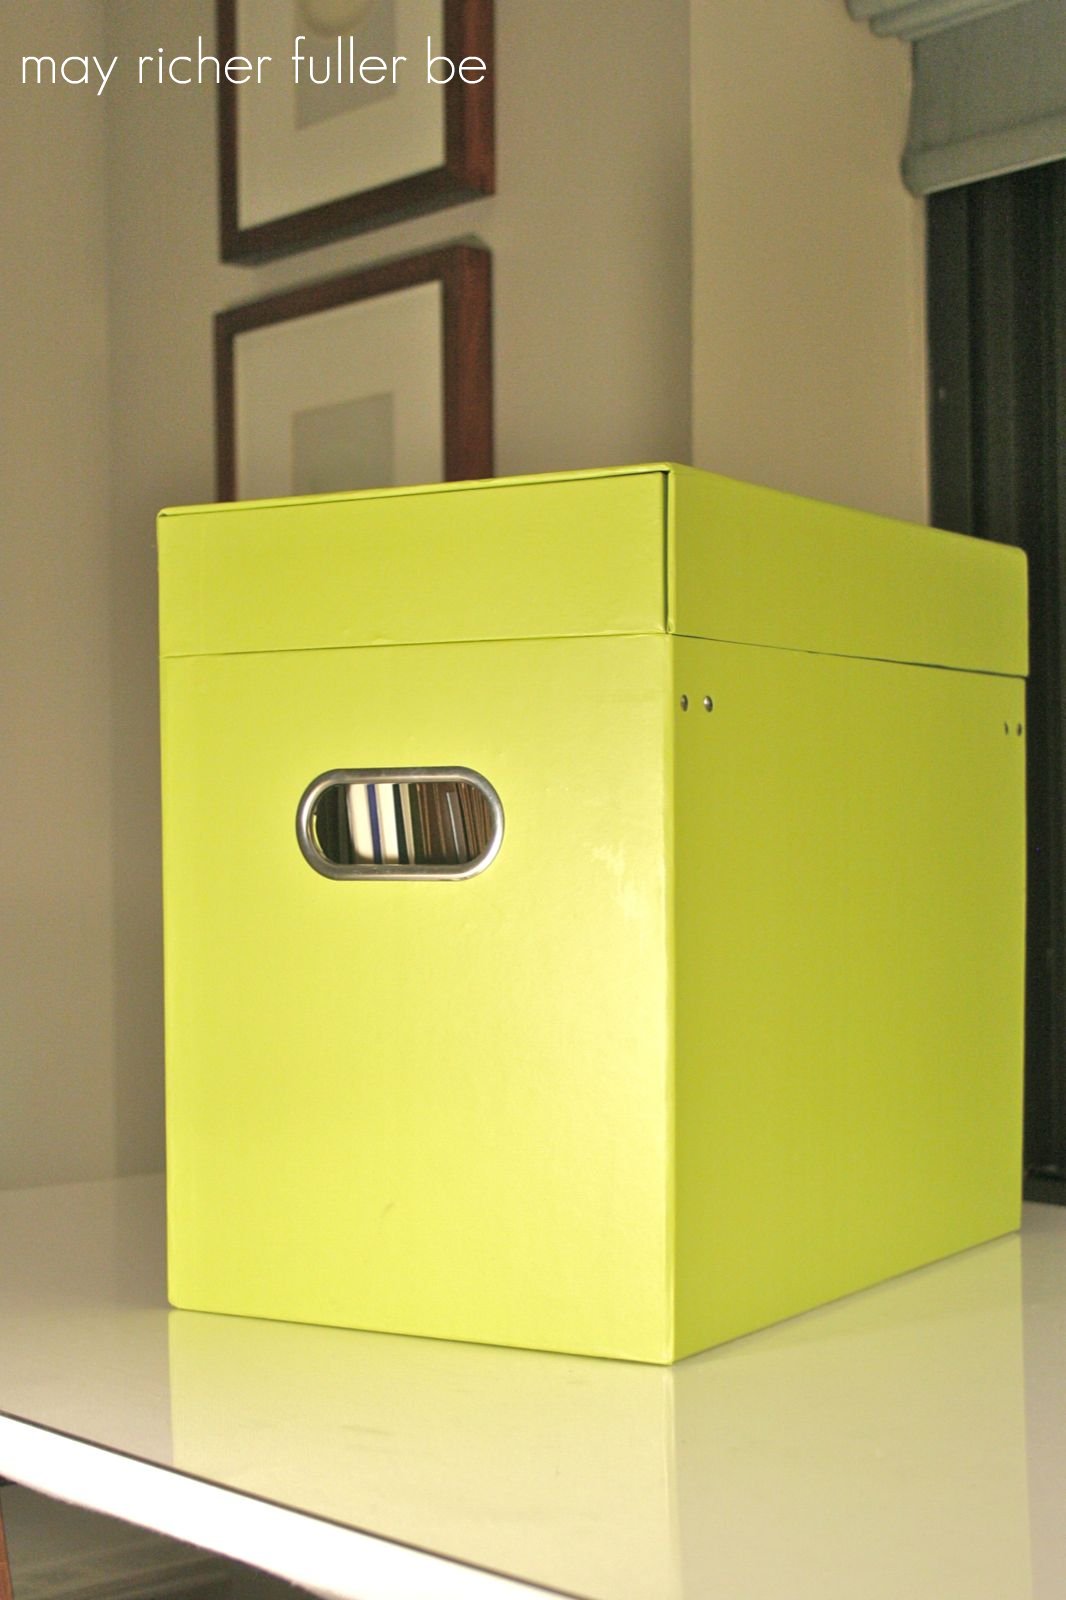
I used gold polka dot washi tape and a green sharpie for my labels. The green background you see in the photo below is actually the top of my filing box. I'll show you the box at the end.


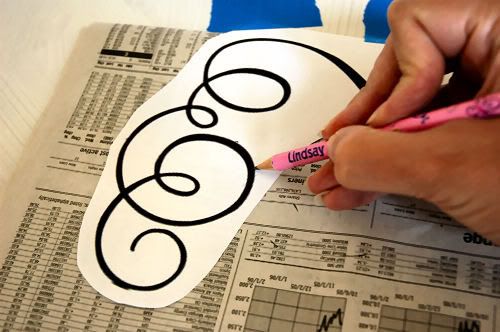
Start by unrolling your washi tape so enough of the tape is exposed to cover your paper label. Align the tape to the top of the label and press down to make it stick. Clip the end off of the tape and fold the excess onto the back of the label. You can trim it right at the edge, but I found it easier to leave a little extra and fold it over. Less frustration and faster when you have to make 10+ of these.


Forgive my strange-looking hand position here - it was hard to take a photo and hold this at the same time!

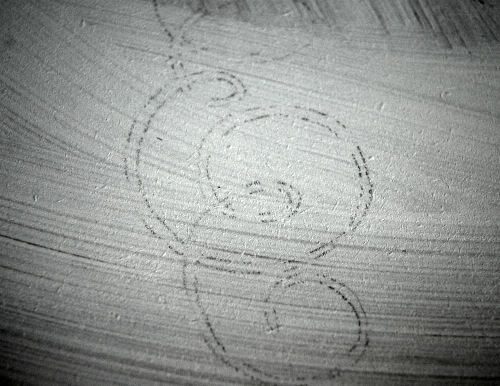
I figured out that the quickest method to mass produce these is to place the washi tape onto all the labels at one time, then cut in-between them and fold any extra tape over the edges. I ended up with a little "label train" before clipping them apart.


Once I added the tape, clipped the labels apart, and folded the extra tape over the edge, I ended up with these:


I used my sharpie to label them with the respective file names, and placed them in their plastic tabs. Side note: I had to use a sharpie because a regular pen or marker didn't work well on the tape's surface. If you want to do this project, test out your writing implement on a small extra piece of your tape before going to town on your real labels.


Here's my set of completed labels ready to go onto the hanging files.

{that label says "genetic counseling" - my day job - don't think I've shared that before?}

For the final step, I slipped the plastic tabs into the pre-made slots on the inside of each file. I chose to center them so that I can easily add more files and keep the alphabetical order intact. Because the tabs are angled, even with some overlap, they're still easy to read.


Filing complete! I'm so glad I've checked that off my organizational list, and made it pretty to boot!

To wrap things up for today, here's my file box with its top - isn't it cute? Who says files have to live in ugly containers? This baby could sit on a counter top and fit right in with the decor. 


Sources:

--------

This post is a part of the series "Operation {Re}Organization." To see other posts in the series, click the tab at the top of the page.


Pin It!

1.30.2013

Creative Bits | 12: Silhouette Art

If you're new to my little ole blog today, welcome! After linking up a couple of my office organization posts over at IHeart Organizing, I had a lot of new visitors stop by yesterday. If you're one of them, I'm glad you're here. Introduce yourself in the comments if you'd like - I'd love to know you!

Creative bits is a regular series here at May Richer Fuller Be. I typically share something of the small/quick project variety (thus the "bits" part of the title) that most anyone could take on and replicate themselves. These are things that I would love to do myself, in our home, and I hope they'll spark some creativity for you as well! To see the whole series, mosey on over to this page.

Today's creative bit comes from a photo I spotted last week on a post from the Nester. I love watching her house evolve as she adds and subtracts different pieces, artwork, furniture and accessories. One of the things I see changing a lot is the gallery wall above her sofa. Every time she posts a new photo, I feel like something is different. I admire her willingness to take risks and just try something. I'm thinking I could learn a few things from her :).

This is the photo that grabbed my attention:


I was totally smitten by this simple little dog silhouette, and thought to myself, I'm sure I could replicate that. I'd love to incorporate a silhouette of Jackson into our gallery wall. I know I could use Photoshop to convert a regular photo to a silhouette, but I'm wondering if other software has that capability as well, since I know not everyone has or has access to Photoshop. Can anybody chime in on that?

Hope y'all have a great Wednesday! I'm hoping to spend a little bit of time outside today since we're having awesome unseasonably warm weather. We'll see if I can escape the confines of my office for a few minutes to soak it up before the cold weather returns tomorrow!

---------

Creative Bits is a semi-regular series here on May Richer Fuller Be where I share little tips, tricks and simple do-it-yourself projects from other creative bloggers' minds. I figure if it makes me say, "wow," it's worth passing along to you! And remember, if you want to pin any images that don't belong to me, please click through and pin from the original source!

Click the "Creative Bits Series" tab at the top of the page to see more posts like this.

Pin It!

1.28.2013

Operation {Re}Organization: The Desk Reveal

If you're visiting from IHeart Organizing, welcome! I'm honored that Jen chose to feature my desk on her blog! I'm so glad you're here. Say hello and stay awhile :). 

I am super excited to share our newly finished office desk today. This project has haunted me since we moved to DC this past summer and I'm happy to say that it's finally finished! As I've mentioned before, we don't have an office, per se, in our apartment - it's more of a corner. In our bedroom.

In our old place in Richmond, we had more space (thanks to cheaper rent there!) and room for a whole office area in our spare bedroom. Without that extra room here, we had to carve out an office "nook" as I like to call it. We needed a desk in that room for a variety of reasons, but I didn't want to spend a lot on a new piece of furniture, so I came up with an inexpensive solution...plywood on sawhorses. Remember this picture I showed you a couple of weeks ago?


Functional, but not pretty. (The mess around it is a whole separate issue...)

Now take a look at our newly finished desk!


I'm loving how it turned out. The style is a mix of rustic and modern, clean-lined and rough-hewn - which is a  pretty good representation of my overall style. I little eclectic, but with plenty of traditional elements as well. 


The legs of the desk are a pair of sawhorses that used to live in my grandparents' garage. I snatched them up a couple of years ago with an idea in my head that they would make an awesome desk or table foundation one day. I'm so excited that I finally got to make that idea a reality.


The desk top is a piece of plywood (yep, the same one from the "before" photo) upholstered in a white cotton duck fabric. A piece of acrylic sits on top of the fabric to create a smooth, glassy surface. I'll be back to share more details on how I made the desk top tomorrow. (*1.29.13 update: the how-to post is up! Check it out here.*)


I couldn't resist accessorizing the desk a little bit, even though I probably won't be using it much (it's mostly a work space for my husband). The lamp was a gift from my mom a few years ago (not sure of the source, sorry!), silver owl came from Target (half-price after Christmas), the spools of baker's twine were a gift from my in-laws (from Etsy, I think), and the pen cup was a DIY project from a couple of years ago.


I wish I could work here all the time! 

Here's the "after" one more time for good measure...


I'll be back tomorrow with some more details for you! Have a great Monday!

--------

This post is a part of the series "Operation {Re}Organization." To see other posts in the series, click the tab at the top of the page.

Pin It!

1.25.2013

Mini Makeover: The Junk Drawer

Everyone's got one - a junk drawer. Where all manner of random bits end up. The drawer everyone loves to hate. Its contents always justified by a thought such as, "I just need a place to put this for now. I'll be sure to put it in its proper place later." Am I right? Those extra triple-A batteries that are left over after replacing the dead ones in a calculator... A receipt that might be important to hold onto... The manual for replacing the Brita filter you keep forgetting to replace.

I know I'm not the only one with this issue.

My junk drawer lives in our front hall and hasn't been cleaned out, fully, in probably two years. I admit it, and I am ashamed of that. That means it didn't even get cleaned out when we moved to DC. I literally moved a junk drawer from one city to another. Terrible! I somehow just kept stuffing things in there and I finally, finally, hit a breaking point a couple of weeks ago. And you know what? It only took me about 15 minutes to clean it out and reorganize it. Ta da! No more shame over our junk drawer.

When I finally decided it was time to address this junk problem, my first step was to take the drawer out and assess its contents.


Let's play "I Spy" for a moment, shall we? I spy, with my little eye...
  • 3 cookie cutters
  • A lamp harp
  • A tiny "Rock City" teacup that from my grandparents' house
  • A random assortment of zip-ties
  • At least 4 packs of gum
  • A voice recorder 
  • A stapler
  • 2 lighters and a set of matches
  • A city bus map
  • A paper kite (yep, a kite)
  • An anti-blister stick (the deodorant-looking thing)
  • The Brita manual
  • A checkbook
  • A bag of tiny screws
  • Pool passes
  • Two sets of (uncomfortable) headphones
There are probably more things hiding in there, but I think you get my point. There's an unbelievable amount of junk that doesn't belong. I'm going to estimate that 10% of that stuff actually belongs in a front hall drawer. 

Even Jackson took one sniff and was offended at the situation. (Ok, I think he was looking for treats, but I like the idea that he was offended by the disorganization.)


So I took control of the situation and brought some order to it.

{forgive the blue tint - forgot to white balance}

Ahh, much better. Even Jackson approves. (Oh wait, now he really did find his treats. Shoot. I guess he doesn't care about organizing.) 


I had that drawer organizer on hand already, but if you're looking for a similar one, I'm almost positive I got it from Bed, Bath and Beyond a couple of years ago. It's really handy for establishing some order to the random things you want/need to keep in a front hall drawer. I also used a small tin to corral the rolls of Jackson's bags (those green and black thingys). I decided to only keep things here that we either need easy access to on 1) an every day/weekly basis or 2) an emergency basis.

The every day/weekly things include: checkbook, gum, Jackson's treats and bags, measuring tape, anti-blister stick, pool passes (for summer), and a pen.

The emergency things include: flashlight, lighters, and batteries. 

I love that I can see everything at a glance. No more digging through random stuff. The items that didn't make the cut (from my extensive list above) either were thrown away or put in their proper place (i.e. cookie cutters went to my baking box).

If you decide to take on your junk drawer, you'll need to decide what to keep in there. Make it fit your/your family's needs. You may not need a measuring tape on an every day basis, but I use mine all the time, so I like to have it handy. What do you actually need in the drawer? What items can you find a new or better home for? Be ruthless in cleaning it out (and trying to keep it that way!).

Hooray for a mini-makeover! Have a great weekend!


--------

This post is a part of the series "Operation {Re}Organization." To see other posts in the series, click the tab at the top of the page.

Pin It!

1.24.2013

Window Shopping: The Container Store

The Container Store is one of my favorite places to browse. I'm totally guilty of going in just to gawk stare at their lovely aisles of beautiful organizational items. Was that description too over the top? So a couple of nights ago, after having dinner with my parents at a restaurant that happened to be next door to a Container Store, I popped in to see what was new. I contained (pun intended) my excitement, mostly, but inside I was doing a happy dance because of all the pretty things. I thought I'd pass on a few of my favorite items in case you're in the market for a few organizational items, or just need some eye candy on a Thursday morning. Enjoy!


// 1 // 2 // 3 // 4 // 5 // 6 // 7 // 8 //


I don't think you need me to explain why I like these things :), but I will say a little something about number three. It's an office made up of elements from the elfa system - a line that's carried exclusively at the Container Store. Elfa is an amazing system that you can fully customize to fit your needs. They have systems designed for everything - closets, kitchens, offices...you name it. It's brilliant. I dream of having an elfa system in our house one day. And I've got a little tip for you in case you're looking to add something like this to your home: they're having a 30% off sale right now. This only happens once a year, so jump on it if you're interested! (Disclaimer: I'm not being paid to say this. The Container Store has no idea who I am or that I'm posting about this today. I just love the stuff and like to share a good deal when I see it!)

Oh, and a reader was asking about a source for washi tape after I posted about it last week. Click number eight to see The Container Store's selection. I know you can find it on Etsy and I've heard Target has some too, but this is another resource for you!

Pin It!

1.23.2013

Operation {Re}Organization: Behind the Scenes


Remember this mess I showed you last week during the "gather and purge" stages of my office reorganization?


I thought it would be fun (and possibly a little embarrassing) to share some behind-the-scenes info about the process. Alternate titles for this post could be: "The {Un}Glamorous Side of Organizing" or "Chaney: Pen Hoarder Extraordinaire." This post ain't pretty, but in the spirit of keeping it real, I figured it would be worthwhile to share. As we all know, organization isn't all that glamorous - until you get the part where you get to use things like washi tape(!) to label things.

As I was cleaning out, purging and grouping my office supplies, I started making a list of all the things I found - mostly for my own amusement, but it did make me realize a few things about myself. For one, I hoard office supplies. I admit it. (That's the first step, right?) Especially pens, tape and paper. And I can't bear to throw away things of monetary value or that are tied to a memory. To demonstrate some of these hoarding tendencies, I took a few of the photos from last week's office post and labeled them with my finds.


Four. Separate. Pen. Collections. Really? That apothecary jar is full of sharpies and markers, which aren't really pens, but for the sake of calling myself out on my hoarding tendencies, they fall into the "pen" category. What can I say? I love writing implements. I did realize I needed to consolidate though. No one needs access to that many pens on a daily basis. So I tested every pen to see if it worked (yep, every one), and put my ten favorites in a pen cup. The rest of the working pens were relegated to my box of extra office supplies.

Also pictured is my extensive tape collection. Double-sided and regular scotch. I probably don't need to say anything else about this except that I don't need to buy any more tape. Probably for like, five years. Seriously. 

Onto the next photo!


First of all, 42-cent stamps? Stamps now cost 46 cents. They cost 42 cents waaaay back in 2009. I looked it up. In order to use that stamp, I would have to add 4 one-cent stamps to the envelope (yes! I can do math!). It would cost me more in gas to get to the post office and buy those one-cent stamps than that 42 cents that stamp is worth. My solution? Hold onto the stamp - maybe I'll need it for extra postage on a larger envelope. Is that ridiculous?

Notepads. I have a size to fit any note-taking need. Need one for a grocery list? Got it. To-do list? Check. Note to the dog walker? Not a problem. Again, probably won't need to buy another notepad for about five years. Maybe ten.

Notecards. Three sizes. Straight to storage since no one is in school or studying right now.

Onto the last photo!


I discovered a small collection of postcards from a trip to Barbados I took in middle school with my family. How in the world these traveled with me all these years I have no idea. Some of them are even duplicates! Though I have good memories of this trip, I have no emotional attachment to these cards, so they took a trip to the trash. And yes, all the rest of the stationery you see there stayed. I have a vast collection. Slightly embarrassing. I'll try not to buy any more of that for awhile. Try.

Whew! That was fun. Hope you enjoyed this behind-the-scenes look. On a positive note, in the midst of this little organizational exercise I did find $21. Yessss. I love finding cash in unexpected places!

Anyone else have some fun discoveries recently while cleaning out closets/baskets/drawers?  

--------

This post is a part of the series "Operation {Re}Organization." To see other posts in the series, click the tab at the top of the page.

Pin It!

1.22.2013

Creative Bits | 11: Simple Design Transfer Method

If you've been reading my little blog with any sort of consistency, you've probably figured out that I'm all about projects that are budget-friendly. When I get an idea and am planning how to make it happen, the first question is usually, "How can I do this by spending as little as possible, but still have the best outcome?" Then I'll think about what materials I have and what I need. If I do need to purchase something specific for a project, I'll try to think creatively about an inexpensive (or free!) option before buying. I'm excited about sharing today's creative bit with you today because it fits right in with that line of thinking when it comes to budget-friendly ideas. It's definitely a "use whatcha got" tip, and it's definitely going to come in handy for a little project I've got up my sleeve.

Ever come up with a design that you needed to transfer from a piece of paper to some other material (i.e. wood), but didn't want to freehand it for fear of messing it up, or not achieving the "exactness" you're looking for? Think typography or a design you've printed out from your computer. I have very few artistic skills, especially when it comes to drawing (I continue to maintain my belief that being "creative" is entirely different from being "artistic"), so this happens to me...a lot.

So when I was Googling something along the lines of "how to transfer a design" for this project I'm planning, I came across a post from a blog called Makely School for Girls, which claimed to have the "Easiest Design Transfer Method You'll Ever Find" (yep, that was the name of the post). Of course I clicked on it. And I think she may be right. Hit the nail right on the head. She used, wait for it, newspaper as transfer paper. Clever clever. And free, if you already get a paper delivered.


The idea is that you place your design on the newspaper, trace over it so it picks up some of the ink, move the design to the place you're transferring it, trace over it again, and you'll end up with a light version of your design you can paint or do whatever with! Like this:


This method takes you from needing to have the skills of real artist to the skills of color-by-number artist to be able to create intricate designs. Yessss. That's more like it. Of course, for full details on this technique, head on over to the original post using the source links above.

Now, you might be wondering what my little project is that needs this method, and I'm going to be a tease and not share details with you right now. What I will tell you is that it's a wooden sign with lettering and numbers on it - is that vague enough for you? Stay tuned; I hope to have more to share in the next week or so!

---------

Creative Bits is a semi-regular series here on May Richer Fuller Be where I share little tips, tricks and simple do-it-yourself projects from other creative bloggers' minds. I figure if it makes me say, "wow," it's worth passing along to you! And remember, if you want to pin any images that don't belong to me, please click through and pin from the original source!

Click the "Creative Bits Series" tab at the top of the page to see more posts like this.

Pin It!

1.21.2013

Gallery Wall - New Additions and Updates

Over the weekend, I had a chance to play with the gallery wall over our living room sofa. I originally posted about it way back in November, so you can check out that post for more background if you're interested.  The "quick recap" version is that we started with this sad, sad blank wall with an off-center wall sconce. Since we're renters, I can't change the unfortunate-looking sconce or its location, so the best I could do was disguise it. To do that, and to add some life to wall, I put up a few frames to start a gallery wall:


It was better than a blank wall, but it was still looking a little...blah (even with my new ampersand artwork). It needed a couple of more frames to fill out the space. I had some black frames hanging around (pun totally intended) that I spray painted white to fit in with the existing look.

{spray painting action in process}

{all done!}

After the paint dried, I reassembled them with their contents: a black and white photo I took in one, and one of my "consider it pure joy" art prints in the other.

I then used a very precise technique called "eye-balling" to pick the placement on the wall. :) Here's where they ended up:


You can see the black and white photo in the bottom left, and the art print on the very bottom towards the right side. I think it looks much fuller and more complete. I'm undecided on whether to add one more for good measure. What do you think?


For comparison, here's the "before" shot again:


And after from a couple more angles. The left...

 ...And the right:


I think it's shaping up quite nicely. One thing I love about it is that each photo or piece of art has a story behind it. I like personal touches like that. Maybe I'll share a few of them sometime.

Do you have a gallery wall in your house? If you do, what's on yours? I'd love to hear (or see!)

---------

linking up to: Emily A. Clark

Pin It!

1.18.2013

IKEA Expedit Shelving

"Multi-functional." "Inexpensive." "Lots of storage space." "Stylish."

Those are words and phrases I often read and hear people use to describe what they're looking for in a new piece of furniture - at least in my world! Anyone else? One such piece that fits that bill is the - dare I say iconic? - IKEA Expedit shelving unit. These babies have been used in countless ways, and I continue to see them all the time on blogs and in shelter magazines. Does this mean they've been overdone? I don't think so. I think it just means that they're fulfilling a need that many people have in their homes. When styled well, or even modified ("hacked," as they say), they can fit right in to anyone's decor without screaming, "Hey! I came from IKEA and I was cheap!" (not that there's anything inherently wrong with that). Mixing an Expedit with more unique pieces from other stores and time periods (i.e. vintage or antique) makes it feel like a purposeful addition.

We own three Expedit pieces. One of these with 8 openings and two of these with 5. The latter two are currently living in my parents' basement due to space issues, and one lives at the foot of our bed. See?


Multi-purpose storage is the name of the game here. Those baskets hold everything from shoes to my hairdryer. Things that you don't necessarily want on display, but need a good, accessible place to live. The other shelves hold things like office supplies (but those are in the process of moving thanks to Operation {Re}Organization).

In our old apartment, we used the three units together in our living room to make an entertainment center. It was great because we used it to display books, little collections and pictures, as well as store things that didn't need to be visible (including my ridiculous magazine collection). There, the baskets held items like table linens, DVDs and out-of-season decor.

{clearly this photo is from last Valentine's day!}

Bottom line? They're really hard-working pieces of furniture that can easily be integrated into any room of the house.

This week, a couple of my favorite blogs posted about their love for Expedit units. They continue to inspire me to be creative about how we use ours. Kirsten (of 6th Street Design School) has a beautifully styled and organized one that she has in her home office:


And Young House Love just got one for their sunroom for storage and display purposes:


Head on over to their sites if you'd like more info.

Great, aren't they? Endless uses, and you can't beat their prices. I could post pretty pictures of them all day, but I think I'll let Pinterest do the talking on that one :).

Have a great weekend!

Pin It!

1.17.2013

Free Art Print - "Consider It Pure Joy"


A couple of nights ago, I was standing in the kitchen staring at a sink full of dirty dishes and a dishwasher full of clean dishes that needed to be put away, and all I could think about was how little I wanted to "deal" with that stuff at the moment. I knew it needed to get done and I knew it wasn't that big of a deal. I just plain didn't want to do it! I had already put it off twice. And I knew it would only get worse with the next meal. So with a sigh, I started to tackle the task and get it over with.

Fifteen minutes later it was done. It was that easy. That time I spent getting my kitchen cleaned up? A drop in the bucket in the big scheme of things. As I finished up, I realized what a wimp I was being about the whole thing. I started thinking about the things I could have been thankful for in that situation instead of whining. Things like having a dishwasher, food to cook, and pots and pans to use to make a hearty meal for two.

In the midst of those thoughts, these four words popped into my head: "Consider it pure joy..."

Those words were familiar, but I couldn't place them. I looked them up and it turns out they're from the book of James, chapter one, verses two through four. It says: "Consider it pure joy, my brothers and sisters, whenever you face trials of many kinds, because you know that the testing of your faith produces perseverance. Let perseverance finish its work so that you may be mature and complete, not lacking anything."

Now, let me say from the outset that I don't believe that facing a kitchen full of dishes is a real trial. I'm pretty sure James meant to refer to things far more difficult that that. But, I think there is a principle here that I need to remember when I face true challenges - to be joyful no matter what lies ahead. I think those words came to me in the midst of dirty dishes so that I would be reminded of them when I do face real trials.

At this point, you may be asking yourself, ok, thanks for the life lesson, but what about that free art print you mentioned in the title of the post!?

Well, because I want these words to stick in my head, I decided to make an art print that I can hang in a prominent place as a reminder to myself. And in case these words struck a chord with you like they did with me, I wanted to make it available for you to have as well!

I was having so much fun designing this print that I went ahead and made it in three bright, fun colors: 


They're designed to be printed on letter-sized paper (8.5x11) and framed as an 8x10. If you'd like one, click on the color's link and you'll be taken to Dropbox, where you can download the file as a PDF. They're completely free (for personal use), but I have one condition...let me know if you downloaded it by commenting on this post! Enjoy!


Pin It!
Related Posts Plugin for WordPress, Blogger...
Blogging tips