7.31.2013

Operation {Re}Organization: Kitchen Cabinets Part 3 {The Details}


I hope y'all have enjoyed the inside look (literally) at my kitchen cabinets this week. (See Part 1 here and Part 2 here.) I've still got a couple of areas to tackle including the deep, dark recesses of my under-the-sink corner cabinet, but I need to grab a couple of items to help it function better so that may take a little while longer to do :).

Today we're zooming in on some details of this project. These are the little things that I hope will keep this space organized and more functional than it was before. Let's start with a little project I previewed yesterday - something I'm calling my cheap frugal version of the pull-out cabinet drawer. Like I mentioned yesterday, we're renters, so I'm not about to invest in expensive additions to a kitchen that's not ours. I used a little creative, outside-of-the-box thinking to come up with something that functions similarly to those cabinet drawers.

Take a look...


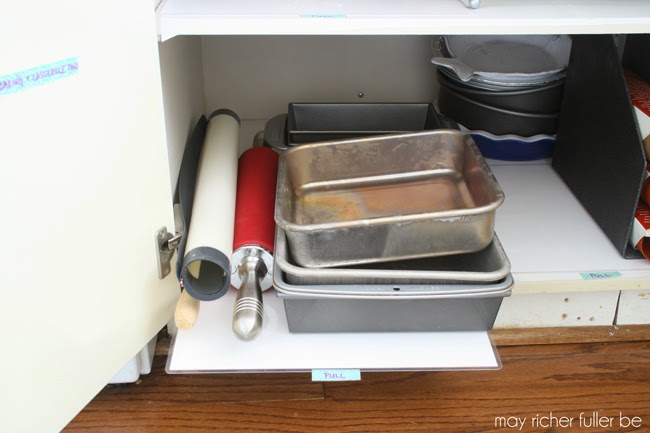
It's basically a movable shelf liner with a little tab on the end I can pull out to reach the contents in the back of the cabinet.

Here's how I made it:

I started with some old, heavy-duty laminated place mats I had been holding onto, but don't use anymore because they have my old monogram on them.


When I placed two place mats next to each other, they pretty much matched the depth of my cabinets exactly (score!).

So I grabbed some clear packing tape and taped them together along the long edge. I put a piece of tape on each side of the place mats so the joint wouldn't flex too much.


And that's it. So simple, yet so perfect for what I needed!

To go the extra mile and make them easy to use, I took a short piece of packing tape and a little washi tape to add a pull tab so that I could easily pull the place mats out from the shelf and grab the contents in the back.


(You can ignore the dings and scratches on the table - comes with the territory of being an old farm table!)

To make the tab, I tore off a piece of packing tape about 4 inches long, folded a portion of it over and put the sticky sides together leaving an inch of the sticky side exposed so I could stick it to the underside of the place mat. Does that make sense? Sorry, that's a lot of the word "sticky" in one sentence. I finished it off with a piece of pretty blue washi tape on the edge that sticks out and wrote "pull" on it with a pink sharpie. Yep, sometimes you need to be explicit with instructions.

Since they're laminated and stiff, they slide in and out easily, which helps me reach contents in the back of the cabinet.


So far they've worked really well! I made three of these movable shelf liners total, and put them in the cabinet under the pots and pans and baking pans/casserole dishes.


There are a couple of other helpful organizational items in this cabinet including an old drying rack that I repurposed to hold pot lids and smaller wooden cutting boards (right side of the top shelf), and a magazine file to corral my Silpat baking sheet liners. You can also see that I added some washi tape labels to the doors so that you can see what's on each shelf at a glance without getting down on the floor to see what's in the back area of each shelf. It's the little things, right? :)

For the lazy susan cabinet, I actually made a list of the contents on each tier, as well as a list of all the items on the floor of the cabinet. This ensures that everything goes back in its designated spot and we don't end up with a mish mash of stuff piled all over that annoying thing.


Maybe I'll type up these lists someday to make them prettier. Maybe. (That's what I call a very low priority item though!)

I think that'll about do it for the details on this project. Did I miss anything you were curious about?

Hope y'all have a great day!

---------


Looking for a unique baby gift? Take a look at my new line of onesies from CSW Designs! Choose your animal, color and pattern (chevron or polka dot). Perfect for the little ones in your life.


Pin It!

7.30.2013

Operation {Re}Organization: Kitchen Cabinets Part 2


At the end of yesterday's post I left you on the edge of your seats, dying to know how in the world I reorganized our cabinets.

Right? Right.

(Yes, there was a hint of sarcasm in that last statement :) )

Well the wait is over! If you missed that yesterday's post, you can catch up here, but here's where we left off: gloriously empty and clean cabinets and drawers...


...And piles of kitchen items everywhere else.


That's what my kitchen looked like for about three hours on Sunday while I pondered the best place for everything to go. I asked myself a lot of questions about what would be the most functional and logical home for each item (since clearly what I had going on before wasn't working!). This will look different for everyone and really depends on your family's needs and the set up of your kitchen. Here's a little bit of my thought process:

What do I do most in the kitchen? Cook? Bake? Both? What equipment do I need to be easily accessible? I'm a pretty simple gal when it comes to cooking and baking. I mostly cook (we try to eat at home a lot), but love to bake, so I like to have basic items for both handy. Every day I tend to use a pot, a pan and a cutting board, so those got some prime real estate in the deep cabinet next to the oven. Of course I use utensils and knives too, but those are already set in their drawer.

What small appliances do I use most? We are Saturday morning pancake/waffle people, so we like to have our griddle and wafflemaker handy, otherwise, the other small appliances are used pretty infrequently and got designated to less accessible spaces. For instance, if we only use the blender every couple of months, it's ok for it to be behind some other things in a cabinet.

What can I keep in that lazy susan cabinet that won't drive me crazy when I have to access it? My main problem with the "organization system" (notice it's in quotes because there wasn't really one) was that things were precariously piled on top of one another and stuffed into ill-fitting spaces, making it impossible to turn. Plus, things just got lost in the deep recesses way too easily. SO, that meant I needed to cut down the contents, regroup items and most importantly, be able to turn the thing and access items in the back. I'll be more specific on what I put in there a little later.

From there, it was all about grouping like with like - especially when it came to baking sheets, cake pans, casserole dishes and serving pieces.

So with allll those things in mind, here's how everything looked after I put everything away:

The Lazy Susan Corner Cabinet:


Hooray, it's functional again! As it turned out, the best things to store here on the top tier were miscellaneous small appliances with lots of parts (like my hand blender and hand mixer), less-frequently-used kitchen tools (like the bagel slicer), and a bucket full of serving utensils we don't use unless we have company or are taking food to a party. Right in front, on the top tier is also my mandoline slicer, which I use a TON when I'm slicing/chopping vegetables, so I like to be able to grab it easily.

The middle tier is the perfect height for storing things like ziploc bags, foil and saran wrap...and THAT'S IT Y'ALL. There's tons of leftover space here we can grow into - hopefully in an organized, thoughtful way. :)

We can now easily turn those lazy susan tiers and get to whatever we need without worrying about everything crashing out onto the floor. Victory!

The floor of the cabinet is actually almost exactly the same as before. It's a good place for the heavy, small appliances. They're organized from least used to most used, back to front. Yes, I plan on using that ice cream maker frequently (even though I haven't yet this summer, oops).

And guess what, all this organization and consolidation left me with not one, but TWO basically empty drawers next to that corner cabinet that I don't plan on filling for now. What?! Added bonus. And I thought our kitchen was a tad small. Silly me.


Onto the next space...

The Deep Lower Cabinet: 


This is the heart of my kitchen. I'm so happy with how it turned out. I access this cabinet probably ten times a day. The top shelf holds our pots and pans on the left, and pot lids, and cutting boards on the right. The bottom has baking and casserole dishes, rolling pins, and my favorite accessory - Silpat baking sheet liners. Love those things for cooking and baking. The pans are organized by size and shape. Now I can see exactly what I have and grab it easily. There's a designated place for everything, which was my ultimate goal. It may not look like Martha Stewart's kitchen, but hey, it's all about functionality here!

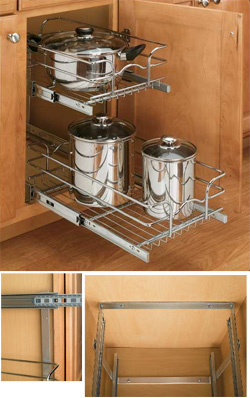
And you know what makes everything so accessible in these deep cabinets? A little DIY trick I came up with using some old laminated placemats, clear packing tape and washi tape (to label it and make it pretty, of course). It's inspired by those AMAZING cabinets that have pull-out drawers so that you can easily access what's in the back. Something like this:


But since a) we rent and b) those are a little out of our budget and needs right now, my solution is completely temporary and cost me $0 (since we had everything on hand). More on that trick tomorrow along with some of the little details that add more function and a little pretty :).

Have you spent time thinking about how your kitchen functions? Organized it to better suit your needs? How about another space in the house? Talk to me!

---------


Looking for a unique baby gift? Take a look at my new line of onesies from CSW Designs! Choose your animal, color and pattern (chevron or polka dot). Perfect for the little ones in your life.

Pin It!

7.29.2013

Operation {Re}Organization: Kitchen Cabinets Part 1


Whew boy! The past couple of weeks have felt like a whirlwind to me! With the launch of the new onesie line on CSW Designs last week, things have been busier than usual around here. I've also been working on a few very exciting behind-the-scenes things that I can't wait to share with you soon. If you follow me on Facebook or Twitter, you may have seen my post last night about August being an exciting month for the blog. Hooray!

One of those exciting things is happening this week. I'm guest posting on Serenity Now! Amanda's on vacation this week (lucky duck) so she asked me to share a project with her readers. It's scheduled to go up on Thursday - I'll be sure to remind you when it's live. :)

OK! Now onto the subject of today's post - organizing our kitchen cabinets. Operation {Re}Organization is soldiering on in our little apartment, and I was so excited to get started on this project this past weekend. I spent a lot of time on the kitchen floor since this project was all about tackling the lower kitchen cabinets. Pretty much every cabinet and drawer in the lower half of our kitchen, including under the kitchen sink (pun intended), needed to be cleaned, consolidated and organized.

Let's take a tour of the cabinets, shall we? Starting on the left side of the kitchen, we have three very shallow and narrow, but very long drawers, along with a deep one on the bottom. Next to that we have my least favorite cabinet of all - the corner cabinet with a giant, two-tiered lazy susan.  These things are just a pain in the you-know-what to organize well.


How 'bout a look inside these disastrous drawers and corner cabinet? Brace yourself...

Ahh! Messy kitchen tool alert...


Followed by this inefficient, space-wasthing drawer that housed ziploc bags and napkins...


Followed by another messy drawer full of serving utensils!


The bottom drawer holds all of our tupperware and is actually working out ok as far as accessibility and organization goes. It's not perfect, but it's the best solution I've found so far for storing the mish mash of reusable containers in our kitchen. I just try to keep all the "like" containers nested together with their lids tucked in on the side. Anyone have a better idea (without having to do something like replace all the containers with matching ones)?


The corner cabinet is where it gets really ugly. Check out those piles of crazy. This cabinet is the reason I wanted to tackle the whole lower cabinet reorganization project. Oy.


Moving on to the next area, which is on the right side of the oven, we have a drawer that holds our utensils and kitchen knives, and below that, a deep cabinet with with one shelf.


The utensil drawer is actually in fine shape (small victory!), so you won't get to see that one, but let's look at the lower area. More mess! The part that bothers me the most is the inefficiency and random placement of things. This is where we keep pots and pans, cutting boards, and a few other small things like the electric kettle (which is an appliance that I LOVE, by the way).


The final area is the under-sink cabinet. It's HUGE and really challenging to organize with all its plumbing and deep, dark, inaccessible recesses.


We, like many others I'm sure, keep our cleaning supplies, extra paper towels, dishwasher detergent, trash bags and extra paper bags in there. We also keep a few large, less frequently used appliances as well including the Kitchen Aid Stand Mixer, griddle and food processor.


That'll do it for the tour of kitchen disarray. Have I embarrassed myself yet? Probably, but hey, that's what this project's all about! I'm ok with showing off my mess (a.k.a. real side).

So what have I done so far? 

Well, I've...

  • Cleaned out two of the little drawers, which are now EMPTY (save for some paper napkins) since I consolidated and moved some things around. 
  • Emptied both the lazy susan corner cabinet and the other full size cabinet, cleaned them, and re-organized them very differently. Hopefully this will be more efficient than what I was working with before!

But, you're going to have to wait until tomorrow to see the after photos of those areas. Yep, I'm teasing you today! This before post turned out to be a lot longer than I anticipated, so you're going to have to come back for Part 2 tomorrow. I promise it'll be worth the wait! I've still got one small drawer and the kitchen sink cabinet to organize too, so you'll be seeing a few more posts on this project!

Meanwhile, here are some photos of the kitchen "in-process." Thankfully, there's a happy ending coming to make up for all this mess...


Empty cabinets = progress. :)


But take a look at our kitchen during the clean-out! Yikes. I can't believe we have this much stuff in just the lower cabinets.


See you back here tomorrow for the prettier, more organized side of this project!

Pin It!

7.26.2013

Creative Bits | 24: Beautiful Kitchen from Beneath My Heart


Happy Friday, y'all! I'm definitely ready for the weekend - are you?

Before we split for the weekend, I wanted to share a photo of this beautiful kitchen from Beneath My Heart. Traci renovated her kitchen a couple of years ago, and the before and afters are just stunning. Check out this post for more photos. If you like my style, I guarantee you'll like hers :).

So what are the "creative bits" I like most about this little corner of her kitchen? Let's start with those open shelves. The pretty white shelves and corbels make a perfect backdrop for displaying her pretty dishes, glassware and other kitchen items. They really pop against that white, don't they? One hint I've heard over and over is that you should store your everyday, most-used items on open shelves. That way, you avoid the "dusty dish effect."

But don't worry, you can still keep less than pretty items on open shelving too - just use a basket to corral them! The basket looks great up there, and has the advantage of providing some great texture and depth to the shelves.

And lastly, I believe that you can't go wrong with a predominantly white kitchen. I will say that this is totally personal preference though and you may disagree with me (which is fine!), but I just love the classic look. I like how Traci paired the white cabinets and tile back splash with those gorgeous butcher block counter tops too. The fact that you can bring in any color you want through the dishes and accessories make it so that all-white kitchens can fit with nearly anyone's style. You can change things up without having to redo your whole kitchen :).

So what do you think? Are you in love with this kitchen as much as I am? 

Hope y'all have great weekends!

---------

Creative Bits is a semi-regular series here on May Richer Fuller Be where I share little tips, tricks and simple do-it-yourself projects from other creative bloggers' minds. I figure if it makes me say, "wow," it's worth passing along to you! And remember, if you want to pin any images that don't belong to me, please click through and pin from the original source!

Click the "Creative Bits Series" tab at the top of the page to see more posts like this.

Pin It!

7.25.2013

Trip Planning: San Francisco and Los Angeles

A little later this summer, we're headed to the west coast for a little bit of California exploration - specifically Los Angeles and San Francisco. I'm really excited to spend some time out there, because neither C nor I have ever been! We're visiting friends and family in LA first, then driving up the coast to San Francisco.

I can't wait.

We're in the process of pulling together a list of "can't miss" places/restaurants/sites, and since we've never been, I thought I'd ask YOU what you'd recommend we see while we're there. I've done a lot of research on SF so far, but not much on LA, so I'd really appreciate your insights on the latter (pretty please!). We love off-the-beaten-path places, but we want to make sure we see some of the major things out there as well. 

Here are a few of the places I'm itching to go to in San Francisco so far. 

Ferry Building Marketplace:


This place looks amazing. From looking at the website and the shops/restaurants, it reminds me of Union Market here in DC (which I posted about here not too long ago). A few of the places I want to hit up are: Acme Bread, Miette, Blue Bottle Coffee and the Farmer's Market.

Golden Gate Bridge/Park:


What signifies SF better than the Golden Gate Bridge? This thing is beautiful. Perhaps a run across it is in order? We're also planning to head up to Wine Country for a half day-ish, so maybe we'll just enjoy the scenic views from the car :).

The Mission District:

{source

I hear this whole neighborhood is pretty stinkin' cool - full of murals, hole-in-the-wall restaurants and shops, and plenty to see. I've got three food-related places on my list here so far: Tartine, Bi-Rite Creamery and Pizzeria Delfina.

Alamo Square Park and the "Painted Lady" Houses:


I'm a sucker for pretty houses, and these iconic ones are right up my alley. Full House anyone?

Ride a Cable Car/Street Car:


Again, another iconic SF activity! It looks like a good way to see some of the city as well. Is that right?

I think I'll stop there...looks like we'll have lots to see and do! What should we add to our list? Fire away!

I'm sure I'll come back with lots of photos and stories to share. Hooray for vacations!


---------

Looking for a unique baby gift? Take a look at my new line of onesies from CSW Designs! Choose your animal, color and pattern (chevron or polka dot). Perfect for the little ones in your life! 

Pin It!

7.24.2013

Announcement! Printed Animal Onesies Available in the Shop!


Y'all, I've got a really exciting announcement today! I'm thrilled to announce the launch of a line of simple, modern-patterned baby onesies that I've designed. CSW Designs: The Shop is officially open for business and stocked full of these adorable pieces. They would make perfect gifts for any little one - boy or girl!

There are six animals to choose from: giraffe, elephant, cat, dog, bird and turtle. Once you choose the animal, pick your color and style (chevron or polka dot) - there are lots of options. Here are a few of my favorites:


I would absolutely love if you'd come by "The Shop" by CSW Designs and take a look. If you like what you see, would you mind forwarding this post or the website on to your family and friends? Feel free to post the image above to Facebook, Instagram, Pinterest, or even your blog! I would be so grateful if you did. I'd love to start this thing off with a bang!

So why do this now? 

If you've been around May Richer Fuller Be for awhile, you may remember I mentioned that a ton of my friends are pregnant right now or have just had babies. That meant lots of opportunities to make or buy baby gifts! During the spring, I put my design and DIY skills to work by sewing up a few appliqued onesies for these new little ones. The tutorial I shared was such a big hit with y'all, which was really exciting for this little blogger. That got me thinking that I might be able to do more than just make a few onesies for friends and talk about them here on the blog. Instead, why not actually design a line of onesies in the same kinds of modern patterns and designs, and make them available for people to purchase online? (And never have to worry about getting out that sewing machine!) That idea has now turned into a reality, and I'm excited to announce the launch this set of printed animal onesies.

If you or someone you know is looking for a baby gift, I'd love if you'd send them to CSW Designs: The Shop. If you want, you can send them here to the blog too - there's a new link up at the top (CSW Designs: The Shop), and the CSW Designs logo on the sidebar will take you to the website as well. (If you're reading this post in email or reader form, you'll need to click over to the blog.)

Thank you so much for helping me spread the word! Y'all are the best!

Pin It!

7.23.2013

How To Make an Upholstered Headboard {From a Curtain Panel}


Thanks so much for your kind comments about my upholstered headboard yesterday! In case you missed the reveal post, you can see it here. Today I'm getting into the nitty gritty details of how I put this whole thing together. DIY upholstered headboards are nothing new (there are more tutorials than most other things in the blogosphere, and so many ways to do this!), but I'm hoping this post will be helpful for those of you whose goal is to make a simple, professional-looking, budget-friendly headboard without a set of power tools on hand. You with me on that? That means if you have a set of hands, a few basic tools, and access to a Lowe's/Home Depot, you can do this.

First off, let's talk about what supplies you'll need. This is for a QUEEN size headboard, so if yours is larger/smaller, please adjust accordingly :).

Supplies Needed:

  • Two 10' 2x4s cut down to four 54" lengths (HD or Lowe's will do this for you for free)
  • One 3/16" 48"x96" (4'x8') brown hardboard wall panel cut down to 48"x62"
  • About 40 1" panel nails (I bought these)
  • Hammer
  • 1" twin foam mattress topper
  • Measuring tape
  • Serrated knife
  • Painter's tape (or any other kind of tape)
  • Queen/King size high-loft quilt batting (110"x110")
  • One 54"x84" curtain panel (I bought the Threshold Shell Print Window Panel in coral)
  • Scissors
  • Staple gun
  • Staples
Step 1: Go to Lowe's/Home Depot to pick up your wood (and other supplies if you don't have them on hand) and have them make your cuts for you.
Funny side note: I've got a Lowe's right across the street from my office, so I went to get my supplies on my lunch break one day. Y'all should've seen me in my businessy attire hauling one of those huge heavy carts full of wood around and then loading that wood into the trunk of my car. The Lowe's employees were definitely laughing at my inappropriate attire. It was pretty hilarious...

Ok, back to the task at hand.


Step 2: Haul your supplies home and set up your work space.

For me, this involved clearing out a space on the floor of our tiny apartment. Let's just say these weren't the ideal working circumstances, but hey, it worked! Please ignore the clutter you're about to see through the rest of these photos...


Step 3: Assemble the frame for the headboard.

Place your 2x4s under each of the four edges of the hardboard. They should form a rectangular frame. Two of the 2x4s will stick out 6" from the 48" length of hardboard. Those will be the legs of the headboard. Make sure the edges of the 2x4s are flush with the edges of the hardboard. The hardboard must be on top of the 2x4s so that you can nail it to the 2x4s.


Step 4: Nail the hardboard to the 2x4s using 1" panel nails every 4-6 inches.

The nailheads are pretty tiny, so look closely at the bottom right corner to see them. I'd suggest putting one in each end of the 2x4 first so that your boards won't move once you start hammering away. This will ensure that the 2x4 stays flush with the hardboard edge.


Once you've assembled the frame, this is what it will look like from the front...


...And from the back...


Step 5: Cut the foam mattress topper to fit the width and height of the hardboard and attach it to the frame.

This is where personal preference comes into play. I cut my foam so that it was 2 inches away from the edges on the top and sides so that I'd have room to add nail head trim if I decided to go that way at some point. I can be a little indecisive sometimes, so if I wanted to add it one day, the option would be there. (Nailhead + thick foam is NOT a good combination, FYI, so leave room if you add nail head trim!)

That means I cut my foam 58" wide. Use a serrated kitchen knife for this.


I then divided the remaining piece of foam in half in order to cover the majority of the rest of the hardboard. It doesn't have to reach the bottom completely because you don't see that part once it's behind the bed.


I used painter's tape to attach the foam to the frame. It doesn't stick super well, but it got the job done until I could complete the next step - wrapping the frame in batting.

Step 6: Wrap frame in two layers of batting and secure it to the 2x4s on the backside using a staple gun.

For this step, I found it to be easiest to have the headboard upright (lean it against a secure surface like a table) so I could pull the batting tight and staple it easily.

Since I bought 110"x110" batting, I just unrolled/unfolded it until it was down to two layers, laid it on the frame and trimmed the excess. I didn't worry too much about this being centered or straight - just eyeballed it.


Looks a little ghost like, huh?

When you're stapling the batting to the frame, my suggestion is to put one staple in the center of each side first, making sure the batting is taut, but not too tight. You don't want it pulling. Then make your way around each edge, pulling taut and stapling as you go. The goal here to to provide a smooth surface for your fabric to lay on eventually.

For the corners, pretend like you're wrapping the ends of a present. Fold one edge in, then fold the other one in on top of it and put a couple of staples in it. It's not super easy to see on the thick batting, so if you want more details on that, take a look at the way I upholstered my desk's top in this post.


Step 7: Iron fabric (if necessary) and line it up on top of the frame.

I chose to use this curtain panel since it was the perfect amount of fabric (just over two yards), inexpensive and I loved the pattern. It's the Threshold Shell Print Window Panel in coral. It provided the perfect pop of color and fun design I was going for in the bedroom. 

Getting your fabric lined up (straight and centered) is one of the main keys to making your headboard look professionally done. This step can be tricky depending on the type of fabric you choose. This pattern was fairly easy to center and make straight because it has a pretty regular repeat to it. If your fabric is a solid color, you don't even need to worry about getting it just right. Having an extra set of eyes is helpful here. I had C help me make sure it looked right.


Step 8: Staple the fabric to the 2x4s on the backside of the frame (yep, right on top of the batting).

Again, I put one staple in the center of each side, making sure it was taut. Before I stapled the whole thing though, I took a look at it from the front and made sure it looked right. Since it did, I kept going. If it didn't, this was the time to make adjustments!


Then I staple, staple, stapled all the way around...and trimmed the excess. I saved that excess for the last step to finish off the legs!


I finished the to two corners the same way I did the batting, making sure they looked the same on both sides (again, a step to keep it looking professional!).


Step 9: Finish off the legs and bottom corners with a little magic.

Ok, so it's not magic, just a little finessing to make sure the bottom looks just as good as the top by the time it's all done.

Take a look at this photo below. You'll notice that the fabric kind of wraps its way from the bottom of the hardboard slightly down the leg. I did this by snipping the extra over-hanging bottom fabric diagonally from bottom to top, toward the leg. I ended up with two triangular pieces of fabric. I stapled one to the bottom of the headboard, and wrapped the other one around the leg and stapled it into place. Does all of that make sense? I know it sounds a little tricky. It looks a bit messy at this point, but don't worry, we're about to work some magic to make it look all nice and finished :).


To finish off the leg, I took a piece of the excess fabric I trimmed off of the edges and cut a piece that fit around the diameter of the leg and is 6" tall (the height of the leg).


I wrapped that piece around the leg and stapled it tightly to the backside.

Once the legs were finished, that was it! Headboard. Done. I definitely gave myself a little pat on the back. And maybe did a little dance...Take a look!


Then it was time to put it in its new home in the bedroom. I borrowed C's strong set of arms and we placed it behind the head of the bed. We didn't bother securing it to the frame because it's wedged in there super tightly. If you wanted to do that though, you'd just have to drill some holes into the edges and secure it to the headboard with some long bolts. 

And here's how it looks against our bed!


We are so pleased with it. I'm so happy with the way it turned out and it really only took me an afternoon to do it! If you want more photos, take a look at yesterday's post :).  Now I just need to get something for above the bed (round mirror perhaps?). That pleated paper wreath is just a temporary placeholder. For those of you wondering, yes, I did end up taking that big beautiful painting down you saw in this post. There was just too much going on with the busy pattern of the fabric and the painting together. 

Now for the budget breakdown...

Y'all probably know by now that I'm pretty thrifty when it comes to projects, so I tried to spend as little as possible on this headboard without sacrificing quality. I wanted to do it right so this headboard would last us a good, long time. 

Project Cost:
  • Wood and hardboard: $23
  • Nails: $2.75 (but I only used about 1/8th of them)
  • Twin size foam mattress topper: $10 (foam is expensive, y'all! This was a more budget-friendly option.)
  • Batting: $13
  • Fabric $25
  • All other supplies: $0 (already owned)
TOTAL: $73.75

Not bad, huh? Especially when you compare it to buying new!

What do you think? Any questions about what I did? Any of you planning to take on an upholstered headboard in the near future?

*P.S. Want to see the EASIEST way ever to upholster a headboard? It's just like this one, but there's NO building involved! Read about my method here.

*P.P.S. Need help creating a home you love? Take a look at my e-design service: Mix and Match Design Company!

Pin It!
Related Posts Plugin for WordPress, Blogger...
Blogging tips