6.28.2013

Lovely Links


Happy last weekend in June! I can't believe come Monday, it'll be July. Craziness.

It's time for another installment of Lovely Links, an every-other-week series here on May Richer Fuller Be. Here are some of my favorite finds, posts and DIYs from the past couple of weeks. Get ready for some serious inspiration heading into the weekend!

**And don't forget (last announcement, I promise!) this is the last weekend to migrate your RSS feeds over to a new reader since Google's is going away on MONDAY! See the icons under "connect" on the sidebar for links to some great alternatives. (I've personally switched to feedly and am liking it so far.)

Now, onto the links!

1 | I'm a crazy list-maker gal, so when I spotted Little Paper Dog's free printable lists, I was in love. I need to get some white card stock so I can print some off myself!


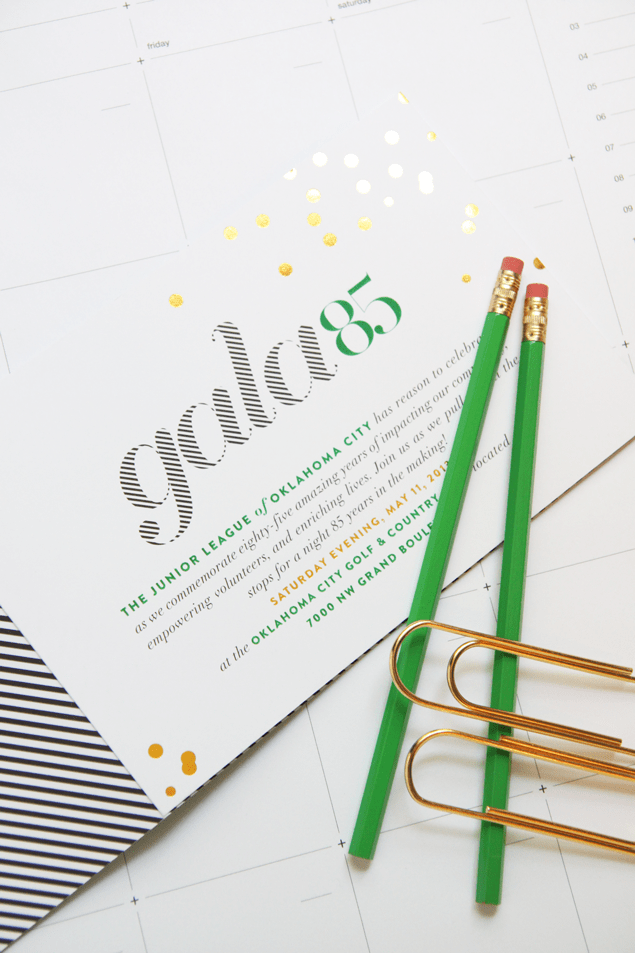
2 | Speaking of paper goods, how fun are these party invitations by Pencil Shavings Studio? Makes me want to throw a party just so I can design some cute invitations.


3 | Make It & Love It wrote up a great post on how to paint a straight line on textured walls.


4 | Holy cow! This craft room reveal is nothing but amazing. I dream of having a space like this one day.


5 | I absolutely love the transformation of this changing table into a bar cart from Southern State of Mind. What a brilliant idea.


6 | Loved this article from Aspiring Kennedy about being realistic about blogging. If you're a little blogger like me (or a big blogger!), I think you'll appreciate it! :)

7 | Even though I don't have any kiddos of my own, I'm totally obsessed with nurseries right now. This one (by Casa de Lewis via 6th Street Design School) is so sweet and simple, and it's gender-neutral-done-right.


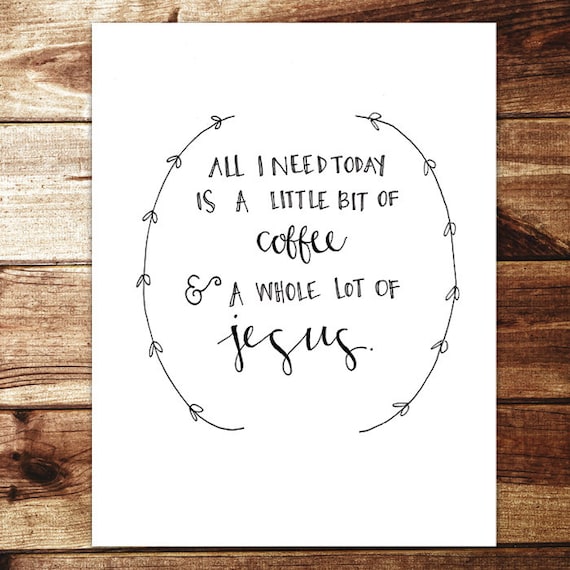
8 | And lastly, I'll leave your with this little art print. The simple quote totally resonated with me and made me smile (as did the design), so I had to share it with you. Anyone else in this boat with me?


Have a great weekend, y'all!

Pin It!

6.27.2013

Operation {Re}Organization: The Dishwasher


While I'm on my cleaning kick (in case you missed the other posts, they're here and here), I thought I'd throw out a helpful hint about speeding up your dishwasher routine. Forgive me if this hint I'm about to give seems a little OCD, but it really works for us, and has made the unloading process less cumbersome. Warning, this hint may be the most obvious one in the entire world, but I just figured it out recently, so just play along with me, k?

Sometime in the past six months or so, I decided I was tired of having to sort the clean silverware and cooking tools as I was putting them away. It might seem ridiculous that I didn't have any patience for this task that takes approximately two whole minutes, but for some reason it really bugged me - that is, until it hit me one day that I should sort them as I load up the dirty dishes instead of after they're clean.

Duh.

So, armed with this new strategy, I assigned a specific item to each section of the dishwasher basket - i.e. all the knives go in the first one, small spoons in the second...etc. as demonstrated here.


In other words, group "like with like." That way, once the dishes are clean, I just put the basket on the counter and grab each type of utensil all at the same time (that's the time saver!) and put them right in their homes in the silverware drawer. This is instead of having them all randomly dispersed and having to sift through each section of the silverware basket to make sure I got all the spoons out and put away, and then all the knifes... 


I taught my husband "the system" too. It only works if everyone's on board, right? 

Now, I will say that I'm not quite OCD enough to be particular about which utensil goes in which section. (For example, knives don't always have to go in the first slot.) It's all about just making sure that "like" items are grouped together in the same place.


On a scale of 1-100 on major world problems, I'd say this ranks close to a zero, but it is one little thing that smooths out my cleaning routine and keeps me a little more sane. One day, when there are more than two people in our house, I'm sure this tiny time saver will come in handy more so than it does today, but it's never too early to get into good habits!

So what do you say...am I a crazy person for sorting my utensils? Or am I late in getting on board with this strategy? Do any of you have any other brilliant tips on speeding up your dish washing routine that I need to know?

---------


Pin It!

6.26.2013

Operation {Re}Organization: The Freezer


Ever since I put together my cleaning schedule a few weeks ago, I've had cleaning up and cleaning out on my brain - especially since I put that schedule up right smack on the front of the fridge. No out of sight, out of mind for this girl. Plus, it's pretty to look at and fits in nicely next to my magnetic fridge organizer.


One of the items I put on the monthly part of the list was cleaning out the fridge and freezer. The fridge got a nice clean-out a couple of weeks ago (Um, it's amazing how well those old/expired items can hide in the back corners. Those sneaky things...), but the freezer needed a little more TLC than just a nice clean-out. Let's just say it had some organizational issues - as in it had no organization at all.


Ahh! Crazy mess alert!

Before we get into the solution to this little organizational nightmare, can I just whine for a minute? Make a plea to all the freezer designers out there? Why oh why is there only one measly wire shelf? Do you really think this is a functional design? Please, please do something to make this precious space a little more functional.

Whoa. Ok. Reeling it in...I just had to get that out.

I decided that in order to utilize that one little wire shelf well, I would need some bins. Preferably ones that cost very little money. Enter the dollar store. The one near me always has a great selection of small plastic bins, buckets, boxes, etc. that are perfect for this kind of job. We'll get to those in a minute...

The first thing I did was clean out the freezer - quickly, before any significant melting could happen - by pulling everything out, throwing old items away, and getting rid of anything we knew we wouldn't eat. I love having a clean slate to work with before doing any organizing.


Much better.

(P.S. You can just ignore the junk on the top of the fridge and the items in the freezer door. Just keepin' it real here - I haven't gotten my organizing hands on that stuff yet.)

I moved the shelf up a notch so that four plastic bins would fit, and did a quick wipe down with some all-purpose cleaner before loading everything back up again.

Here's how it looks now with the new bins!


I loosely grouped the items in the bins by category knowing that we generally keep the same types of items in our freezer. I'm keeping it flexible for awhile though, just to make sure I'm really sold on this bin system. If I decide I like it, I'll probably label the bins by category.

For now, starting from the top left and moving clockwise: the first bin holds bread and snacks, the second bin holds ice cream (yep, that needs its own bin), the third hold meat, and the fourth holds vegetables. We keep a bag of ice in there too because the ice from our automatic ice maker tastes yucky :(.

So for a total of $4 (bins were $1 a piece) that's how I cleaned out and organized our freezer. Do you have any tips or systems that have worked well for yours? I'm always open to suggestions!

Pin It!

6.25.2013

Window Shopping: Rough Luxe


I think it's about time we head out on another window shopping trip, don't you? 

Last weekend I took a little trip across the river to Virginia to check out a new warehouse sale called Rough Luxe Marketplace. While the name of the sale may not sound familiar, you may recognize the name of the gal that runs it - Kelly Millspaugh Thompson - founder and owner of Stylish Patina. She's many things, including a successful interior designer and blogger, chalk paint extraordinaire, vintage furniture finder, barn sale runner, and most recently, shop owner. The Rough Luxe Marketplace holds a collection of vintage and new pieces, and is an extension of her new shop (also called Stylish Patina) in Falls Church, Virginia. It functions like a barn sale in that it happens once a month, but with the advantage of being right in the heart of the DC Metro area - at least that's an advantage to me being a DC dweller!

If you've been reading the blog for awhile, you might remember that I took a trip out to a few barn sales in Frederick, Marlyand, including Kelly's, and they did not disappoint. You can read my recap of that trip here. She's no longer running that barn sale (it's changed hands and is now called Sweet Clover), and is now focusing more on her shop, a vintage rentals company and this new Rough Luxe adventure. 

Whew! That backstory went a little longer than I anticipated! Sorry 'bout that. All that to say...I went to the inaugural sale this weekend! And window shop I did. Ready for some less than awesome iPhone photos of some highlights?

1. I loved this collection of random drawers. What a great way to store things on shelves! Even if they're different styles, painting the drawer fronts the same color can make them "go together" quite well.


2. I had to do a double take with this guy. It looks like regular ole painted wood armoire, but when I opened it up, I realized it's actually painted metal! How cool and different. At $50, it was a total steal. Talk about great storage potential.

3. These cubes were fascinating to me with their rough, irregular edges. They look like they came straight out a West Elm catalog. They'd make great little side tables.


4. My fascination with typography continues with these old wooden letter stamps. I had to restrain myself from digging through these. After all, I already have some vintage printing press letters.


5. Underneath those cool moss balls are a couple of wood dough bowls. They've been super popular in recent years because of their rustic look and versatility. I didn't look at the price on these, but I know they can be on the more expensive side.


6. Lovely upholstered ottoman. No description needed :).


7. Lastly, how could I leave without admiring a pretty chalk-painted piece of furniture? This dresser would make a great addition to a little girl's room, or could be used as a buffet...TV stand in a living room...lots of possibilities.


Hope you enjoyed going on a little window shopping today! If you live in the area, this sale will be happening again the weekend of July 19th. If you need a shopping partner, let me know! :)

P.S. Want to do some more window shopping with me? My last fun adventure took me to CB2 and West Elm - love those places!

Pin It!

6.24.2013

Coral and Gray Dipped Side Table {DIY}

Happy Monday to you! I hope y'all had wonderful weekends. We spent a good deal of our time cleaning out our closets (ack!), shuffling some of our under-bed storage, and compiling a somewhat embarrassingly large donation pile. If I want to see that particular area of our apartment ever again, I'll have to take a nice little trip to Goodwill in the very near future.

I did set aside a little bit of time yesterday to do a quick paint project though (as you saw in the title and photo at the top of the post). I've been enamored with the "dipped" paint look for awhile now, and after showing y'all the Sweet Beast's take on it for her entryway table on Friday, I decided to go for it.

This little side table was the perfect candidate for a dipped paint experiment. It was a $5 yard sale find from about 3 years ago that I had spruced up with a little white paint and a cute glass knob.


In it's original original form, it was natural maple with a coat of poly on it or something. The white was certainly an improvement over that in my book, but over the past few years it's accumulated some wear and tear - especially on the top.


Instead of throwing another coat of white paint on it, I figured I'd have a little fun with it in the form of some Annie Sloan Chalk Paint in French Linen that I had on hand, and a sample pot of one of Valspar's spring colors in Sonora Rose. It's a nice bright coral - much brighter than I would usually choose!

(Side note: I got the sample pot for free thanks to a Lowe's coupon I pulled out of a Real Simple magazine a couple of months ago. Lucky for you, if you have this month's issue, there's another one in it! Take it to Lowe's and grab a sample of your favorite color or try out a new one.)


First, I painted the whole side table with two coats of chalk paint with my favorite Purdy paintbrush. I prefer two thinner coats to one thick one, even though the chalk paint can says you only need one coat.


And yep, I painted right in the middle of our living room over the comics section of the Sunday paper. It was pouring rain outside, so no balcony painting this time! Thankfully, chalk paint doesn't have any nasty-smelling chemicals in it, so painting inside isn't an issue.

Once the chalk paint dried (I only had to wait about 45 minutes - that stuff dries fast!), I used some Scotch Blue painter's tape to mark off the "dipped" paint line on the legs.


I arbitrarily chose to tape off each leg 5.25" from the bottom. I made sure to really press down the edge of the tape to seal it off so that the paint line would be nice and crisp.

Then I went to work with two coats of Sonora Rose on each leg. To really make sure I got a crisp line, I made sure to paint from the bottom edge of the tape down toward the bottom the leg. That way, I wasn't pushing any paint underneath the tape's edge and messing with the seal.

I let the paint dry for about 15 minutes, then pulled the tape off while it was still wet (another helpful strategy for a crisp paint line). It worked perfectly! Crisp, solid lines all around. Just look at those beautiful dipped legs!


Ah, the magic of paint. She's a real beauty now. Plain Jane to a knockout - ha! Here she is all dressed up next to our sofa.


And one more time before and after:

Just lovely!

Now here's the thing...she may not stick around our house. As much as I love this little side table, especially after her transformation, I don't really have a good home for her. She's living next to an upholstered chair in the living room for now, but she's too tall for it, and the rest of our living room furniture leans a little too traditional for her to fit in well with her punchy, modern style. I'm holding onto her for now, but she may end up on Craigslist soon. I'll let you know if that happens!


featured on:

      Chase the Star

---------


Pin It!

6.21.2013

Creative Bits | 22: Entryway from The Sweet Beast

Well well. This turned into a week full of entryway talk! Are you tired of it yet? No? Oh good, because I saved the best for last today. While scanning my Pinterest images for inspiration, I came across an image I had pinned under DIY, and realized it was the perfect candidate for the next Creative Bits post! Emily, who writes the blog The Sweet Beast, made over her entryway space with so many fun, fresh pieces and accessories I just had to share it. She hit on so many of the important elements for an entryway that I talked about earlier this week. Take a look:


First of all (I know I listed it as point number three, but...), can we just take a moment to admire that dipped console table? I'm smitten by it. I know the "dipped" furniture trend has been around for awhile now, but wow, this version really is awesome. Emily posted all the details about her IKEA Svalbo hack here if you're interested in taking this one on yourself. This is a perfect piece of furniture to take a chance on design-wise. Major impact with minimal effort.

I also love the fact that she added a mirror here. Its large size has the effect of acting as another window for the entryway, making it feel larger and more spacious.

And lastly, how fun are all those accessories she added? She did a wonderful job of adding color and visual interest without making it look cluttered. Plus, she still has a place to drop her keys and other items without having to move anything out of the way.

What do you think of this entryway? I'd love to walk into this happy space every day. 

Have a wonderful weekend, y'all!

In case you missed any of the other entryway posts from this week, you can catch up here:

Pin It!

6.20.2013

Jackson's Summer Adventures


Hey there, Jackson here! I just wanted to check in here on my mom's blog to make sure you didn't forget about me. After all, it has been a few months since my mom wrote about me and my new bed - which I love by the way. It's super comfy and my mom says the fabric is pretty snazzy, but I don't really care much about that as long as I can dig in it to make it comfortable for napping.


In fact, sometimes I like to sleep under it. I'm good at hiding.


Sorta.

Aaannyway...what I really wanted to do was come by and tell you a little about my summer adventures so far. It's been great. My mom said I could borrow some of her iPhone and Instagram photos so you can see me in action.

As usual, we've been taking lots of walks when my mom gets home from work. We go on all kinds of adventures - sometimes we walk in the neighborhood, sometimes to the park and sometimes we even get to go into the woods and hunt deer. One of these days I'm going to catch one. If only my mom would let me off that annoying leash contraption, I could use my lightning fast speed and stealthiness to sneak up on one and get it. Look at how sneaky I am in this video. The deer didn't even know I was coming...


Almost got one that time. (Oh, and my mom said to ignore her silly commentary in the video. She's embarrassed about it.)

One of the other things we do sometimes is go to my favorite store. Every time we walk by I look longingly through the window hoping that maybe, just maybe, we'll go in and somebody will give me a treat. They have these amazing sausage things there. Yum.


Other times, if I'm really lucky, we go down to the creek so I can cool off on extra hot days (all that hair makes me really hot).


Speaking of water, my favorite adventure so far has been to the river house. It. is. the. best. I get to run around there without that stinkin' leash and explore everything. While we were there last time, we went to this beach and I dug this awesome hole. I'm not sure what I was looking for, but I just knew I had to keep digging.


Didn't I do a good job?

When we go out on the boat there, my parents make me wear a life jacket. I had a minor incident last summer involving me jumping off the boat after some dolphins in the middle of the deep water (I just had to try and get 'em. They got away so fast though!), so now I have to wear this thing all the time. It's not so bad though, I guess. The blue and yellow do look pretty nice on at least.


All this adventuring sure makes me tired though and I'm always looking for the most comfortable place to nap. My mom found me on the couch pillows one time when she was washing the slipcovers. She wasn't real happy...but can you blame me? Look how fluffy that pillow is.


When I'm really sleepy, sometimes my dad lets me cuddle with him. Nothin' better than that.


Don't be deceived by that docile look though - I'm totally a fierce animal. See?


Roar!

So that's my summer in a nutshell so far. What have you been up to? Dug any good holes lately?

Pin It!
Related Posts Plugin for WordPress, Blogger...
Blogging tips